Everything posted by AndrewG
-
Diagram is washer configuration for an earlier JDM SWB (with tank in boot). Note that there is an extra front pump (but no tank) for the front washers.

-
Washer reservoir in N/S/F is radiator expansion/overflow tank.
-
The reason is that the position of the heads of those two bolts (with all the gubbins that is near to them) makes it very difficult to get to them with socket and then undo (as you will find out). Slotting makes it much easier to secure them back in position by positionng them underside and then winding them back up from the top with a screwdriver.
-
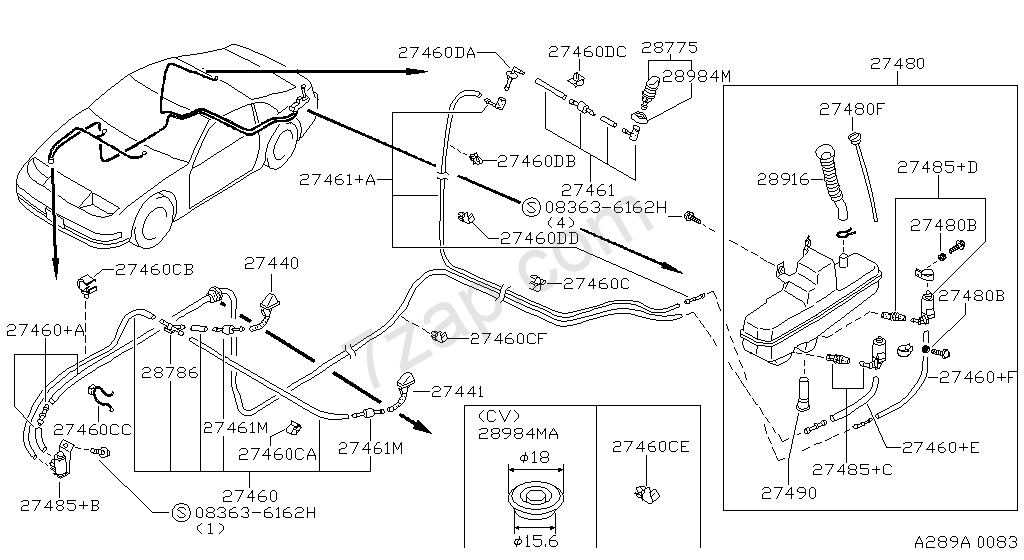
As the front side indicators (and rear indicators) are working, I would concentrate your efforts on the engine compartment harness that feeds the front indicators down each side of the car (see el-126). You can see that the side indicator connections E1 and E15 are spliced off the harness which then continue each side down to the front indicators connectors E8 and E40. I've attached hi-res copies of E-69 (the wiring diagram) and el-127 engine compartment harness. You said that you changed the front bumper, did you change the indicator/side lamp assemblies as well? el-69.pdf el-126.pdf
-
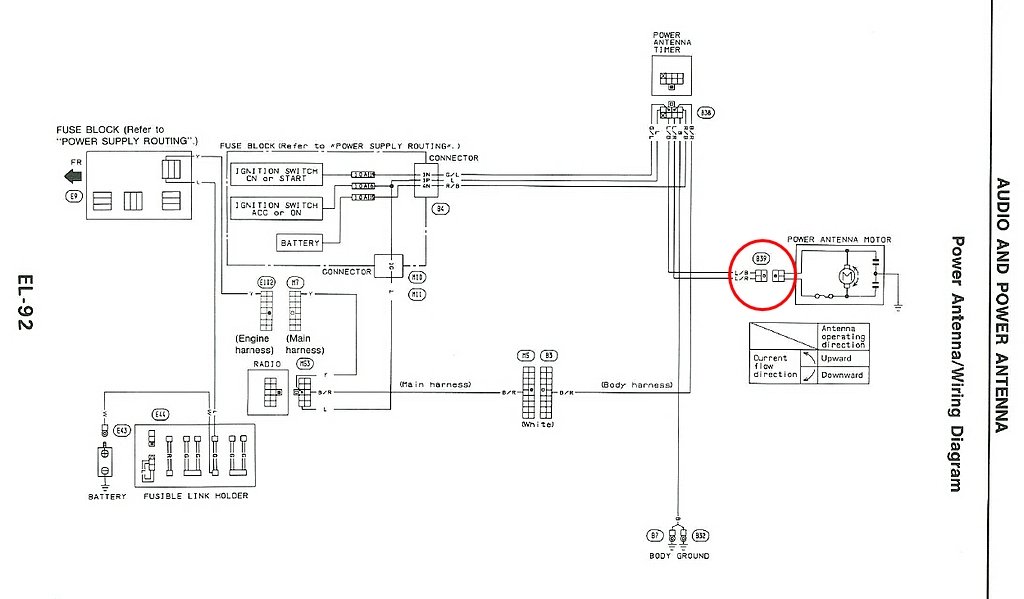
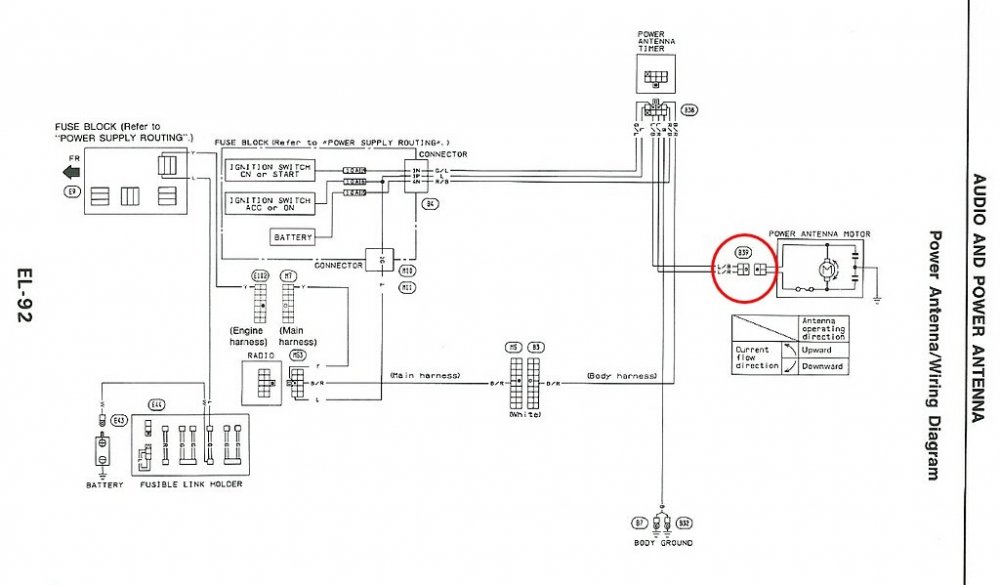
Power only gets applied to the aerial when the Power Timer Amplifier wants the aerial to go up or down. It does so by changing the current flow direction to the aerial. If you hook it up to a 12v battery and it goes up, then switch the leads to make it go down. Disconnect harness as circled below. For safety put an inline fuse in the +ve test lead. If the motor works then the problem is further up the circuit.
-
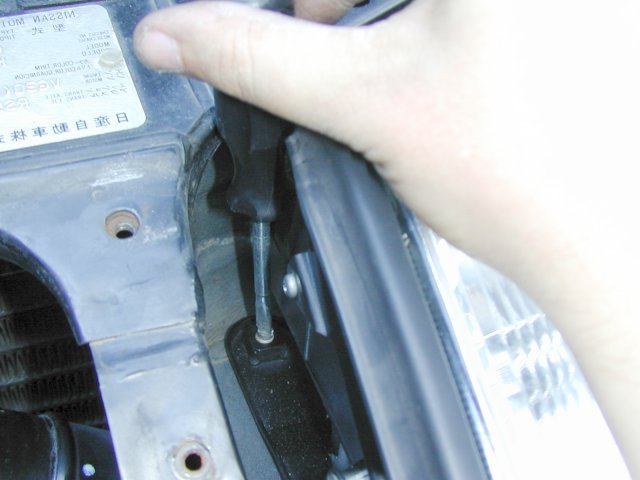
Just a couple of things to add. Take great care when removing (and refitting) the headlights with the bumper in place to avoid scratching the paint work on the bumper from the two front fixing studs (as shown below). Masking tape layered up on bumper upper edge can save many tears! Also slot the inboard rear fixing bolts on each headlight (with a hacksaw). It makes life *a lot" easier to refit those bolts the job next time (you still need to take out the bolts out the first time to cut a slots in them though). .

-
For reference: Front bumper bar removal.pdf https://www.nicoclub.com/archives/nissan300zx-z32-headlight-removal.html
-
For aftermarket (upgraded) clutch: http://specialtyz.com/blog/?page_id=178
-
Thanks, from your experience when they list a part are they actually able to supply? My normal supplier is showing NLA. I'll make an equiry with Amayama and see. https://jp-carparts.com/nissan/partlist.php?maker=nissan&type=132&cartype=&fig=240C&page=1&part=2401153P60
-
Yes! I did, thanks for pointing it out. I was looking for a 24011-53P60 ('94 later injector) type.
-
As far as I can tell RHD engine harnesses are NLA (from Japan or elsewhere). I've been looking for one. That leaves LHD OEM and aftermarket (Z1, Wiring Specialties) from the US. LHD engine harnesses will fit RHD cars with a bit of extra harness length tucked up in the engine bay or the passenger cell by the ECU. *** Corrected my senior moment! ***
-
Have a word with Jim@PowerZed for advice. For s/h parts you could try https://www.ebay.co.uk/str/banzaibreakers A number of members have used Banzai with success. Engine looms (wires and plugs) tend to degrade over time from the exposure to heat, and tend to fail when trying to move them around when undertaking big jobs like engine removals.
-
It is not the clearest photo but these are the factory positions for UK spec:

-
Yes, *gently* heat (50-60 degrees C) the rear of the lamps with heat gun to soften mastic and prize off the lights. I used this stuff instead of the OEM sealant, easier to fix lights in place and when removing them. Doesn't damage the plastic of the lights and puts much less strain on the fixing studs as the units are mounted in place. https://www.toolstation.com/shop/p11002 Cut the nozzle to give a ~8mm bead.
-
If it helps you, before I sold my Stillen Type III lip I gave a lot of thought of how best to fix it properly to the bumper. I've seen some poor jobs which in my view spoil the fit and finish of an otherwise well made piece of kit. For what it's worth, I'm happy to pass that information on when you come to fit it.
-
Rich, welcome to the Club and thank you for your support.
-
Try Jim@PowerZed.
-
PM BigH, he had his Work Equips rebuilt (I can't remember by whom). The rears had new barrels: https://www.300zx.co.uk/forums/topic/157302-project-wide-arch-uk-tt/?do=findComment&comment=1736396
-
Well done Gary! https://www.classicandsportscar.com/news/e-type-vs-corvette-inside-may-2020-issue-csc

-
Best wishes on your Birthday Craig!

-
Such a nice colour that.
-
Have a read of this to get you up to speed:
-
JDM and UK/Euro/US spec compressors have different coolant pipe connections. JDM: UK/Euro/US


-
Tampon??? Wet wipes my dear boy... https://translate.google.com/translate?sl=ja&tl=en&u=http%3A%2F%2Fwww.zcar-owners.net%2Fcgi-bin%2Fdiy_bbs%2Fcbbs.cgi%3Fmode%3Dal2%26namber%3D25%26rev%3D%26no%3D0
-
Done the insides?