

Everything posted by AndrewG
-
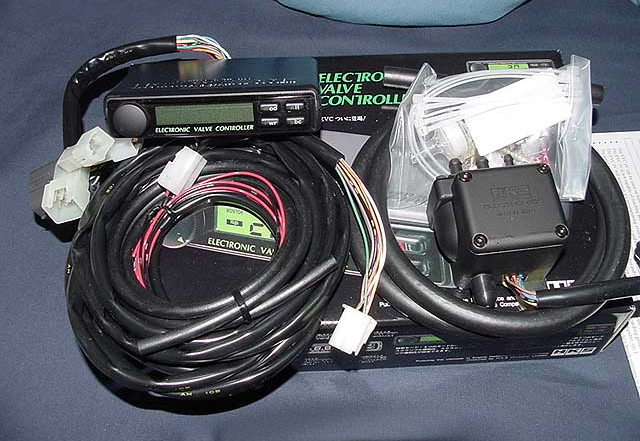
HKS controller lives in the glove box fixed to the top surface. Set to 1 bar maximum boost, I treat it as a "fit and forget", so don't need to see it when driving. It also reduces the temptation to play around with settings...
-
HKS EVC 4 - Reliable system fitted over 10 years ago, no problems. Stepper motor is a precise and efficient design and is very good at holding a steady boost and catching boost spikes as they occur.
-
Best wishes on your Birthday Richard!

-
You after the circuit diagrams? http://www.300zx.co.uk/tech/manual/manual/el/070.gif http://www.300zx.co.uk/tech/manual/manual/el/072.gif
-
That depends on what he said, email "interested" is not the same as calling "will buy for full asking price in cash if car is as described". If it was me, and I was serious about the car, then I would call the dealer and say so.
-
It was hot weather! The constant stop, rev the engine, move a bit (few yards) and stop again got the thing going. I still have the AC rad in place, so that might have contributed. The cooling system, VC etc is all working fine, it was just a *very" hot day. The other bonus (if you can call it that) is that you can hear and feel when the aux fan is on.
-
Ted, I have two covers, one for the drivers side (with a hole in it) and the one for the passenger side (no hole in it). The passenger one is missing its little location tabs, but you could glue in place. They are yours if you need them.
-
The aux fan will kick in whether or not you have an AC system fitted at 105C. The ECU controls its operation under those conditions. See my FSM post above for the complete picture of the low and high fan speed conditions.
-
It isn't sold until the money is in their bank account...
-
Very nice Terry. Are you not going to do a throttle body water bypass?
-
Why? It still protects the engine overheating even with the AC off. It came on several times when we were in +30C stop start traffic (with no AC working).
-
We have had rather a lot of rain recently... Have you checked the targa drain tube behind the drivers trim panel? Damp carpet?
-
I just went and measured it for you. You don't want to use the ECU to control it? It comes on and off at 105 and 104 Celsius. That worked fine when we got stuck in stop start traffic for hours in the south of france in +30 Celsius weather.
-
All four pieces?
-
It sits about 65mm from the rad, so not so bad. You could make a shroud around the aux fan circular housing to bring that gap down if needed. Either way, you would be able to reuse the stock mounting points.
-
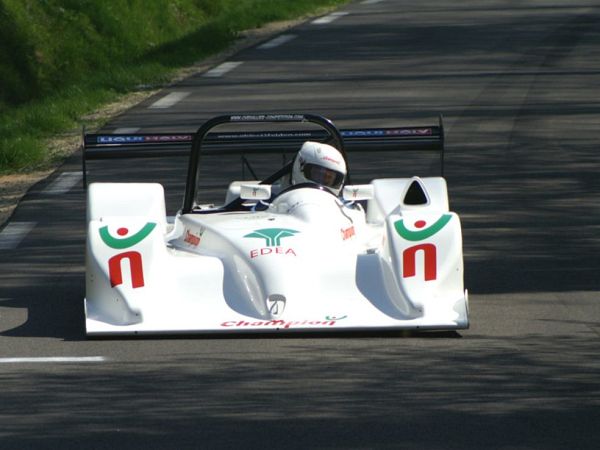
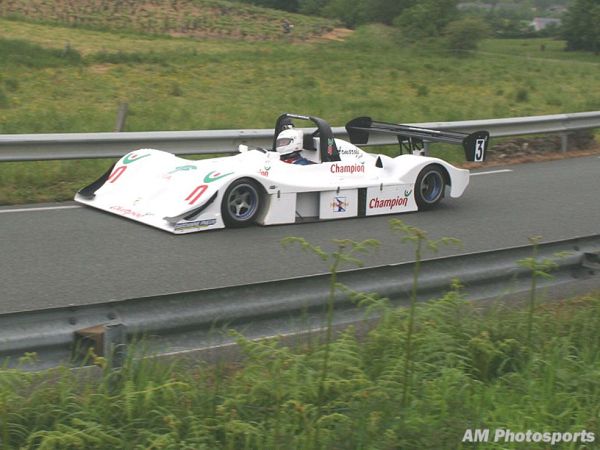
As we have had a couple of high speed car videos posted recently, I thought I would post one of my favourites... Course de Côte de Gemenos, near Marseille. Best experienced with the volume up. [video=youtube_share;Wgzi7A02kSY] As you can see there is very little margin for error on that hill climb. Balls of steel! The car is a NORMA M20 powered by a BMW M3 400bhp 3 litre straight six engine.
-
The ECU controls the Aux fan (even when the AC is off): http://www.300zx.co.uk/tech/manual/manual/efec/031.gif
-
Before making your decision, you should be aware of this information regarding AMS pulleys: http://www.twinturbo.net/nissan/300zx/forums/general/view/2326060/AMS-Water-Pump-Pulley-misalignment---per-Honzrrs-request.html
-
So what is your revised budget?
-
He doesn't want to...
-
That looks like a stock 300zx aux fan. If it is, just mount it to the existing chassis fixing points.
-
Why don't you just replace the VC? The setup works well under all conditions.
-
I think the standard setup gives you a starting (as same as before) handling point, albeit with reduced body roll. You can use ARBs to change the degree of understeer and oversteer by changing the settings. If I used the car on the track then I would experiment with different settings, but I don't so I haven't.
-
Tom, I set mine up as per instructions (middle back, soft front). Have you fitted the front arb? Update - I see from your other post that you have fitted the front arb. What difference were you looking for? I found that body roll was significantly reduced on cornering.
-
That wasn't quite what I was getting at, as I should have said with all the hidden roof bits painted black too. It is just when the targas are in, then the whole surface (windscreen, roof elements, targas and tailgate glass) become a single visual "black" entity. When the targas are out you are left with a black H shape in the roof surface which breaks the visual effect, as your eye now sees the interior components of the car. So the H part is now smaller visual element between the windscreen and tailgate glass and to me looks better in the dominant body colour.


