
Everything posted by Black-zed
-
well he did all the work i mentioned above in 28 hours
-
firstly you can see scratches because you need to use a finer grade wet & dry, i always use 1200 - 1500 grit to get it smooth, always use primer filler to help fill imperfections. i normally rub down then fine grit, 3 coats of primer, wet flat again then 1 more coat of primer, 3 top coat wet flat then final 3, lot of paint but gives a good finish. they always say to compound 2 pac paint as the lacquer can dry rough, ideal you should be using a single pack paint, base coat is intended to have a clear coat on the top, but don'y use cellulose lacquer it will go white flakey and look naff in about 2 years
-
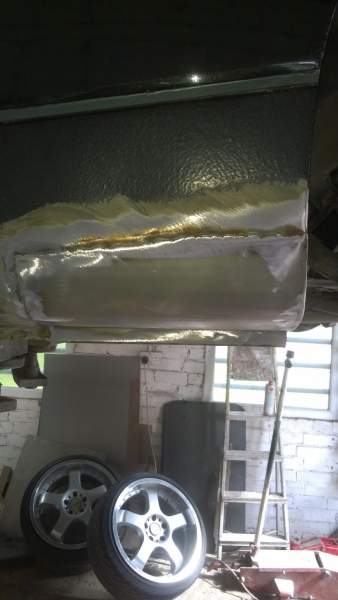
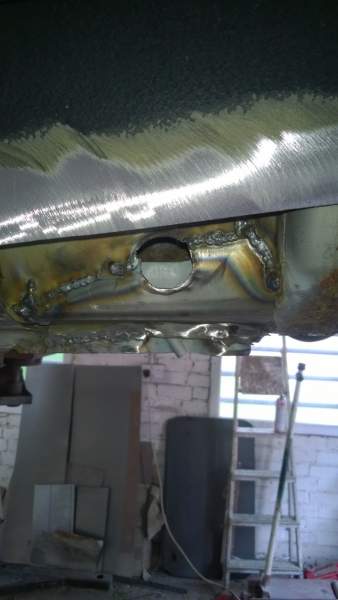
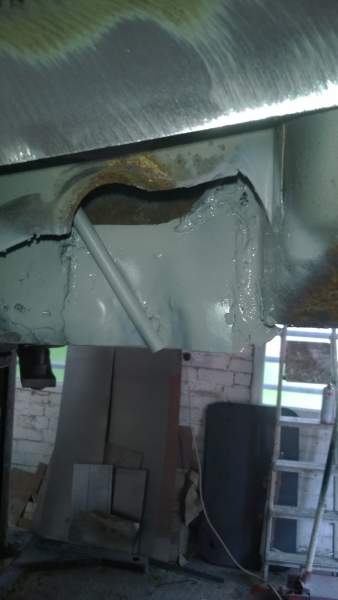
and the finished job just before stone chip was applied, he also drilled a couple of holes in the sills and wax oiled the inner cavities
.jpg.b8576bf0c5ea4e52f541af0431d114d8.jpg)
-
theses aren't in order but will give you an idea of his work
-
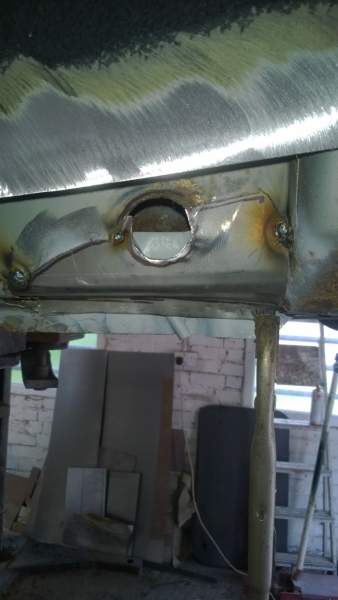
no he fabricated all the panels from scratch so no need to buy repair panels
-
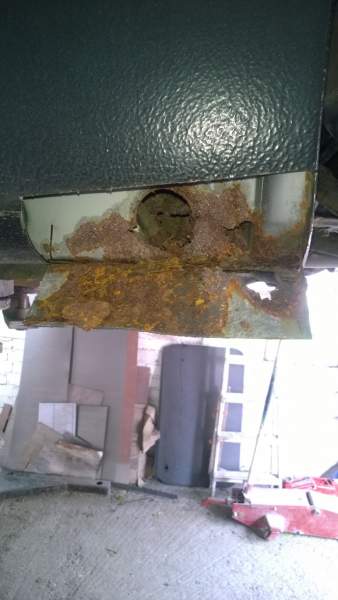
i had mine done this year, both rear sills, (which are 3 layers) both front corners of the floorpan, rear bumper supports (the panel behind the bumper behind the rear wheel) and a few areas between floor pan & inner sill all in my total price was £590, the guy that did mine is prob a bit of a trek for you but i can highly recommend him, he's based in tamworth next to drayton manor park, his name is guy eastwood i can give you a number if needed. he used to do all the welding repairs for jeff at zed world so knows his way around a zed and all the common areas that go on them.
-
i've got the ai606 don't think i have a valet switch in mine, but the led is mounted on top of the steering cowl so it's visible but it's not out of place
-
all my vac line have been replaced with silicone lines, except 3 as i didn't have enough hose which were to bypass the vac line under the plenum to the carbon canister and the 4mm vac line for the canister the short lines from the recircs to the hard pipes. but they have been replaced now just the wastegates to boost controller to do but i'll get that done when the plenum is off. anyway back to this issue i've now sussed it and what a pain, it turns out the positions of the hard pipes have been bent around a bit, so the recirc line was bent over under the outer turbo pipe along with the 4mm vac line for the canister and the 6mm canister line was under the inner turbo pipe so initially the pipes were connected into the engine the wrong way round although it looked correct not sure if this would have made any difference when running but at least the lines are how they should be now
-
as far as i know i still have a carbon cannister under the bonnet car was stock when i had it aiv,prvr etc all intact only mod was the boost controller, i'm going to have another look today it just seems a bit strange looking at the canister line it's a hard pipe all the way down, but when i blew through mine air was definitely coming out of the disconnected recirc vac line.
-
yes i've seen that map and that is what has confused me the 2 pipes together should be the carbon canister but it's not on my car as i said i've blown through the hoses to check and the 6mm canister vac line definitely goes to the recirc, and what should be the recirc is blocked when i try to blow through it my best guess is they have somehow been reversed, either from factory (maybe a friday afternoon job) or by a previous owner but all pipes are stock when i disconnected what should be the recirc valve on the side of the plenum and run the new hose direct to the valve i had a vac leak from the front of the car
-
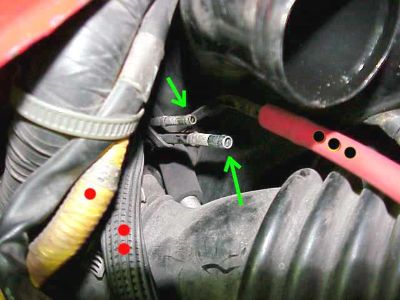
i'm looking to try and shed some light on my front vac lines working off the attached pic, the pipe with 3 red dots should be the recirc valve and the forward 2 pipes together should be the carbon canister, now these were connected to the correct ports on my engine but when i pulled the recirc line to replace the hose i had already disconnected it at the valve, so i blew through it to check and i couldn't even blow through it as though something was connected on the end. i then pulled what should be carbon canister line and connected some hose to it and blew through it and this was connected to the recirc valve all in all very strange all the pipes looked original at the recirc valves anyone else come across this? or is the info on this pic wrong?

-
Caps I think are separate when you order
-
Good job I didn't bite the bullet and order a set! I have had a quote back from a company for vacuum metalizing the current reflectors in my rebuild set, £35 ea for main beams and £25 ea for dip beams plus £5 return carriage all in all not a bad price.
-
i contacted them last week as they are currently on their website and they say they have several brand new sets in stock https://www.z1motorsports.com/front-lights/nismo/jdm-z32-non-hid-headlights-p-6173.html
-
well not quite the last set Si, Z1 have several sets of RHD jdm headlights in stock but at an overly inflated price, $398 ea plus $413 shipping for the pair works out about £900 plus import duty & vat. cheers for the input on LHD drive headlights i did consider it as an option to swap the masks & the glass to make them RHD, i have however gone down the route of buying a used set (just been delivered) which cost me £90 for the pair, reflectors as i though are past it, so these are purely to do a complete strip down and refurb over the next month or so.
-
not 100% sure it will cope with the heat
-
apart from not getting tinfoil to sit correctly without creases, i don't think it's much more reflective than my current tarnished reflectors
-
cheers again fella, i'll look around on the net and get quotes, my current reflectors are worse than your original ones as in i have tarnishing and black pitting in the silver finish, i couldn't find my other set of lights so bought a pair off eBay as a winter project to do a full strip/clean rebuild and get the reflectors redone, hopefully will then be as good as they are going to get then refit them just before i put the car back on the road in april,
-
ah brill thanks redwine, i've just tested mine and they do seem a lot better but still got a few specs of dirt in them, but i do have another set of jdm headlights hanging around somewhere so will give them the full treatment and fit them over the winter the new headlights would be nice but i can't warrant over a grand for a set. any recommendations where you had the vacuum coating done and turn round times?
-
i've just had my headlights apart to clean them and i found both dip & main beam reflectors are badly pitted with quite a large area of silver missing off one of the main beam reflectors, now i'm sure after cleaning these will be a lot better but ideally want to sort these reflectors out. the main beam ones feel like plastic, not sure about dip beam ones as i didn't do a complete strip down. but they have gone back on the car for now to see how they perform. so as i see it i have 3 options 1.find somewhere to resilver my current reflectors (i can only find places that deal with metal reflectors on line with around 8 week turn round) 2. buy some new headlights, i have found somewhere with some rhd jdm units in stock but not in the uk, by time iv'e paid the vastly increased price plus shipping a pair is £900 plus import duty & vat 3. buy some LHD headlights from the zcentre or mjp and use them for parts to refurb mine (seems a bit of a waste but cheaper then new option) any advice greatly appreciated
-
i must be member number 1, one zed on the road the other parked up in dry storage only been there 10years so far, i will finish it one day...........at least the engines back together


-
mine randomly does this and has been the last 5 years, it's not got any worse and did it last week for the first time this year, i did have the clutch pedal depressed when it did it, released the pedal and it was fine, got to admit not checked the bolts, that could be a job for the weekend if it's dry
-
yes there about but watch the max ratings they are normally quoted and are 4x rms in general sometimes more
-
with the drivers being 2 + 2 ohm it basically means you have 2 x 2ohm voice coils in the subs this gives you several wiring choices you either run 1 4 channel amp 2 ohm capable and importantly put a mono input in and run rear l & r to one sub and front l&r to 2nd sub, other option is again a 4 channel amp run bridged on both channels to power each sub, but bridged will only normally do 4ohms, so to get that you wire both coils in series + into + terminal on first side of speaker then link - on first side to + on 2nd side and finally - on 2nd side to - from the amp that will give you 4 ohms
-
As on the title looking for a good condition rear view mirror, mines chipping around the edges and gone loose on the mounting
