Everything posted by Chris300
-
Sorry Pete, it seemed to be a good gathering of people with varying ideas and set up and the right time to ask questions and get a better understanding of the 300zx braking capabilities. :thumbup:
-
So what sort of abuse can the standard brakes take? let’s say a fast track (Goodwood motor circuit) is the benchmark, 2 laps, 5 laps? Not having driven my 300 hard for any sustained time I’ve not found the limit.
-
So realistically what would be the difference in stopping distance on the road with let’s say the https://www.z1motorsports.com/z1-products/z1-motorsports/z1-motorsports-14-akebono-big-brake-kit-300zx-front-and-rear-p-4625.html over a fresh refurbed standard calipers with good quality pads and disks?
-
Joely is right! Go slap yourself every morning until this arrives, then every 10 minutes until the Zedroom has nothing but a clean Zed in it. https://www.ebay.co.uk/i/311584372616?chn=ps&var=610548797830&ul_ref=https%253A%252F%252Frover.ebay.com%252Frover%252F1%252F710-134428-41853-0%252F2%253Fmpre%253Dhttps%25253A%25252F%25252Fwww.ebay.co.uk%25252Fi%25252F311584372616%25253Fchn%25253Dps%252526var%25253D610548797830%2526itemid%253D610548797830_311584372616%2526targetid%253D551846416317%2526device%253Dm%2526adtype%253Dpla%2526googleloc%253D1006773%2526poi%253D%2526campaignid%253D1506022786%2526adgroupid%253D59527570513%2526rlsatarget%253Dpla-551846416317%2526abcId%253D1139586%2526merchantid%253D7207214%2526gclid%253DEAIaIQobChMIiNKTqeT23AIVR9iyCh1nvQayEAQYByABEgKyIPD_BwE%2526srcrot%253D710-134428-41853-0%2526rvr_id%253D1635988593646%2526rvr_ts%253D4d61b3691650a9ca1c6193c4ffe7a4a1
-
The first part I’m looking for is the fuel tank and the rubber seats that the tank straps sit on. If you can point me in the right direction I’d be great full.
-
Often I can spend a lot of time trying to navigate nissan4u.com and not find what I’m looking for. So I thought I’d start this post to help people like me, who aren’t very good at looking up part numbers, utilise the knowledge and experience some of you amazing people have.
-
Uk manual. :cool3: :thumbup: I prefer the standard look, maybe with some “99 parts on the right colour 300. I do think though that, providing the kit is fitted properly, kitted 300s can look very cool also. This car is heavily kitted but it also looks good on the car. Some better quality pictures would be nice. :wink: Congratulations and good luck.
-
Welcome back. Unfortunately the picture link isn’t working though.
-
Just a though BUT couldn’t each person creat a journal so all of us can see these sweat cars and give us the opituiny to cast a vote on “the best of the best”?
-
Love it! I think it would look even better with a set of “99 lights but only just. The red in the “99 center, bumper and the spoiler light looks great and on the black paint really makes it pop. Did you use a chrome vinyl for the test? I even like the font. Perfect tail pipes and a personal plate. Best rear end since rear end snce Katie Middleton wiggled into view. :thumbup:
-
I do like Stevens idea! :thumbup:
-
Love the off white interior. :cool3:
-
Bugger! I was working in Southampton the other day and could have picked you up but I’m around Chichester today. (Totally useless post I guess. Sorry) I hope it’s nothing to serious and gets sorted.
-
Disgraceful! IMO you should post the CCTV footage so we all know who to let into our houses. I’m sure you won’t Luke as you have more class than that.
-
That looks great Howard, very stylish. Why have you left the edge where the roof panels sit red though, are you putting red flashes on the car or will the red be hidden?
-
Yes, I did that once or twice just so I had all my information in one accessible place. I enjoy going back over my journal from time to time just to see the progress and keep me motivated and I’ve not even done that much yet.
-
It’s part of the subscribed members forums. I would really like that forum to take off, be great to follow peoples cars. :cool3:
-
We need more posts in the Journal forum. :thumbup:
-
This guy (I mean member) sounds perfect for taking all the fun out of (I mean moderate) every post made from here on. :hammer:
-
I’ve had to share that video with all my friends and family. It’s truly amazing Jeff, I’ve never seen anything like that before. BMWs in lane one! :wink:
-
Did you get a bite to eat at the OCT? They do a lovely breakfast bagget. I’d like to sort a mini meet down there sometime soon.
-
Hi guys I’ve always wanted a white UK 300zx and due to a change of job I’m now able to look for another car and ditching the pickup. I’m toying with the idea of using my current 300zx as my “daily driver”, although it would still cover less than 3k a year as my new job will be accessible on a bike. My current 300 could live under the car port and a project 300 could be rebuilt in the garage. So I’m after a white UK manual 300zx. It must be accident free, hpi clear, full service history. Any condition considered though but please be realistic with what you want for it. Please feel free to email me at fccuk.oo7@hotmail.com Cheers, Chris.
-
I don’t know the ins and outs of the forum nor the history. I do however injoy 90% of the posts here and most of those post aren’t in the “subscribed” members forum. To me there is little point to being a subscribed member, I only subscribe to show my appreciation for the forum and help it continue to run as I’m sure most of the subscribed members also do. In my humble opinion this forum should be for paid up members only. As said by others we have a unique car and club. Take the bull by the horns and if people want to take advantage of the skills and knowledge of the people here then they will pay the small fee of £20pa to do so. Just my thoughts and said with no offence to those who don’t pay the fee and enjoy this forum for nothing. Cheers, Chris.
-
Are the glass trims easy to remove? I wanted to take mine off for a really good clean but don’t want to break anything. :w00t:
-
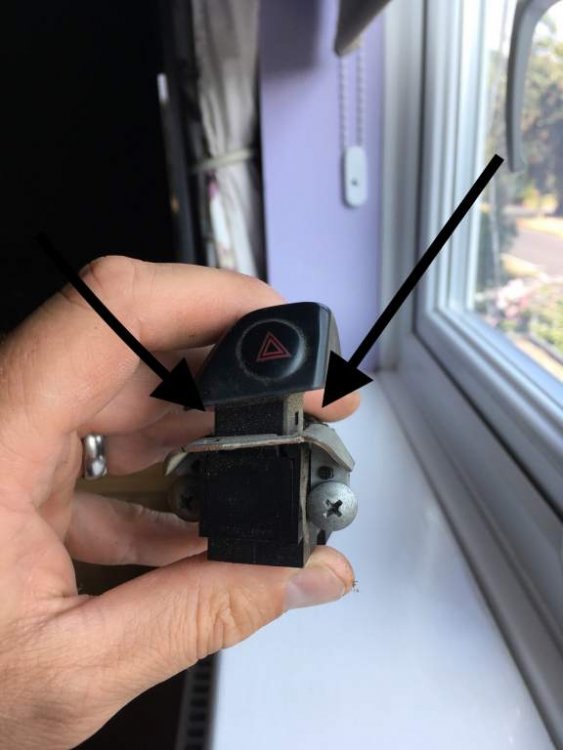
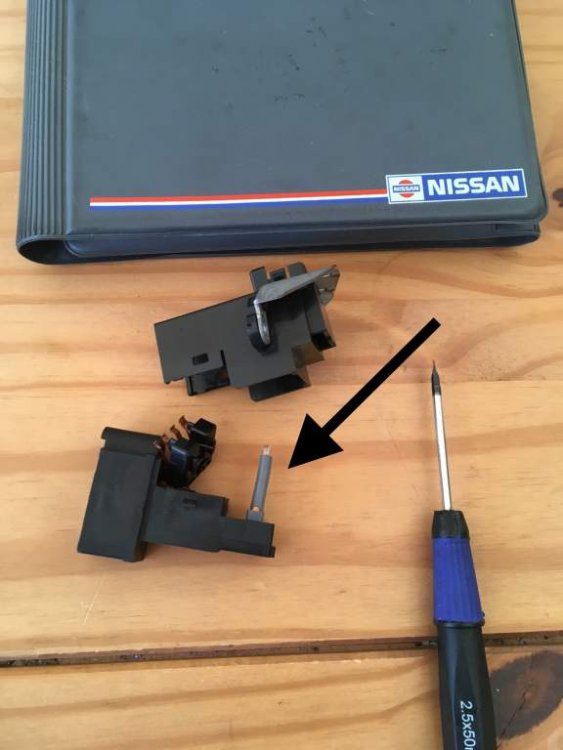
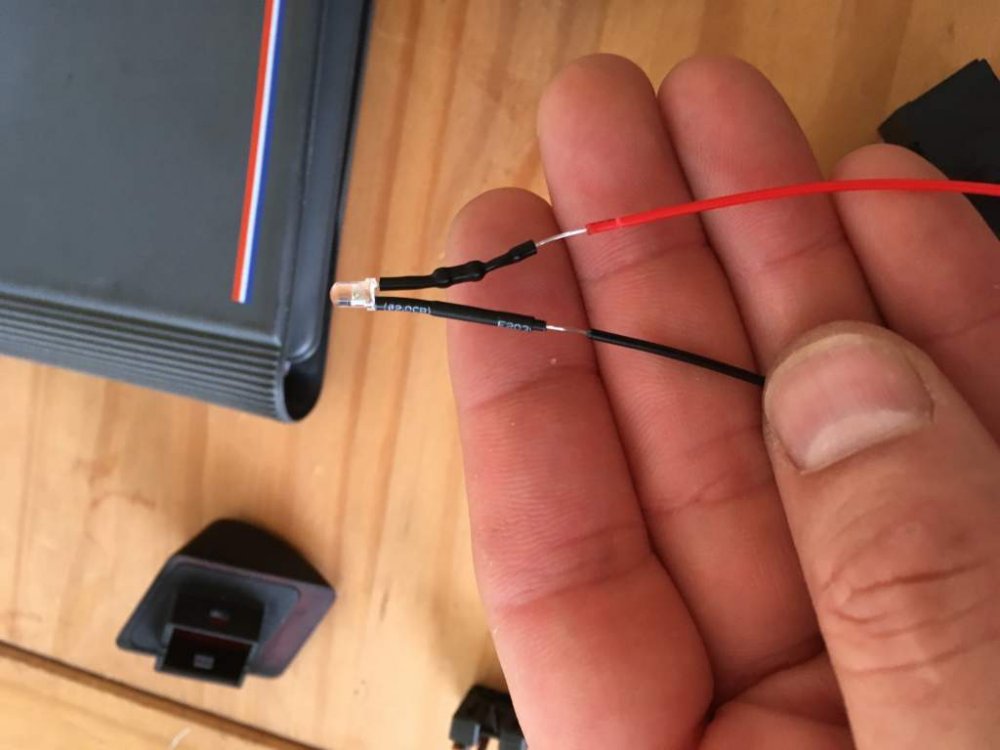
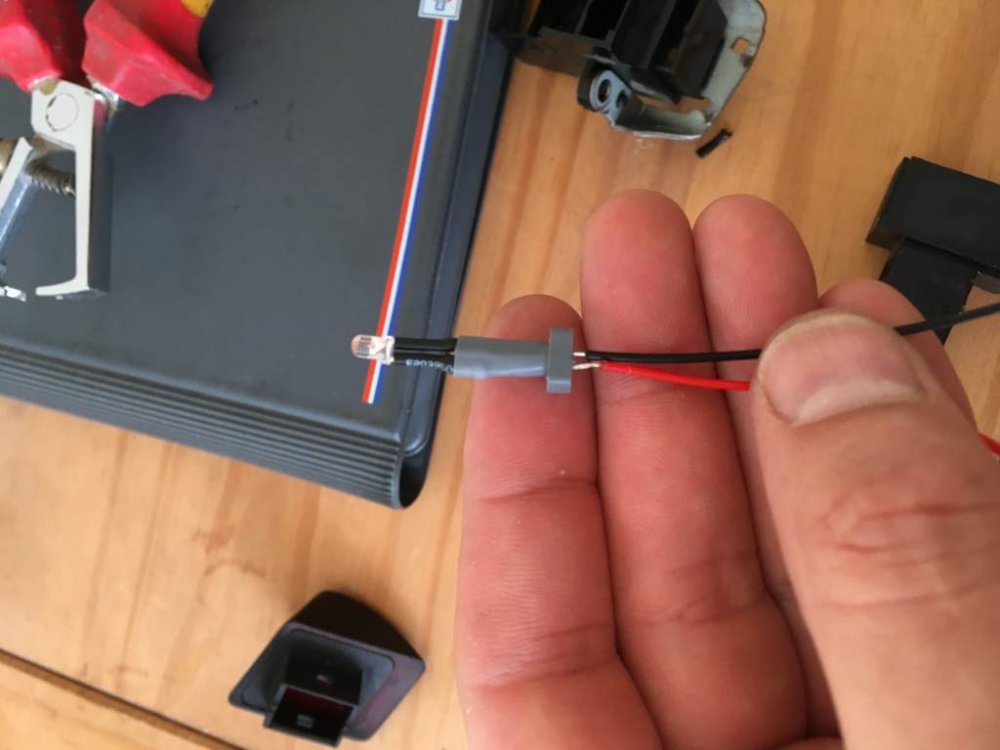
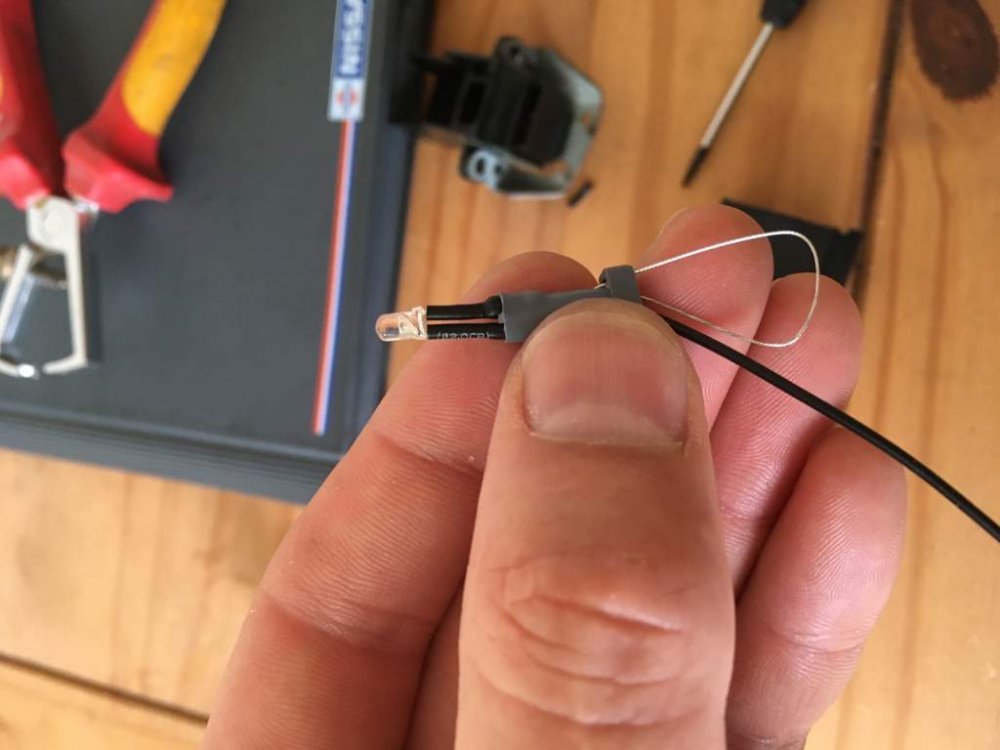
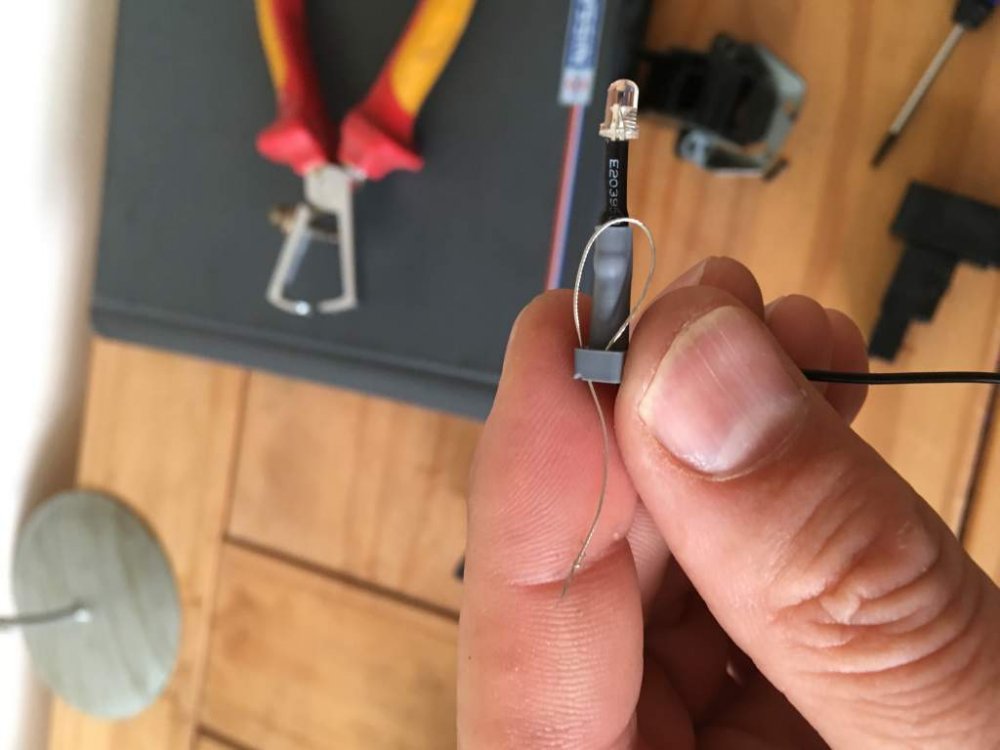
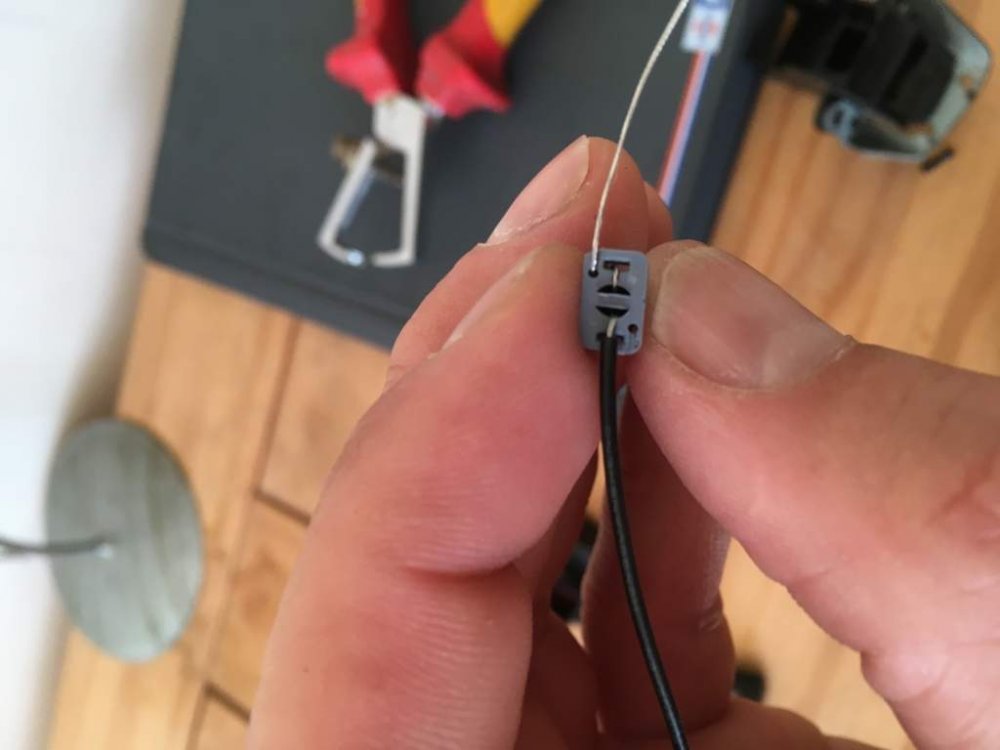
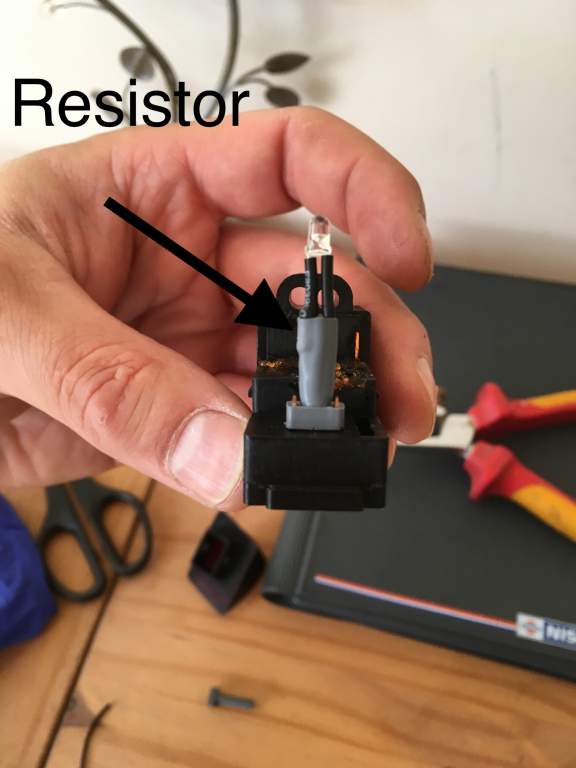
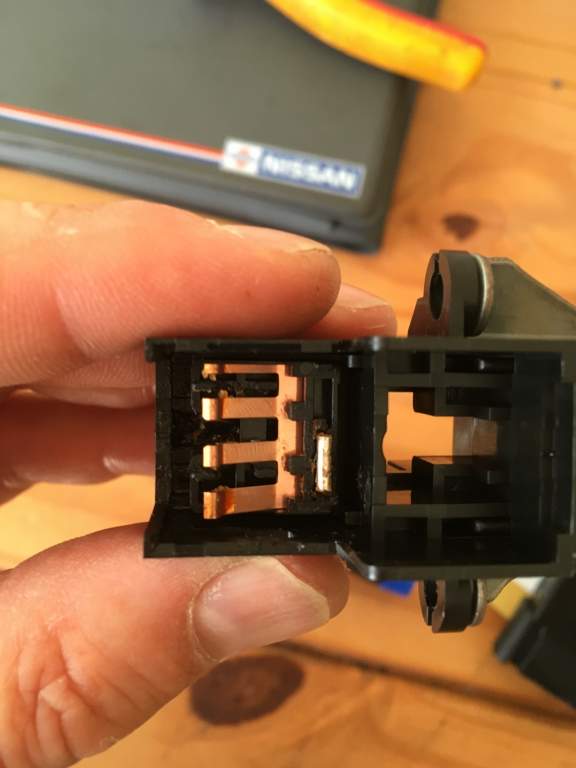
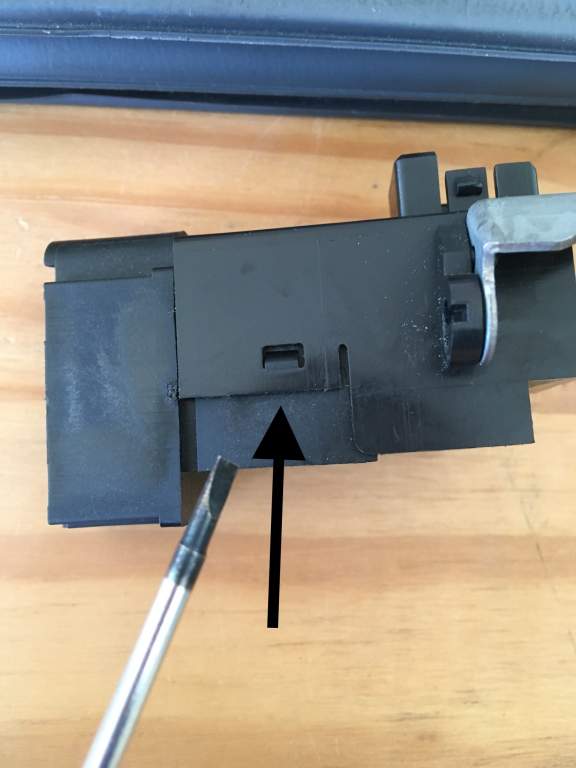
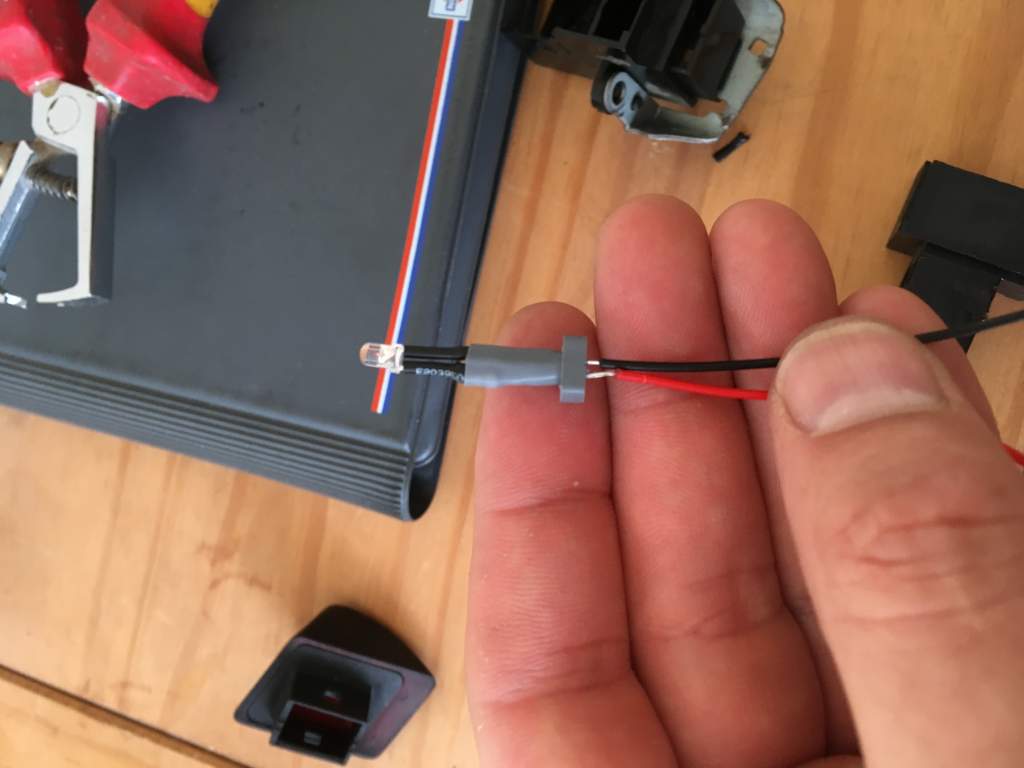
Part required is a 3mm LES, I got mine from eBay. First you will need to remove the hazard switch from the air con pod. This is easy enough, remove the button by slipping a small blade screwdriver down the sides of the nob and ease the nob up. Now you successfully tugged your nob off you need to remove the pod face. Undo the two screws on the underside of the pod and ease the face off the pod. Unscrew the hazard switches two retaining screws, move the switch to gain access to the back and release the wiring harness. You now have the switch removed and need to split it to get to the grey lamp holder. Slide your small blade screwdriver down the side retaining clip and gently separate the unit. NOTE THAT THE SWITCH IS SPRING LOADED AND WILL FALL APPART BUT DONT PANIC. You now have three parts to the switch plus the grey rubber lamp holder. Pull the grey lamp holder out of its retaining pins and remove the lamp and wire. The LEDs that I found have a resistor in line which will not go down the grey lamp holder enough for the LED to sit at the correct height. I decided to snip about 10mm off the holder so the LED sat nicely. You couldn’t have done this with the old filament lamp as the wires were not insulated, the LEDs are at the lamp and need to remain so where exposed. To prep the LED you will need to start to remove the insulation on the tails of the LED. (You need to do this before running the wire through the holder as you’ll likely pull the wire out the LED if you try to do this when fitted in the holder.) With around 50mm of wire exposed spin the cable to keep the strands tight, this is important later. REMEMBER TO KEEP WIRE THAT IS EXPOSED AT THE TOP OF THE HOLDER INSULATED. Now feed the black wire down one side of the holder and the red down the other side. Pull and push the LED and resistor so the lamp is near enough the same height as the original was. With the exposed wire hanging out the bottom of the holder you now need to thread the wire correctly so it doesn’t slip out when fitted. Remove the remaining red and black insulation round the wire remembering to twist the wire to keep it tight. Push the wire back through the larger hole on the side that the wire came from. Pull the wire tight before moving to the next stage. Now push the wires down the small holes returning it back to the base of the holder. Now move the wire to the side and trim tight to the holder. Repeat this with the second line of wire. Place the grey holder back in its retaining clip being sure that the resistor is on the left side as shown. Now you need to put the three parts of the switch back together. The small part has two raised lumps that need to be seated in the main switch housing. Push the switch in slightly and drop the small part onto its seats. Releasing the switch should hold the smaller part in place and now you should clip the cover on. This part is a bit fiddly but keep calm and you’ll nail it. Now with the switch in one piece plug it back into the harness and test. If it all works then rebuild the pod in reverse of dismantling, BE CAREFUL NOT TO OVERTIGHTEN ANY SCREWS ON THE POD. If I didn’t work make sure your resistor is on the correct side, your instrument dimmer isn’t turned down (These LEDs might not like to be dimmed) and if it’s still not working there’s a chance you’ve pulled the wire out the LED or the LED was faulty. I hope this helps guys. Sorry if it goes on a bit, mods feel free to edit if required. Chris.