

Everything posted by redwine300
-
Nice one Jeff! :thumbup1: I am looking forward to replacing the new ones now knowing that. I was dreading the possibility of getting the thing stuck half way in and being up the creek without a paddle. Thanks Mate.
-
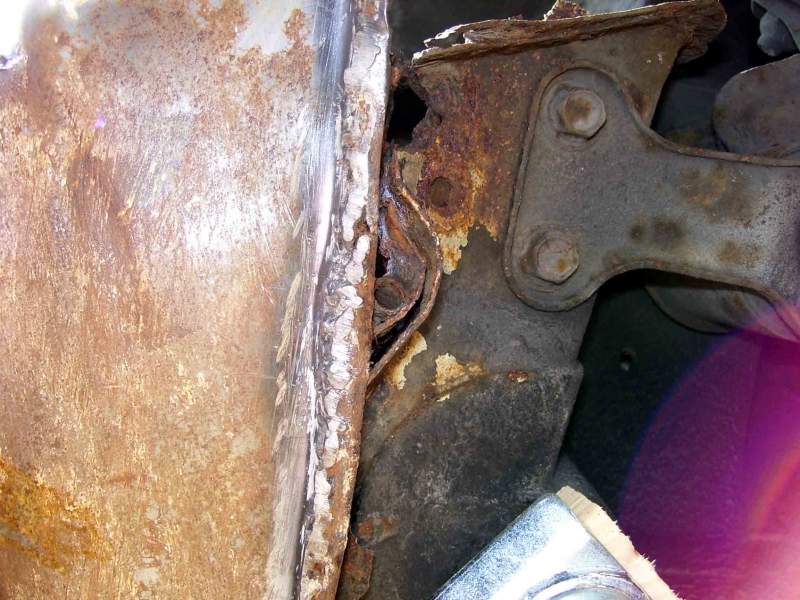
Once I had removed the track rod and tied it out of the way, I removed what was left of the rubber boot. After that I used a dremmel to cut off the the tapered part of the ball joint. I then ground back the rest of the ball joint flush with the face of the arm itself. (making sure that all of the shoulder was removed and not digging into the arm itself.) The next stage was a bit more frustrating to say the least. Using a Draper 3 legged gear puller and a combination of sockets, I gradually pressed the little bu**er out. Important! I heated the end of the arm with a blow lamp every turn or so making sure not to over heat the hub itself, If I did not keep the heat in the arm the thing just refused to budge. All in all it took me 3 to 4 hours to get the thing out.
-
Cheers Bud!
-
Well, with only a month to go until the dreaded MOT, I thought I had better tackle the rear outer ball joints. So far I have managed to get the passenger side out and will hopefully remove the drivers side tonight. My concern is, how do I go about getting the new ones in? If I drive them in, (well greased) I am worried I may break the flimsy shoulder off, and if I warm the arm up will I cook the grease out of the joint itself once it is in position. What would be the best way?
-
Beautiful Job mate, Where do you get the outer lenses from in such great condition?
-
Possibly, as the engine is receiving un metered air that is by passing the MAF sensor itself. Therefore could be running lean.
-
I know what you mean there Smithy, I have been caught out before with reference the stained line. This time I took the lid off, bang on the level as I left it a couple of weeks ago. Could I have over extended the clutch plate due to my pedal adjustment?
-
Not sure about the air issue, pedal seems to have a very positive and firm feel to it, no sponginess at all. Never the less I will check though. As for the fluid level, I have just checked and all is well. Puzzled to say the least.
-
Recently bled my clutch and adjusted the travel in the pedal, everything seemed great for a while, but when I backed her out yesterday the clutch point had moved from the mid point of travel to virtually the top. Is my clutch on the way out? or have I incorrectly set something.
-
Not sure if this relay has anything to do with your intermittent screen wash and wipe. I think it is only to operate the headlamp wash and then trigger the wipers to clear any over-spray. I will have a look through the wiring diagrams. p.s. it is possible to save the connector side by stripping out the female spade connectors, a bit tricky as they are barbed for retention. (There is a bit of a knack to getting them out) I replaced all my spade ends and re built the connector.
-
Hi Vodkashots, Had the same problem, I think it works in conjunction with the lights switch if memory serves me right, when you press the centre button, it fires the headlight washer and also activates the wipers for a short while so as to clear the over-spray. Only active with the lights on by the way.
-
Over the last couple of days I have had the dreaded intermittent drivers side window problem, which today became permanent! So, looked like the dreaded soldered joints had finally given up the ghost. Looked up Jeff's "How to" fix and hey presto, now works a treat. Happy days!! Nice one Jeff!! Again!
-
Cheers zhoodyx. Thanks for the advice.
-
Long term I will be going for the braided system, (winter project) but for the moment I need to service my rear brakes in time for the dreaded MOT in a few weeks time. I think they are sticking.
-
so I clamp the pipe between the bars then? is that right?
-
So does the hose go through the the rubber bore then? Me no understandy
-
As the title really, http://www.ebay.co.uk/itm/2-x-Draper-Hydraulic-Brake-Hose-Clamp-Pipe-Clamping-11534-/150805639036?pt=UK_Hand_Tools_Equipment&hash=item231cb76f7c
-
Would be intetrested to know also.
-
^^^ Ditto ^^^ Well chuffed.
-
I think you can get the newsagents to drop it off daily.:lol::lol:
-
Hi Andy, The front drain tubes exit the A pillar and let the water out via the two gaps between the sill and the front wing, just about where the fixing pionts for the wing are. As for the rear, the drain tubes exit at the rear end of the rear sill section, the tube should be visible through a half round shaped hole at the sill seam.
-
Hi 111mattin111, Have you got any pictures of you existing system? particularly the exits. Also, would you PM me a price please?
-
When I stripped her out during my welding escapades, I cleaned and freshened all the carpets etc' and once completed I have only done limited dry weather driving. Virtually water tight now and smells of leather again.
-
Battery. Levels, condition and charge etc'
-
Tyre Pressures?
