




Funkysi
Registered Member
-
Joined
-
Last visited
Everything posted by Funkysi
-
I have Tein S-Tech on mine, they're about 25mm lower.
-
My Z is lowered and I am running +20 on an 8.5" wheel at the front.....how low are you going?
-
+ you're old, so it all helps! :p ;) - - - Updated - - - Saying that, so am I in terms of car insurance. :(
-
Ideally you'd want a +20 on an 8.5" wheel to give it a flush fitment. So out of the two, you'll need to go for a +30. Having said that, if you went for a +35, you could get 15mm bolt-on hubcentric spacers to give it the flush look and pull it out to +20 effective. If you went for the +30 wheel, you'd need slide-on 10mm hubcentrics and longer wheel bolts. 10mm is too thin for bolt-on hubcentrics . Depends what you want to do with it really. Bolt-on hubcentrics are cheaper and easier to install as you don't have to buy 10x longer bolts and then have them fitted. Total outlay would be less with bolt-on versions despite initial outlay being a bit more.
-
Sounds like you have the later style indicators then, similar to these. These are the earlier ones....notice the different diffuser pattern and smaller rear section which has no bulb holder. UK/Euro indicators US version indicators - same as early JDM versions with the exception of the awful amber sections. JDM 99 front end - with stock smoked indicators.
-
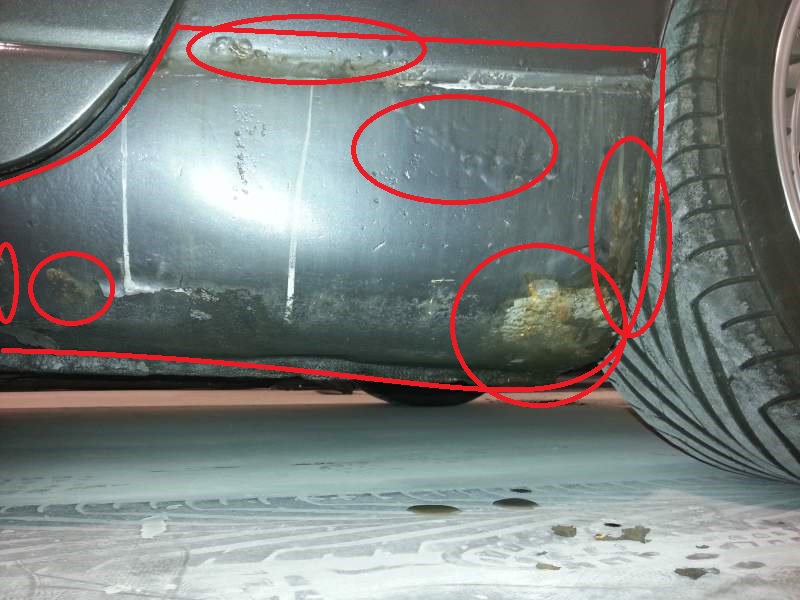
It WILL need welding dude. That rust has come from the inside out. Grinding will NOT remove it. The back of the other sill will need doing too. What's happening to that is what's happened to your rear sections. They rusted from the inside out. Putting stuff over the top of that will do nothing other than cover it.
-
There are in actual fact 5 types of indicators. JDM style 1 JDM style 2 UK spec US spec - occasionally seen on JDM cars JDM bumper indicators
-
Well, my take on it it is, it's better to do it first correctly. Sure, grinding back and fibreglassing would 'look' fine, but the rot is still there, so it would come back. I've highlighting the area that would likely need to be removed. I've circled the areas with rust. As you can see, it covers quite an area. Whilst you can cut bits out here and there, you're better off replacing that section and since it'll be covered by a skirt, it doesn't really need to look pretty. But it'll serve its purpose. The ringed area will 100% have come through from the inside out.
-
Rust treatment is fine for small amounts of surface rust; for instance, over paint chips, grazes and scuffs, but yours has worked its way through mate, so rust killer will be useless as the metal has corroded through.
-
The problem with that is, the rust on your sills will be coming from the inside out, so it needs removing. All the bubbling you see underneath the paint are not just small rust blisters, the rot will have worked its way through from the inside of the sill to the outside thus pushing the paint out in bubbles. If I am totally honest mate, it looks like your sills have had some poor repair work done to them already. It's bubbling above the swage line too and that will be rust that's underneath that will have crept up. Rust is like cancer, it needs completely removing if you're ever to halt its progress. If you cut that section of sill out, it would be pretty manky behind it. Grinding back the surface and fibreglassing it is only masking the problem and will make the rot behind get even worse. You won't be able to view the sill with taking the interior quarter panel out either. It's double skinned, you have an inner and outer portion. If you don't take that rot away now, it could start to affect the inner sill and that's where it starts to get seriously expensive and will effect the structural rigidity. I STRONGLE advise you NOT have that 'ground back and fibreglassed', I am actually surprised it was even suggested by your paint guy.
-
Looks like it was painted by PJ from Southwestzed. :lol:
-
SWB? LWB? Ask one of these whether they can cut out a section and courier it to you. http://www.ebay.co.uk/sch/i.html?_trksid=p2050601.m570.l1313.TR0.TRC0.X300zx+breaking&_nkw=300zx+breaking&_sacat=0&_from=R40
-
Dude, that's a complete bodge. He shouldn't really be suggesting that. It's a structural area as it's within 30cm from suspension mounts if it's going to be hidden by a skirt, then all you need to do is to weld a patch. Cut out the cancer and weld in some new metal. Doesn't really need to look nice if it's going to be hidden. Fibreglass repairs on sills? Eeeek! Steer clear.
-
Good choice. Both the Stillen lip and the Impul bumper are a ton better than that 'orrible Greddy Gracer thing you had. Your car will look a peach when it's done, really looking forward to seeing it with a complimentary front end, something I always thought it needed as the rest of it was so nice! :)
-
Reckon with the way your car is painted James, if you did paint your lips black, your car would end up looking like a Minstrel Show. Keep 'em as they are! :)
-
I would as Vig's car before alignment showed no 'visual' negative camber. Far better than chuffing up the arches.
-
Looks good! There were some awesome deep dish wheels for sale on ebay recently that would have finished that off a treat!
-
..

-
Correct.
-
..

-
I find that most aftermarket electrical products that are fitted to cars are this way. I've seen many Z32s with a complete mish-mash of tatty and untidy wiring. It's not hard to do a decent job of wiring stuff. A 'little' more time. When I fitted an S2 electric seat, I managed to cut out loom from a newer model and splice it in, soldered it correctly, used heat shrink and made it look factory - even though it was hidden away. When I ran new cables for my speakers, I made sure I routed the cables through existing cable entrys and holders. Having a bit of OCD with being neat and tidy kinda means I automatically give a damn. :)Thanks :) Dave's still posting horse shit though - nothing changes! :lol::pBut you know what....? I'd still have had more on my first profile! :p
