
Everything posted by dicky96
-
Cheers guys Jeff you fixed it by your magic touch or something! Maybe your reputation scared it into submission I'd taken the cover off the switches and noted there are at least five wires going to the switch. I'd also managed to drive the seat even further forwards while messing so this was just going from bad to worse. :sweatdrop: I then came in to pick up my test meter and noted Jeffs Post Found the power connector to the motor under the switch by touch alone and managed to unplug it. Problem was it's like gynacology through a letterbox. Couldn't even get the plug far enough out from under the seat to figure how to switch the wires - there are three by the way, is that like forwards drive, backwards drive, and ground? Anyway not getting enough cable to work with I plugged it back in and the seat still would not move back so I went back to the wiring on the switch, having first banged my head on the steering whicle whilst trying to get back out of the footwell Then decided to look which coloured wires go to the motor as a starting point, gave the connector under the seat a waggle to release it and suddenly the seat started to move back. It now moves both way fine :yes: cheers dicky
-
Got my car back this morning after having them new wheel studs fitted Problem is for some reason the electric drivers seat will not move back. It moves forwards OK though Which means i now have it in a rather uncomfortable position to drive it :sad: Is there anyway to manually move it back, or some liekely cause of the problem thats easy to fix? dicky
-
yes picked it up this morning but have another problem.......
-
I have the info - but don't want to step on any toes of who books 300zx show meets in the midlands Is that OK?
-
Nice to hear you got a nice spin out int the Z But how come you had nice weather and just a run up he M1/M6 ours was as shite as ever - cloudy and fecking cold? Hmm wheres that tongue icon?
-
Weston Park Yeah looked it up - of course it would be easter weekend and unfortunately I would only be able to make the Monday That one they have near me at Trentham Gardens is 6th June Date: 16/06/2013-16/06/2013 Times: 10.00am - 5.00pm Car Information: Tweny two super years at this great venue which offers over 1200 vehicle entries, 50 Club Stands, Autojumble and Trade - with the beautiful backdrop of the now fully refurbished Trentham Park and Italian Gardens. Over 5,000 visitors enjoy this great day out every year. Event Description: Set in the beautiful backdrop of the now fully refurbished Trentham Park and Italian Gardens. Location: Trentham Gardens on A34 near Stoke Staffordshire Postcode:ST4 8AX And I will go down to that one as it is three miles from my house. HAs anyone attended Trentham before, car shows are a new hobby for me
-
Actually Gaz those wheels of yours look real nice Did I do the wrong thing fitting those very stark/angular dotz hanzos? Actually they look good on the car and personally I really like them but they do look a bit harsh in close up pics. As mentioned I am getting the calipers and hubs painted at the moment so they will look a bit dtfferent soon I notice from you pics you also have the arch liners painted (or at least they look more black than mine, even when mine were fitted) As this is intended to be a show car come fun road car (not daily runabout) maybe I need to spend a little more attention on this area of the car? My pics are clear enough - advice happily accepted But the hanzo wheels are staying Rich
-
oops duplicate post
-
Yeah I did worry about that but I thought it would be a bit OCD if everytime I parked the car I then nudged it back and forth a bit until they were the right way up :whistling: I'm already parking like a girl to make sure I don't scuff them alloys!!
-
No Gary, they are stick on ones I got off a guy from ebay http://www.ebay.co.uk/itm/140893813119?ssPageName=STRK:MEWNX:IT&_trksid=p3984.m1439.l2649 They look fine (mine were 60mm and he does various sizes / colours) but I am not totally convinced they are going to stay on, even though I get them lacquered over If they start to come off I think I will try plan B - which is to get some smooth centre caps, spray them black, and get then some Z logos in white in stick on vinyl (probably try the same guy who sign-written my van) so only the Z is stick on, not the whole thing. Then apply them and overspray with lacquer dicky
-
Just another little touch added to the wheels Z logo badges fitted today Really I should have got it washed first lol. It's at the garage at the moment replacing the worn wheel studs so while I am at it I'm painting the calipers and hubs red The wheel arch liner is not fitted at the moment as it was catching on the wheel and I need some more clips to hold it in place, most of the old ones broke Rich
-
I can't PM you on the forum as you are not a subscribed member. Where is the show in March? I am not far from Daralston R'bout though. My car is in the garage having new wheel studs fitted and calipers/hubs painted but it should be back on the raod for saturday - as long as the paint sets that is What time are you gonna be there?
-
@alfie Im not a million miles away from you in stoke - just had a similar job done on my zed (body kit and full respray) and was really happy with the work carried out. Not the cheapest no doubt but they pretty much took the car apart and sprayed all the panels then put it back together Can I also suggest if you are gonna do this, replace all the external trim with new? It will cost you hundreds extra but the results are well worth it I believe Mine is here http://www.300zx.co.uk/forums/showthread.php?166671-dicky-got-a-white-zed&highlight= If you are interested in using the same guys jest get in touch Rich
-
prefect m8 cheers
-
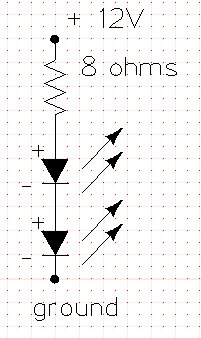
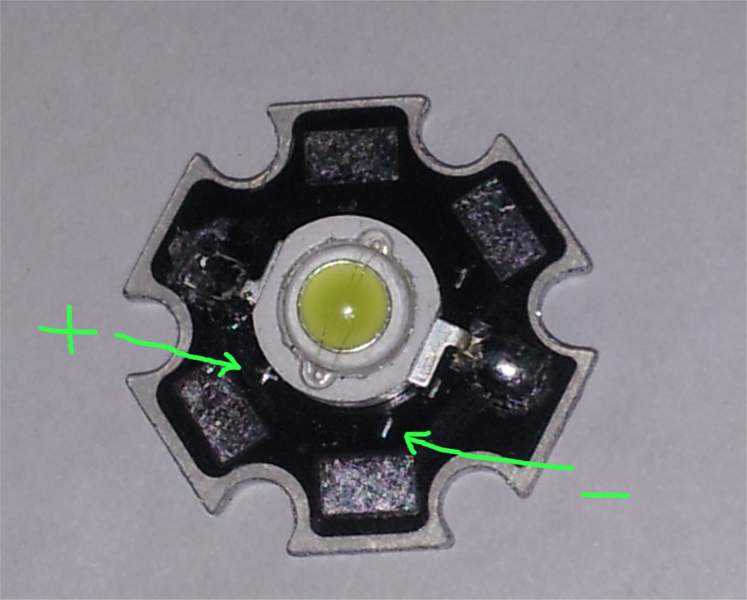
I didn't have time last night to load up the circuit diagram (which is very simple) so here it is. Here you can see the two LEDs are wired in series with the resistor I used a resistance of a bit under 8 ohms for each pair of LEDs which gives a current draw of about 500mA at 12V (total 6 watts - which is correct as each LED is 3 watt) The LEDS can handle up to 700mA, though i doubt they will be noticably brigther so you could get away with a 6.8 ohm 10W resistor(Maplin H6R6) or 8.2 ohm 10W resistor (Maplin H8R2) Price of resistors 79p each If you get your resistors elsewhere, make sure you use a 10Watt resistor as it is dissapating around 6 Watts so gets pretty warm - you may get away wih a 7 Watt one at a push The LEDs I used are 3 Watt cool white LED 'Stars' http://www.ebay.co.uk/itm/10PCS-3W-Cool-White-12000K-High-Power-LED-Light-Emitter-with-20mm-Star-Heatsink-/221064294501?pt=LH_DefaultDomain_0&hash=item3378757065 That is for a pack of 10 for less than £6 inc postage (OK you have to wait a week or two) yo can buy them individually but at about £1.20 each it aint worth it as you need four anyway The stars have 6 'tabs' two have the LED soldered to them, the other four you can solder to, two are +ve 2 are -ve. See attached pic Just be careful that if you solder bare wires and mount them to the veroboard, where the wires bend around the ede of the 'star' that you don't short out against it as it is aluminium The output power of each LED is about 180 lumens so they are BRIGHT with a capital everything!! My four LED prototype is kicking out around 700 lumens of reversing light - yet only draws about 1 amp. I would really like to do a three LED per side reversing in the bottom sections of the panel, plus three LED per side fog (or brake repeaters) in the top sections of the panel The 3W red LED stars are about 80 lumens each So you would have 480 lumens of RED (six red LEDs) plus 1000+ lumens of reversing light (six white LEDs) :tt2: :tt2: :tt2: And the beuty of it is, with 3 LEDs in series you would need a lower value resistor that would run cooler, and still only draw 1 amp for the reversers and 1 amp for the fogs/repeater! I'll be happy to post up the build plans and make some up for members (at a small profit) once i got it working right. It would need some sort of divider building into the existing bulb enclosures You would simply reconnect your normal wiring loom with the original connectors for the reversing lights and would have two terminal block connections. One where you would have to wire to your fog light circuit and optionally the second connector for wiring to your brake light circuit as required. If I put a diode in the brake circuit then when your fog lights were off they would be used as brake repeaters instead (optional) :innocent: So now, here is the teaser guys - anyone want to send me a spare rear panel to work on, and in return I'll build you one for free once I prototyped it? cheers Rich
-
It is not possible to PM you m8, says your account will not accept PMs dicky
-
Well actually funnily enough - I ordered some red 3W LEDS from ebay (these were like about £12 for twenty) and they should be the same brigthess as the white ones I was intending on putting another strip of veroboad alongside the white ones, to have either LED brake light repeaters combinef with my reversing lights, or to have fog lights combined Or both - using a diode so they come on with both brakes and fogs As for having the top section reversing and the bottom section brake/fog - no problem In which case you could fairly easily fit 3 x 3W leds behind each section side by side.. That would be even brighter than this version with 3 leds per side instead of two and would look pretty cool actuially.... now you come to mention it :drool: dicky
-
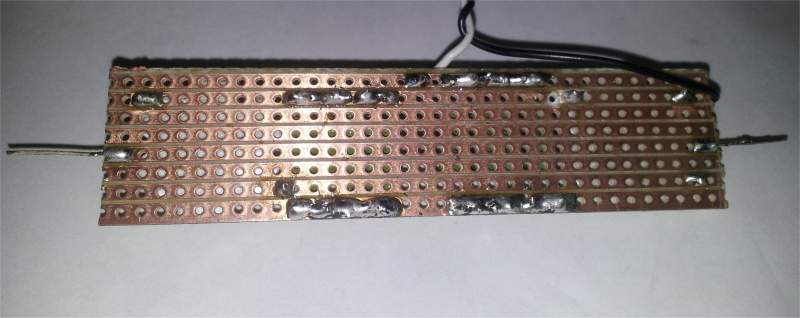
And here is a short video of everything back on the car and working Silly me while filming, absent mindedly took the keys out of the ignition and eventually the turbo timer times out lol The 3W LEDS were from ebay I payed about six quid for a pack of 10. The resistors and verobard are very cheap. The whole mod should cost you less than a tenner and you will have plenty of LEDs left over for other projects Anyone wnating to have a go at this should be able to do it from these pics - there is ONE cut track on the veroboard, you an see it in the pic. Also make sure your wires soldered to the LEDs do not short out onto the aluminium star shaped heatsink that is attached to it! Rich
-
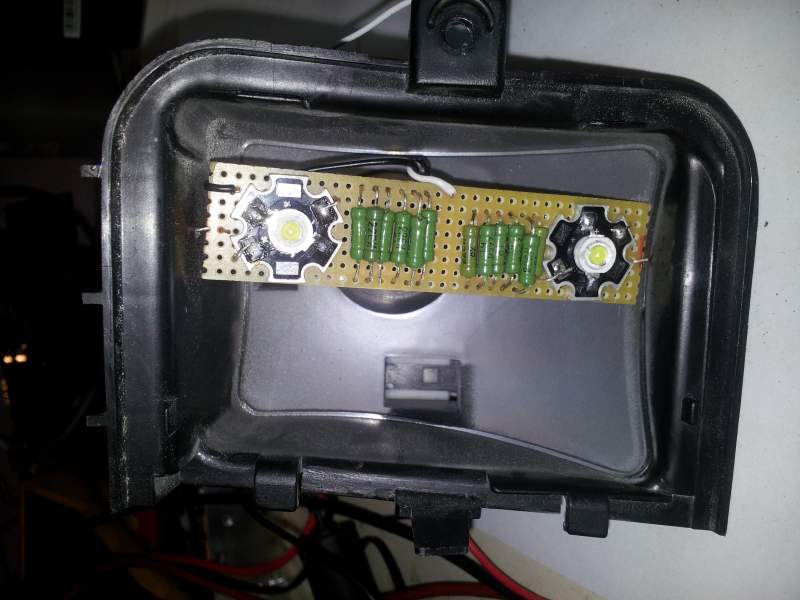
Here is the unit mounted, you can see how I fixed it in place by drilling a couple of very small holes and pulling those stiff wires through the holes from the end of the verobard, once i had it posiioned correctly i bent the wire over ( I pointed a green arrow in the pic so you can see what I mean) then put a dab of glue on to hold it all in place. I actually used some of the cut off resistor legs for the stiff 'wire' to mount the board :sneaky2: I soldered the wires to the exisitng wiring for the bulb holder so I could just plug everythign back in to the wiring harness
-
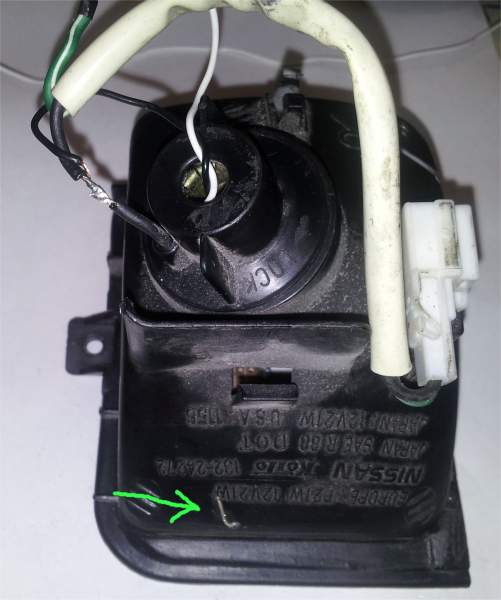
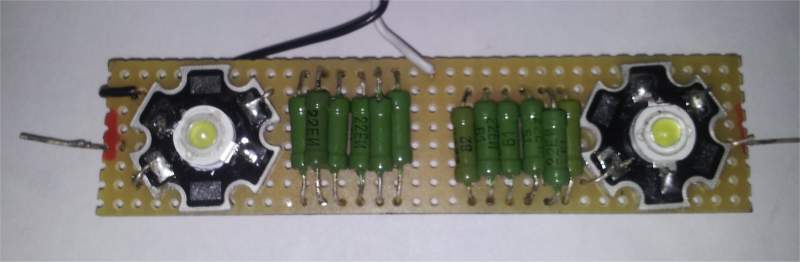
Is it just mine or are all the lights that Nissan fitted on the 300ZX crap? Anyway, sick of not being able to see at night when reversing I decided to do something about it today First of all I used four x 3 Watt white LEDs and put two each side. I used some resistors I had lying around (rather than buying some wirewound ones) I used 22 ohm resistors, six in parallel then another six in parallel to give a total resistance of about 8 ohms. They dissipate quite a bit of heat! I would suggest if anyone wants to build a similar circuit you just by a couple of power resistors instead The pics tell the story well.... so here goes. The little bits of wire sticking out from each end of the veroboard are purely there to physically mount it in the reversing light enclosure
-
Andy Couldnt see you photo clearly enough to see that is the adjustment pot But out of interest, what is the part number on the IC (the black thing with lots of legs) it is rather blurred on youir pic, but may be of interest rich
-
OK I just felt I had to post this Since i got my Zed fitted with body kit the way I wanted it and resprayed white I have to say the response from the public at large is pretty impressive (and YES I'm lovin it) It seems no matter where I her park up.... or just driving along the road - there are folks admiring the car - like the 'trolly' lad at tesco I caught admiring it- or the couple on the shoppping centre carepark the missus over heard saying wow thats a nice car, and she said 'wow isnt it low' or even the group of young guys in some dodgy looking 'ugraded' hatchback with a drainpipe for an exhaust who pulled steady alongside gauping the other day - until I decided to put my foot down a bit :tt2: Today pulling up at a pub (business customer of ours) some guys stopped playing pool, knocked on the window and asked what make it was (through the glass) So I gotta say I'm loving this car. And I aint even done the interior yet :drool: So no doubt it is not just me - it didnt happen before I did the bodywork/respray - but the effect of that work has been pretty astounding - who else has a 20 yr old car that folks drool over? Yet what would you buy new for the cost of owning such a car (guess between buying it and working on it mince cost about 8k now) And if your Z gets that sort of reaction, does it make you smile everytime you wake up and see it on the drive? I do, and I anin't ashamed of it! :wink: Rich
-
Hi Paul R Wow I'm not the only Z owner in stoke on trent? Actually to be fair I've seen maybe three or four others in the city - I think i saw your black one on Tescos Longton Car Park a few months ago but I could be wrong Rich
-
Ahhh Hmnmmm Actually I was just today thinking of replacing that trim around the back hatch, as when I got my car resprayed I replaced all the rest of the exterior trim and scuttles (why respray a car and put 20 yr old trim back on?) So the trim round the back hatch window looks worn compared to all the rest Also the back hatch glass has a few scratches - I had in mind if I got a windscreen co to change the glass (or remove it and refit it) they would just fit another trim, like when changing the windscreen From the above I asume it is not quite that simple? @sayers wouldnt your insurance cover glass replacement without affecting your no claims? Rich
-
Mmmm Replica Momo ---- so is that a good thing or a BAD thing? PS = VERY nice interior pic by the way znut...... The price for that steering wheel looks attractive and I'm looking for something to go with the new leather full retrim which is gonna set me back another £1000 or £1200 so a few quid saved is a bonus no doubt (as long as it does not impact onquality too much) @andy - that illimination looks real nice mate with the SMD strip :drool: Think I'll order some of these indiglo gauges, get the dash out on the bench ans see what I can do with it, tryin once again to outstage you... in the nicest possible way of course :devil2: Hmmm why didn't Nissan just call this model the 'Nissan Moneypit'? cheers once again Rich