
Everything posted by vodkashots
-
 Phutumsch Again Jonce Gary Wilson IanL t.mogsy


-
chill guys, i got the photos, they aint going any where, ive been busy, takes time to upload photos and im limited to 5 photos per post as well. Phutumsch Chris (Artztogo) Jason Farrow (the beast) MarkDerby


-
Loading shiney-itis in 3.......2.......1......
-
I second that statement. Do your self a favor, you do not need to be blowing white smoke to have a blown head gasket, it doesnt even have to be idling rough, a small tear in the gasket is enough. Get on ebay and buy your self a block tester kit. http://www.ebay.co.uk/itm/UNIVERSAL-BLOCK-TESTER-KIT-FOR-GASKETS-CYLINDER-HEADS-BT500-/151046876264?pt=UK_Diagnostic_Tools_Equipment&hash=item232b186c68 who ever said you shouldnt bother, no disrespect, but yes you should bother, it will save a lot of time and effort if you know what condition the HG is actually in, over heating as i found out 2 years ago can come from a number of area's and the first and foremost area to check out is the head gasket. so get that done first. If the test comes back fine, then we can move on to less expensive and easier solutions for you to fix.
-
Doesnt really grip the seat though, well i tried attaching it to the seat but the seat has too much flex in it, which is a shame as with the base attached, it holds the seat very firm, think i might put some area's inside it and screw it to the base of the seat instead.
-
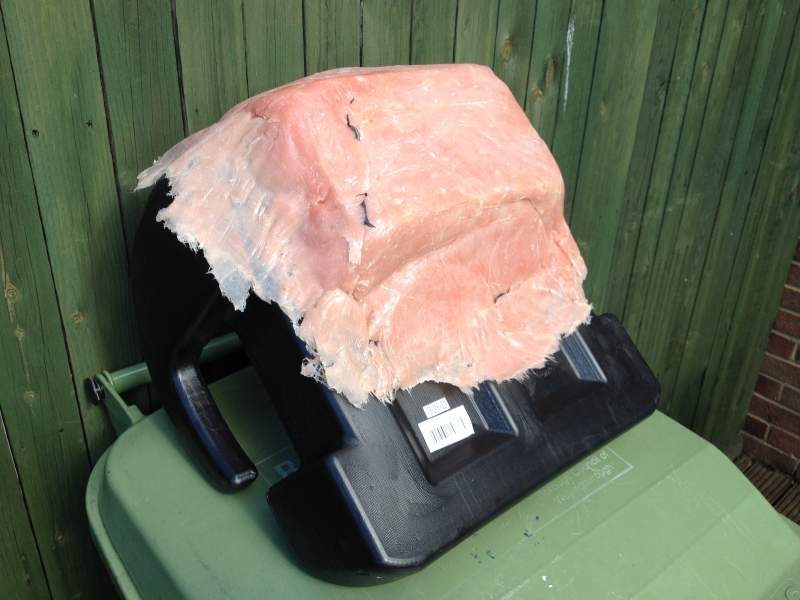
Bloody stupid 5 pictures rule...... Anyway, once it had cured enough to be handled, i removed the bag from it and test fitted it while waiting for it to cure fully. Just need to clean up the edges and attach it now Will update further once ive got it attached to the seat.
-
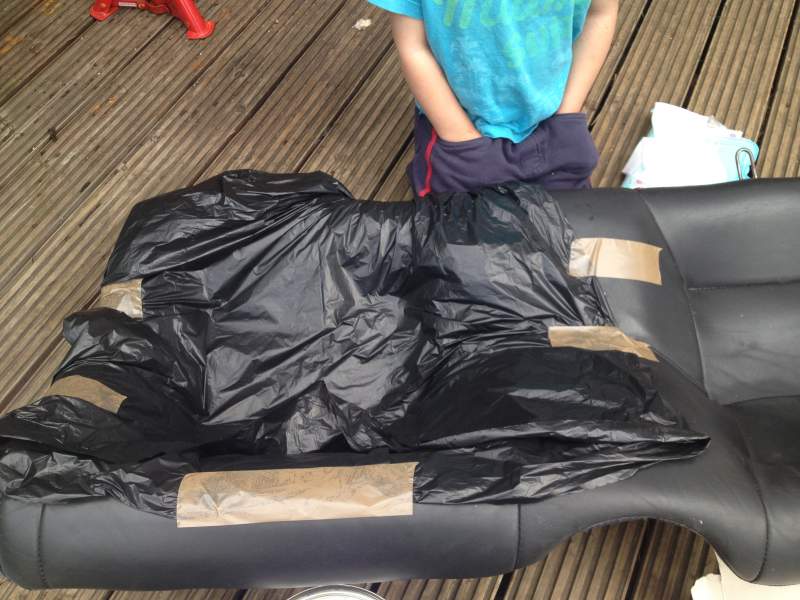
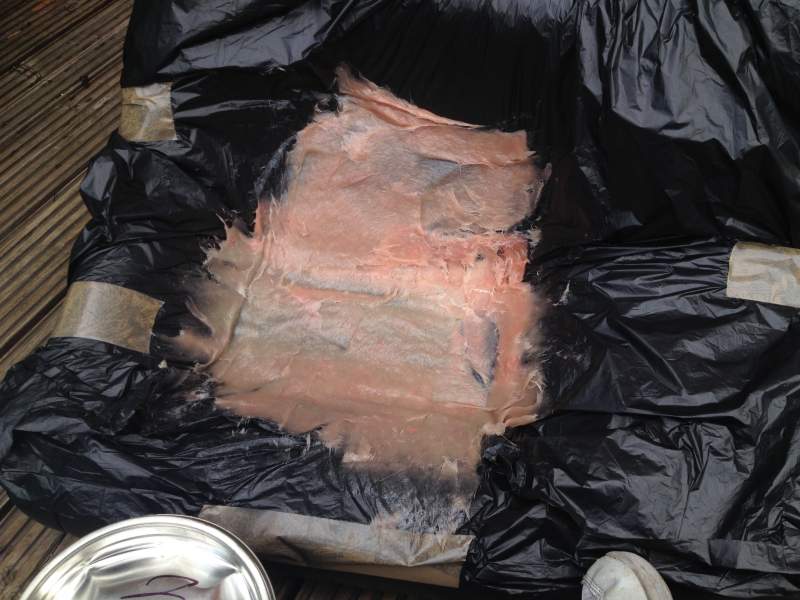
Well anyone with children will know that getting a car seat to fit in the rear of our cars is to put it bluntly a bloody nightmare. When my bumper was cracked and being fixed i came up with a damn good idea. To use the fiber glass past to make a seat base to help my car seats from sliding around on the leather seats. Here is my child seats in question. Now, with cloth seats the child seat isnt a issue as the seat + child compress the cloth and it holds the seat, with the leather seat the added stiffness means that the child seat only contacts in small locations allowing the seat to shift and move. the idea was to take a mold of the seat using fiber glass, then attach that fiber glass mold to the child seat. So with out further a due. My little boy helping put the plastic bag on the seat Bag secure. Slap that paste in and let the weight of it, form the shape of the seat, i found starting at a corner then spreading it out the best way to get it going with out it taking the bag with it. Once it starts to cure, it pretty much stays where it is. One base is now done, just need to let it dry fully and attach it to the seat once ive tided up the edges.


-
I am well jealous looks fantastic and i need a respray on mine.
-
Thanks guys, Jaikai is there a reason why 2 of my images are not showing in post 2? (never mind re did them and now they are showing)
-
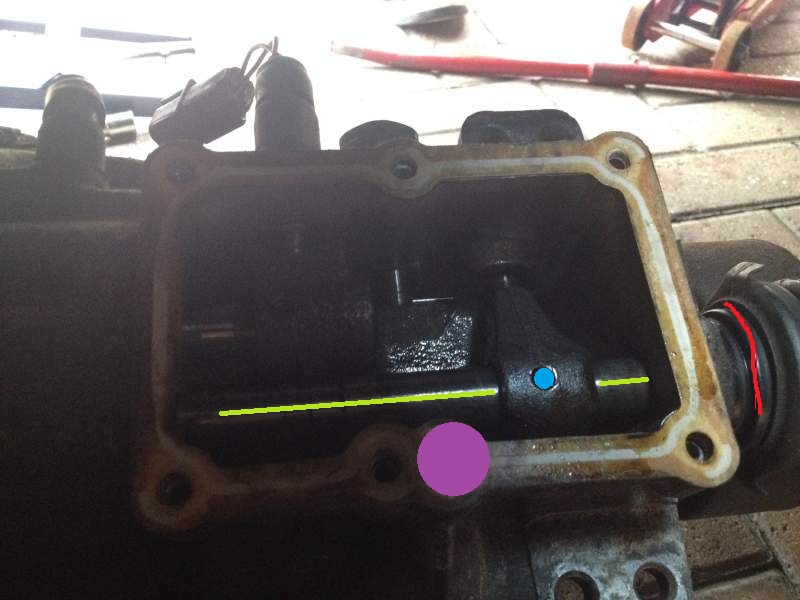
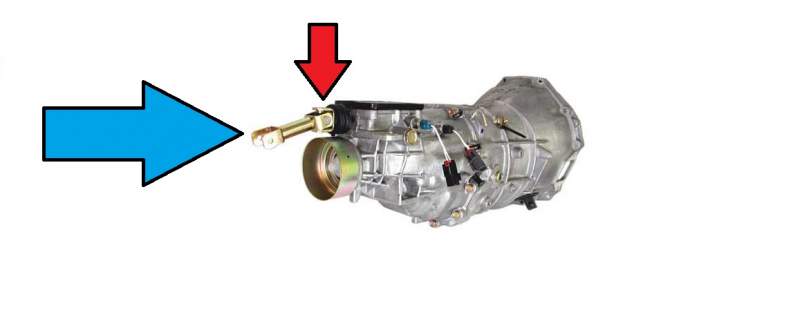
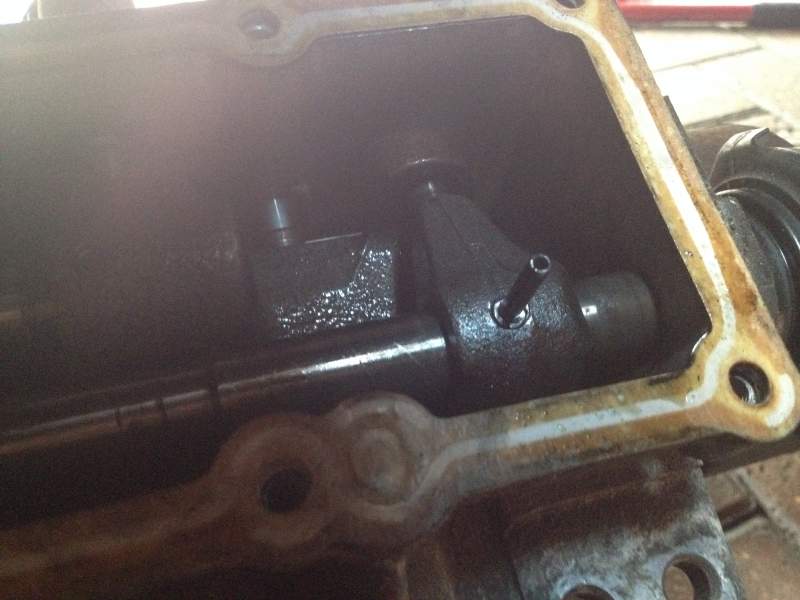
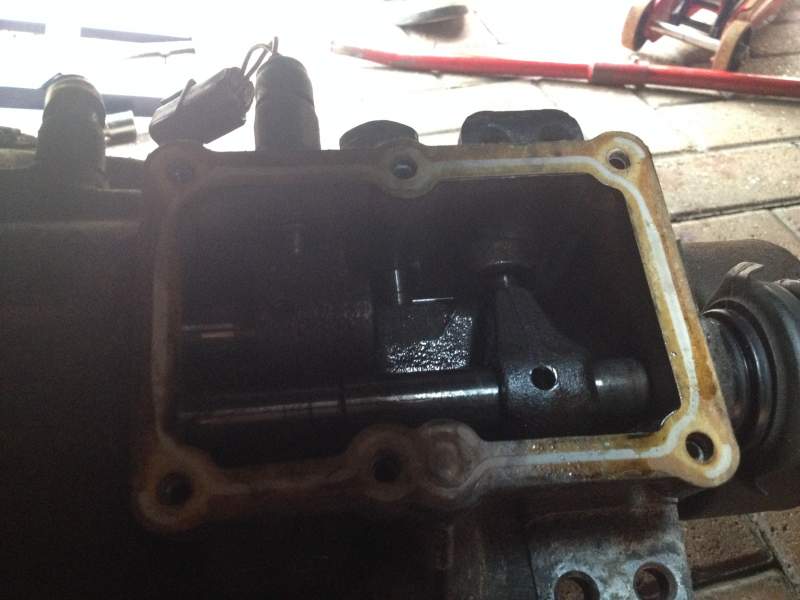
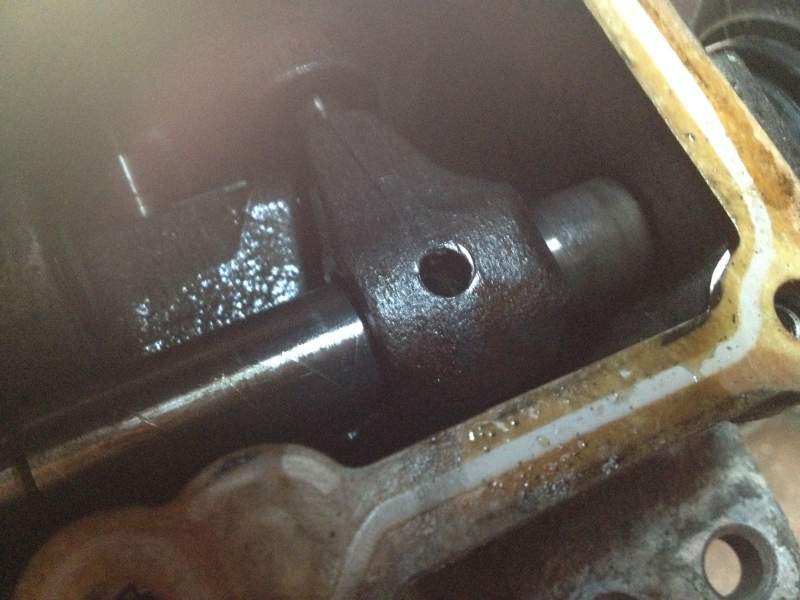
You can use a magnet to retrieve the pins from where they fell in the oil well. Pay attention to how the old arm was aligned, there is a raised bit at the end where the gear stick bolts too, this needs to be facing up, also the ball joint part of the internals that you pulled the striking arm from, is also directional and sits only one way, pay close attention to the rotation of that before removing the striking arm and after removing it from the gearbox. Now, fitting the new arm is easy, just slot it back through, and into the ball joint part and push all the way, i used the large center punch to align the holes up, place the locking pins into the hole and tap them back in, put the big one in first, then tap the small one into it. Connect the dust boot with the drain hole facing down (there is a small drain hole on it. as can be seen in image 2 above) Replace the metal plate and bolt down. You are now done, gearbox fitting is a reversal of how you took it off, if you havent already done so, as the gearbox is off, it might be a good idea to replace a few things while you are their. a list of other optional things to replace. - Rear crank seal - Clutch - Clutch release fork - Clutch release bearing - Clutch release pivot ball - Gearbox oil Hope this helps someone, as i couldn't find a write up for this job and its not uncommon. My only assumption on how this U-Joint failed, is the gearbox at some point was lifted using it, as its not designed to take weight, im sure this has bent the ends and eventually the bearings have worked them selves loose. Below is a location guide. Green - striking arm Blue - Pin to be knocked out Red - Dust boot Purple - Spring and ball that you need to be very careful of. Below is location of striking arm related to gearbox Blue arrow - striking arm Red arrow - U-Joint that failed.
-
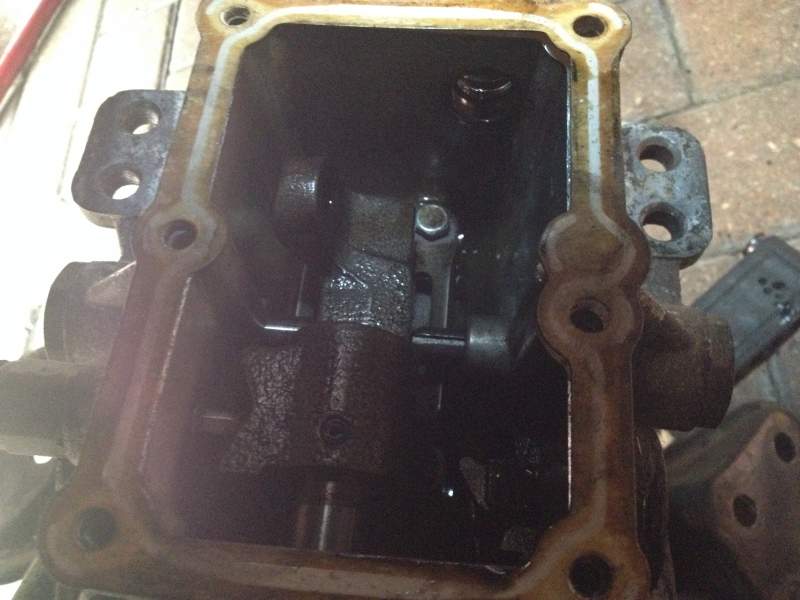
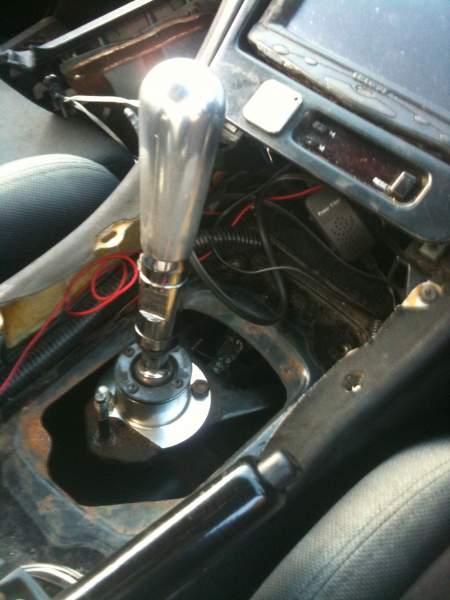
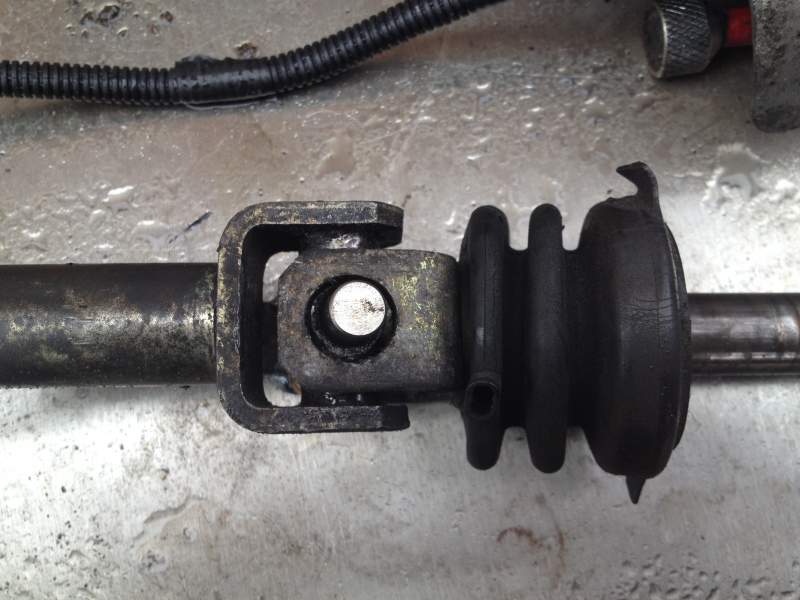
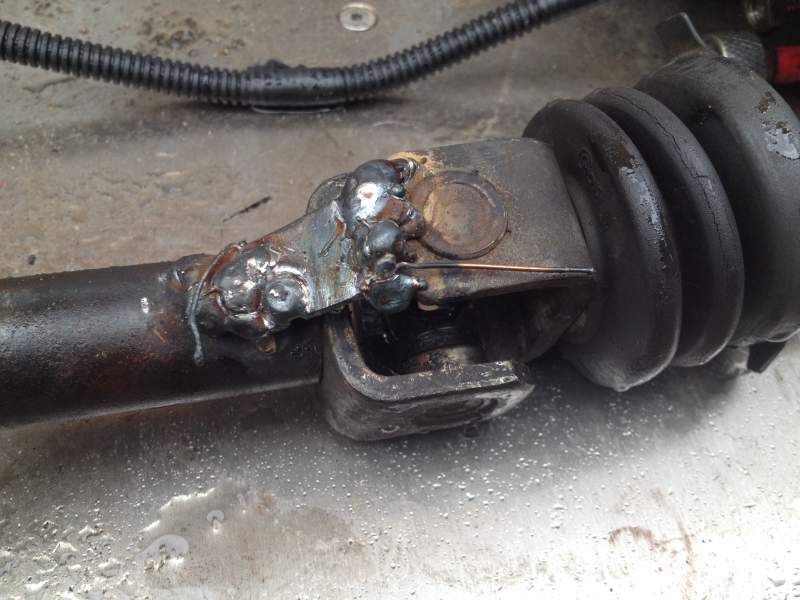
So, last week had a bit of a mishap where by my striking arm decided to come apart while driving and left me in 3rd gear. after a quick ring to JeffTT at zedworld, a new arm arrived the next day. A bit of welding work on the old one and i could drive it very carefully to my friends house in Corby to finally get to work on it. Though once welded, you need to leave your gear stick like this, or you will snap the weld when pushing left and right to get 1st / 2nd and 5th / reverse. the removed arm looked like this. Not the neatest weld, but only had to get me 15miles. and worked quite well. the U-Joint actually gives you left and right movement when the gearstick is bolted to the plate that holds the dust boot, and boy does that dust boot keep the heat out the car lol. So anyway, how to change it. Jack car and make sure its secure in the air, the idea we had was get the gearbox to lean back and tackle from the top, unfortunately this doesn't provide enough room, so its gearbox off time, which by the time you have the gearbox in a position to lean back, is only a case of removing the clutch slave, starter motor, gearbox wiring and gearbox bolts. So removal. Undo battery connections Remove 4 x 10mm bolts holding small tunnel brace to car. Undo the exhaust and remove. Undo 6x 10mm nuts holding heat shield on to car tunnel, this will expose the prop shaft. With the hand brake on, use 2 17mm spanners and undo the 4 bolts connecting the prop shaft in the center, make sure you mark with tipex or something before separating the join so you can line them up again when putting them back together. I find it best to have the rear of the car in the air, that way you can release the hand brake after doing 2 bolts, rotate the prop shaft 180 degrees, put the hand brake on and do the other 2 bolts. Undo 2 x 17mm bolts holding the center prop bearing to the underside of the car (assuming you do not have a one piece prop) leave the rear of the propshaft in the gearbox so as to stop oil leaking out. Support the gearbox using a trolly jack. Undo turbo intake pipes and throttle body pipes, you only have to undo them, you can leave the other end attached, its just so the engine can lean back, it will pull its self clear of the pipes. Undo 1 x13 mm nut on end of starter motor and remove live battery cable, unclip starter motor single wire from gearbox loom. Undo 1 x 14 mm bolt and 1x14mm nut holding starter motor to gearbox and remove. Undo 2 x 12mm bolts holding clutch slave to gearbox and remove, cable tie this out of the way. Undo 1x 12mm nut connecting the gear leave to the striking arm, remove center bolt, then 4 x 10 mm bolts holding gear lever support from gearbox and remove Now supporting the gearbox, remove 6 x 14mm bolts holding gear box rear support to body work of the car. Now lower the rear of the gearbox gently Using 2x 10 inch extensions and 2 x 3in extensions and a 14mm socket, undo 2 x gearbox bolts on top of bell housing, you can also get to the 2 bolts just down and either side of the top bolts this way if you wish but you can also get to these using a U-jointed socket extension from the sides. remove the easier to get to gearbox bolts from around the edges of the gearbox Unplug gearbox sensors and move wire clear and cable tie out of the way. The gearbox should be able to come away from the engine, i used a breaker bar in through the starter motor opening, resting against the clutch pressure plate housing, lift the gearbox level to release the pressure on the center spline inside the gearbox, and gently lever the gearbox off and away from the engine. lower gearbox to the floor. you might need a hand with this if the prop shaft is still in the rear of the gearbox, i left it in as id recently changed clutch and the gearbox oil was still fresh, the prop has a tendency when the car is only a few inches high to dig into the ground when moving the gearbox clear and lowing it so you need to be aware of this. Now you do not need to pull the gearbox out from under the car. On top of the gearbox is a black metal plate near the rear where the striking arm comes out. remove 6 x 10mm bolts holding this in place, there is a small spring and floating ball to be aware of here, so pay attention and be careful when removing the plate. Loosen dust boot from striking arm Image shown has pin already knocked out, but this is what it looks like under the plate, there is a gasket holding the spring and floating ball in place for me here, so i was gentle enough not to disturb it. To detach the striking arm from the rest of the gearbox, there is 2 small pins, one inside the other, these need to be knocked out using two different size center punches Knock them all the way through and wiggle the arm free from this and the gearbox
-
Flip the image and it makes more sense.

-
these are some of the best tools ive ever brought for working on my 300zx http://www.halfords.com/webapp/wcs/stores/servlet/product_storeId_10001_catalogId_10151_productId_811703_langId_-1_categoryId_165572 as well as a breakers bar.
-
Option on the US market models, it's not that the hand brake is on the wrong side, it's that the steering wheel is lol (pretty sure image has been flipped) Red interior is all the rage in UAE
-
Been running it on my 4s for the past day and a half, and its been fantastic, no bugs or anything, battery seems fine as well, cant see how its a Step back? looks fantastic, runs fantastic, i installed it by backing up my iphone first, then wiping it back to factory before upgrading, then restored my back up, not one issue so far.
-
I'm thinking it would be better done with gearbox off the car, if you drop those pins in the gear box it's going to have to come off anyway
-
Thanks Jane lol (via facebook)

-
thank you so much matey :D does that mean i gotta come be tea boy for a day? ;) is it just the one pin i need to knock out? looks simple enough
-
aah :D still shocked at just how easy the zed's dash is to remove, when i first looked at it i was like "ho god im going to be here ages" but 10 bolts later (after striping the side pods and clocks off obviously) out she came.
-
Considering how easy it is to actually remove the dash, id go for that option just to save time and hassle :D
-
There are two hoses coming out of the fire wall behind the engine, if they are not looped together (engine side) then it could also be your heater thermostat that is located behind the glove box on the A/C unit, you cant miss it its fed by a large wire into a metal bracket Now with the help of my technical diagram below (made just now using MS paint i might add) situated behind the glove box and dash is the following, Green blower motor Red A/C cooling box Blue Heater matrix Blue box, is location of A/C thermostat thingy ma bob. if this is faulty, then it doesnt open the heater matrix to allow hot air / water to flow through it (pretty sure thats how it works, could be wrong, but ive had this fail on a pug 406 before and changing it gave me hot air back)

-
Would like to give a public announcement that JeffTT is a epic star and is shipping me a Striking rod :D LOVE YOU JEFF (but not in a do you up the bum kind of way)
-
Awesome life matey :D I still really need a Panasonic 3DO back in my life. Bit of useless trivia for people Need for speed was released on the 3DO first, then PC. Before it arrived on the PS1 Also, you just cant beat a game of Po'ed on the 3DO, first main weapon? a frying pan lol
-
From looking at the service manual there are 2 pins that need to be knocked out to get the striking rod out, not sure if this can be done with gearbox in the car still or if im going to need to remove the gear box from the car to get better access / view
-
Anyone have a write up on how to change the striking rod?
