




Funkysi
Registered Member
-
Joined
-
Last visited
Everything posted by Funkysi
-
So the speakers are what I've currently been messing about with today. Removed the old ones - I had no idea that what I pulled out were only 13cm Kenwood speakers. No wonder I wasn't happy with the sound! Here are the old Kenwood coaxial speakers next to the main driver of my new component set, plus one of the cross-overs and a tweeter. To fit these main drivers to the brackets, I followed AndrewG's advise and got myself some MDF speaker spacers, excuse the crappy quality of this photo! Andrew has very kindly routed a 45° chamfer at about 5mm depth so that they'll fit the current brackets, but now allow larger speakers - I will need to do some more sanding to get them to fit, but this gives a great point on which to work off of. I had already covered the speaker bracket in sound deadening material which I will have to strip some of it out - I am not sure whether to do the door frame too as suggested by JoelyP. I have done the inner skin which you can see through the speaker bracket - this bit I don't know whether I am doing right, but I gave it a go! What I've also been doing is planning where to put my tweeter (ooooh err!). Now the tweeters supplied with these particular speakers are really not very elegant looking, nor do they come with a nice enclosure. These are designed as a replacement for OEM fit tweeters for existing housings. They're ugly and I sure as hell don't want these sticking out of my door cards (which was the original plan). They're not able to be flush mounted, so they'll have to be hidden away! Because the hardware that came with them was also limited, I just had to hide them away completely.....but where!? I took an idea from JoelyP who has made up a bracket that sits behind the air vent in the doors which the tweeters are mounted to projecting sound into the cabin by way of the vent. Quite ingenious. I changed that design ever so slightly and decided to mount them on the side of the vent ducting in a modified tube (supplied). They now sit proud and sculpted into the ducting. I've had to mount them like that as the ducting itself has a channel guide for door mounted cables. Anyway, my idea is very similar to Joel's, but gives a little more access to unhindered airflow as they take up a little less space and are quite aerodynamic. The tweeters are angled so that the sound is projected into the cabin. The vents are at a reasonable height and angle themselves, so should sound pretty good, certainly a LOT better than my old setup! You can just about make them out behind the vent here. When fitted in the car, you'll not be able to view them at all. In addition, even if the vent is moved to an extreme angle, the tweeter still has a sound path. Under regular airflow angles onto the occupants, the tweeter has an excellent sound path. I'll get some better photos once the tweeter enclosures have been finished as they've not been sealed in properly yet.
-
When I bought my Z, it had a 2 stack JVC head unit as can be seen below - this was waayyy before re-trim time and was exactly how I had it when I bought it - I was lucky enough to have some studio photos taken of my car for Japanese Performance magazine. It was actually an OK system, but because it was Japanese supply, no RDS and the frequencies were at a different range, so it had to go - plus I didn't really want a tape deck anymore! I went out and bought an Alpine IVA-W200RI touchscreen and ordered a double-din fascia from z32-zone in Japan - the first and only one of these to be fitted over here that I am aware of - this was back in 2008, long before Zthirtytwo were about. I fitted it all at the same time I did the retrim - I upgraded the rear speakers to Alpine 16.5cm coaxials in gutted out Bose speaker boxes and ran high capacity cabling to the front. The fronts had some Kenwoods wired in - I can't remember whether I fitted them or not, but they weren't up to much, but I knew little about audio, so left them there - they were co-axial too. I hated the lack of bass in the car, so bought a nice sub box and 12" Alpine sub and a Pioneer amplifier. This made the bass a lot better, but mid-range and general clarity of the rest of the system was just pants. I then grew to hate the sub and amp. I like having the boot space for when I go touring and I really don't like having a huge great big speaker there. Every time I opened the boot, I was worried someone might see my 'phat sub', so it had to go as I couldn't cope with the embarrassment. I did a bit of research which involved bugging AndrewG and JoelyP a lot. I wanted something hidden, discrete, but with an OEM quality sound - something my system really lacked. I didn't want an amp or a sub to be visible and I don't care for competition systems and having monitors and all sorts of nonsense in the boot. Which leads to what I'm doing with my Z's sound system at the moment. First things first - I was never happy with the z32-zone 2 din fascia. It was a 'remanufactured' OEM item and was looking a little tired - so took part in the GB for the Zthirtytwo 2din fascia which is much better. Excuse the low-level light ouput of the head unit. A combination of angle and having it set to -8 brightness didn't help! New Vs Old After buying these I wanted the rest of the system to be beefed up. I wanted a tiny amp, but something that would give me enough RMS to power a set of components which, from reading I discovered to be the best thing you can do to the audio in the Z as you raise the sound stage....so I bought these. I matched the speakers' RMS as close as possible to that of the amp. Firstly, the amp. This little gizmo had an excellent review from Talk Audio's Adam Rayner and received strong reviews out in the market place, it's which is another Alpine product and is a booster pack/digital amplifier giving the output of my head unit another 2.5 times the power! I didn't want increased volume, I wanted increased clarity and paramount to this was package size! Small is best as I wanted to hide it and the wiring well away; it's all plug and play and ever so neat (I like neat). This pic, next to my hateful Blackberry gives you an idea on size. It's 4 x 45w RMS, so enough to power a new set of component speakers to reasonable clarity. I stripped the passenger footwell out for access and unhooked and moved the main car harness which gave me enough room to fit the amp behind the lower strut bar. So it's very neatly hidden and still has relatively good access to ambient air - it's a digital amplifer, so it doesn't really need it. Alpine give you long enough looms and connectors for you to be able to run this amp to pretty much anywhere in the front of the car. I haven't finished installing the cabling, but it's routed, just not secure. I wanted to power the unit before I did all that! If you see the metal bar at the lower half of the pic, you'll see a little black box behind it, that's the amp! You can see the cable feeds too and from it. That cables are then routed back to the centre consol area and you plug the Alpine HU loom into it (which mates with the ISO connector) and then you plug the other lead which comes from the other side of the amplifier directly into the back of the head unit (which is the only flying lead that you need to utilise). It's all plug and play and actually frees up a lot of space behind the head unit. I was then able to strip out any unnecessary wiring and tidy up the speaker cables. I also added some edge grommet to those horrible metal reinforcement spars to protect against cable chafing. I actually want to ditch all of those bullet connectors - but not too sure whether I want to hard-wire the ISO loom to the Alpine loom..... The beauty of this set up also is that there's not an RCA lead, signal lead or power lead in sight! I was able to strip out all of that too and it made me feel goooood! This is the stuff I used as edge protection - pretty decent stuff to fit and is pretty secure. Now I have powered the head unit up and with only the rear speakers connected, it sounds so much clearer with more defined mid-range. I might get some slightly better rear speakers too at some point - the coaxial versions of my components. The current Alpine coaxials are slightly over powered and could do with something with a slightly higher rating. I can't wait to wire in the new component speakers!
-
Have they been polished? Have they also had powdercoated clear-coat or is that bare metal?
-
Ditch the vents IMO. They do not and have never looked cool. The car isn't mid or rear engined, the vents are tiny and just look really odd, it's the one thing I never really liked about the Strosek kit - the bizarre non-functioning vents in the rear quarters, :) - - - Updated - - - Howard!!!! Tutt tutt! Not a good look! ;) Andrew's rending is good - I think you should go with it! :)
-
Pretty sure Alan (grundpa64) did this. I have seen it done elsewhere and looked a lot better. PM him - I've tried to find a photo I have also seen it where the vent on the rear quarters has been smoothed in and that makes a HUGE difference. That's something I'd always do to one of those kits.
-
Modified the internal ducting for the door vents to accept a little tweeter build. They're now hidden, but facing toward the seats, encased and smooth so as not to hinder airflow. Very happy with it all. Can't wait to finish fitting all my upgrade stuff. Will get some photos up when I'm done.
-
Jesus, it has its own poop deck. Seen it before; it always reminded me of something - like Pikachu had had sex with a Sunseeker 75. + =
-
I get what you mean. But I think they can look better by doing the detail things I suggested. Having a correctly cut plate makes a HUGE difference, so does having all the digits on one line - nice plain font - no borders, tacky logos and other graphics. Import plates catch my eye too. - This is as neat and as tidy looking as a UK cut out....if you do it right, which I kinda tried to do. :)
-
I don't think either are let down by anything. :)
-
I have no preference. I like them equally. Both look good with the stone-chip effect smoothed. I like side markers and exotic/import look of the import bumper, but like the UK for its domestic look and functionality. One thing that completely ruins the look of an import bumper is having an ill-fitting number plate. Either too big or too small and it looks really untidy. Import plates look better with all the digits on one line, rather than two. Detail is the key.
-
I have no rear fog lights. Never driven my Z in fog, light summer mist is all I ever seem to encounter so I have no use for them at all. I have a bulb holder and switch which I use for MOT purposes which use one of the reverse lights. Quickly take it out after and return it to dual reverse lights.
-
Arches rust from the inside out anyway - condensation between spot welds etc rather than from chips.
-
Nice and subtle. Skirts-only work well on a black car. Reckon a Stillen extension would look HAWT on that too! :)
-
....and smooth nose panel? Would look a lot better without the snout. :)
-
Telepathy and sine wave.

-
Selling template is good. We employ the same methods on the US forum. Works well.
-
Looks like it's a moderators' rights only forum. Maybe Lee's only just put it up there? Sure it wasn't there yesterday?
-
-
Your car will look very odd with side skirts only IMO. The middle of the car will look lower than the front and rear making it look a little 'off balance'. I'd steer clear of Wings West and Veilside type skirts and anything else that has strange shapes and pointless vents in them. Go with smoother more complimentary ones. I'd personally also avoid vented nose panels and most of the more commonly seen aftermarket front bumpers like the Greddy, Wings West and Veilside types - they don't work with the car's natural shape at all. Shoot for Stillen bumper extensions, they tie in far better than anything else about unless you're lucky enough to find a complete Impul kit!
-
I guess you didn't read the thread title Lee.... :p
-
Haha. Ok Einstein! ;)
-
Get it finished Bert! :)
-
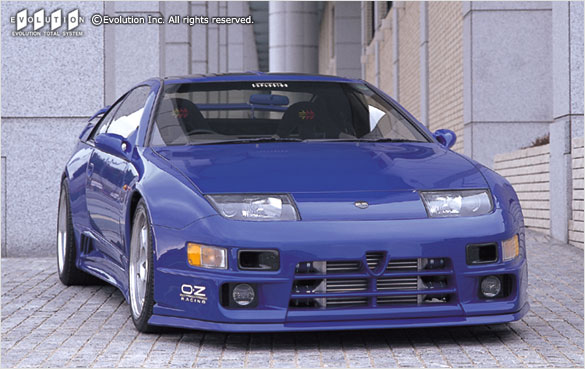
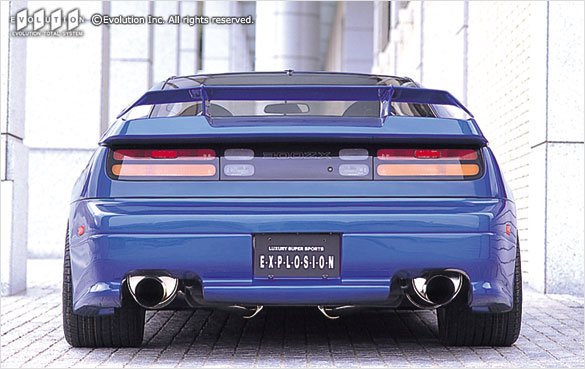
This car came up for sale on here a few years ago. Just wondering what became of it? Strangely, I like it and always have....I am not adverse to bodykits and never have been, just the commonly accessible horrors that appear all the time....are just that....all that there ever seem to be! Anyway, having a conversation with someone on facebook about it and wondered what became of it? I have a feeling it might have been exported back to Japan, but I'm not too sure. It's quite a special car and was Explosion's own Demo car. I guess Jeff might now?
-
Maybe - it's not just the human body, but my heating will stay off for far longer once it hits 10, just that 1 degree. Also, I noticed water dry up on the roads once it's above 10. Below and a short shower can keep the roads we all day.
-
...I seem to have a theme of black wheels at the moment....and I still can't stand 'em! :lol: