


Everything posted by phutumsch
-
Becoming a popular tyre are the Vredestein Sessantas, i wanted them all round but had to just settle for the rears as they didn't have fronts in my size, a very attractive tyre on as well :cool3:.
-
Only some gaskets, ester oil and stem seals but car as never smoked from cold though, we wanted really the engine pulling to fit the oil lines as it's not a two minute job, so can tie it all in and give it a proper going over. Just the bottom end re build Noel, Lee Dent as been sent all the stuff for that and then i take my car and we finish the job together, hopefully asap :cool3:. Might well be booking it back in with you next year to see how much more it'll have - if any ? :yes:. Godspeed GSP600 churbos, haha :biggrin:.
-
I don't expect everyone to know about my car but i've owned it 5 years, it had brembos, alunox exhaust, chipped and i was at 340BHP. Then about 2 years in i started uprating and putting it all on the shelf, turbos, radiator, clutch, injectors, smic, etc. Another year passed and i took it to Noel, i had 580BHP and 504BHP at the wheels, so of course happy but not with all the smoking it did !! 1 year on, so the summer of 2014, i powder coated this and that and generally making under the hood more pleasing on the eye. That brings me to where we are today, should be getting all this fit within the next 6 weeks and i'll no doubt receive pics and update as the build progresses. :thumbup:. These are ball bearing turbo oil line restrictors bought, the plan is that these will eliminate the smoke i had on boost. Some eagle connecting rods with race bearings, all these were an absolute steal at £255 delivered, bought from a private UK ebay seller :thumbup1:. I'm sticking with 87mm bores, i was very happy with £380 delivered to the UK for these Wossners, but the duty stung real bad at another £96.00 :cursing:.


-
Very nice :thumbup1:. I intend doing mine similarily with a gunmetal colour.
-
Respected.........thank you Dave !! He wants 3k or close to it, 2300 is the max really but he will not take i expect as someone may well come along and give him 2800 say. Me and Ian must err tremendously on the side of caution with regard to our comments on the sills, they don't look bad at all but we can hardly go sticking screwdrivers in the sills, all we can do is on street level is tap, push about. Both do require a good going over and some plating in places but it does appear minor, normal for a 25 year old car, but from what we saw a few hundred is needed to put them right. Also when you turn sidelights on, the low beams come on, something you could put right yourself but if you're not that way inclined it could easily cost you another £100.00 for a auto electrician to have a fiddle. I don't know about the engine as Ian test drove it but he says it was way off his power wise, so again some coin needs putting aside to look into this, it didn't smoke at all though, the only test i'd like to see would be to start it from cold but aside from the lack of power it did sound perfect. I am saying and Ian will concur, a contingency of £700 on top of the asking price and you've not a bad vehicle that stands you at 3k.
-
He will need a bespoke map in time (bout £250.00) but a simple off the shelf chip (£25.00) will suffice in the meantime. Fuel pump (i didn't) is just peace of mind, as is water pump ( i did). Standard clutch won't hack it, you'll need a stage 3, also an uprated rad is required.
-
Just buy a box full of various sizes and lengths for a few quid, one size doesn't fit all applications.
-
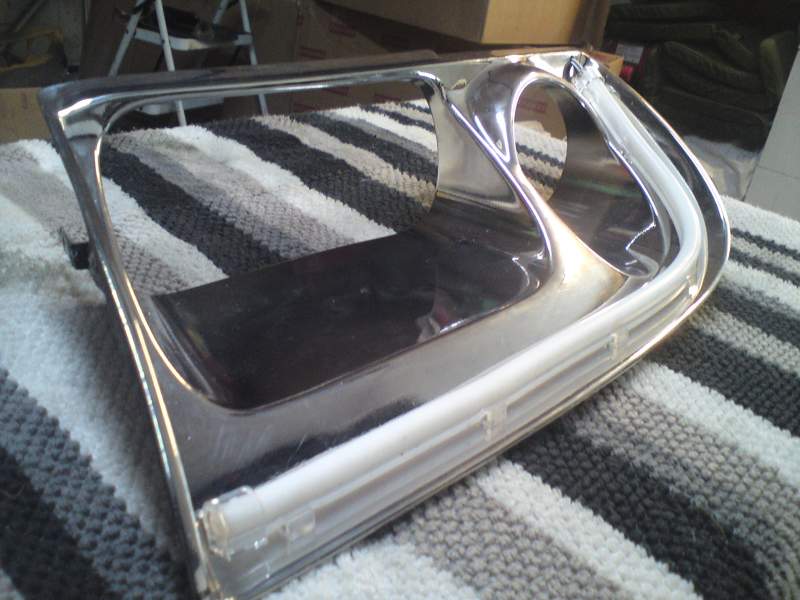
My initial guidance was to do a kind of 'u' shape but when i mocked up it was too much, too busy - just sweeping down the side and on the bottom acknowledges the lines of the car and does keep the light the furthest possible width apart. These inserts have a natural channel that lends itself very well to the work done, it's ok to say do a square but you have really to cut your cloth with what you've got, it wouldn't actually be a square anyway, it would - just with rounded off corners.
-
They belong to the guy in post 6, he may want to divulge what he paid if he wishes but the inserts weren't cheap, so this added more pressure to my remit. It's up to him how he wants to use them but if the tube is white, so therefore on sidelight and then you twist the knob again to dipped, you could have a relay that flicks off the tube but not the indicator part as you still want that to work or do you, all depends if you have another front indicator on the car or not. The beauty if you like is that the headlight houses everything needed to satisfy a tester, a personal preference could be that lights are not wanted or possible in the front bumper.
-
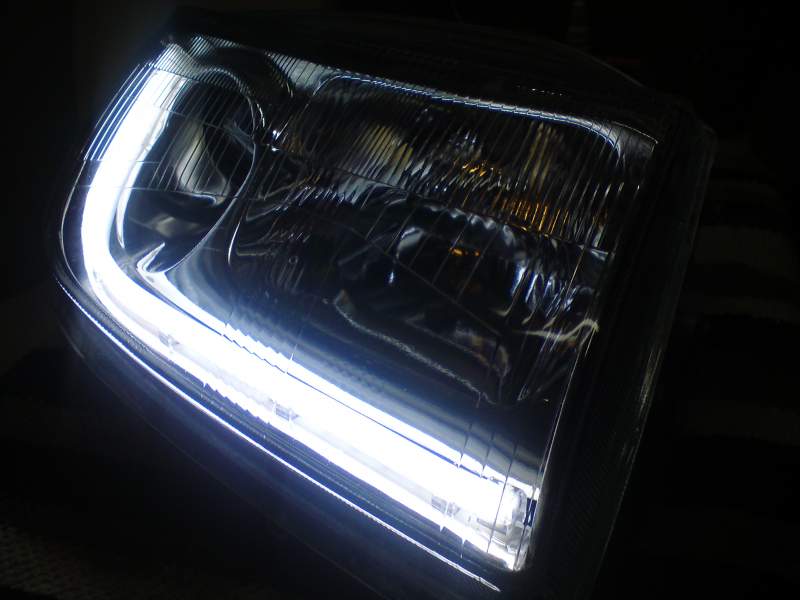
No idea, i always try and make for longevity, hence the silica gel sachets, grommets, soldering, etc. The headlights are sealed with extra flexible silicone, the smd strips are protected from the elements inside the opaque rubber tube and now will not be flexed again. One final thing the smd's work in series of 3 so if you get failure it will be just 3 and because the tube diffusers or disguises this slightly darker area will not be totally obvious.
-
Here is that promised video, apologies for blurriness, i took it and then packed the headlights so wasn't able to re shoot but i think you get the idea. I also fit a HID light kit and a new H1 bulb for the fellow forum member who may or may not make himself known. Quite enjoyed doing them actually as i am getting some 99 spec inserts and it as enabled me to have a think of the direction i will be taking myself. [video=youtube_share;iVMWyuaSYwA]
-
Yes, smd strips on there own are either side or front emitting, although these tubes have smd strips inside they project light 360 degrees once the light hits them :cool3:.
-
My indicators are just the same, the things come on then go off, come on and then go off and this just repeats infinitely............:whistling:.
-
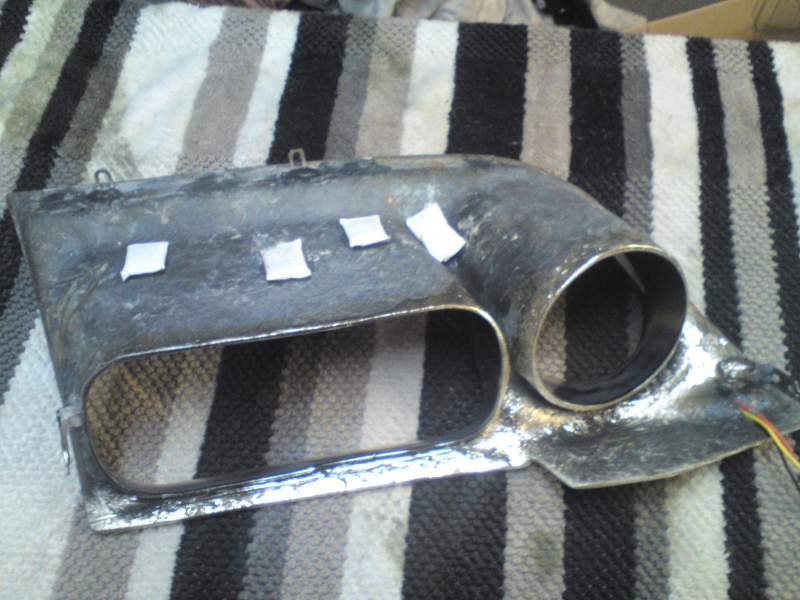
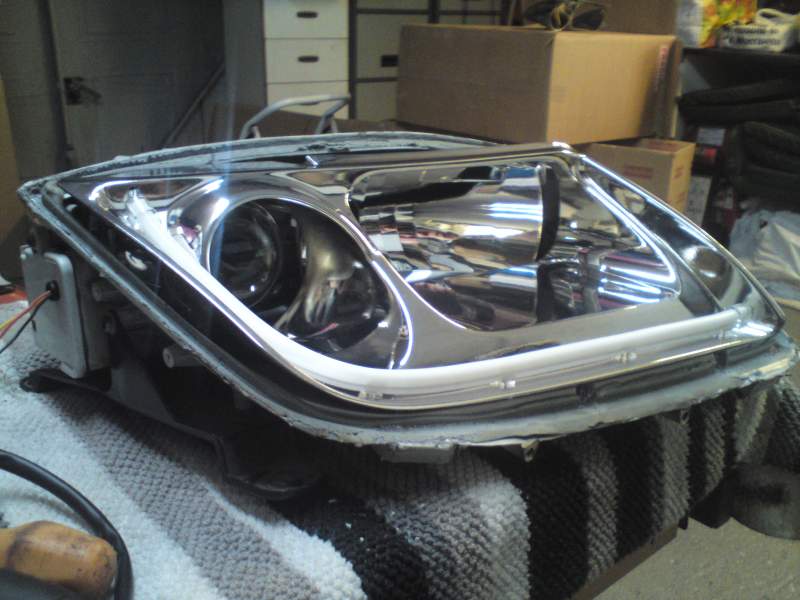
I was sent a set of headlights, chromed 99 spec inserts and switchback tube lights, my remit was left to me to fit. Having changed all the adjusters to metal as usual 50% were broken, i found a spot where i could attach some silica gel sachets :cool3:. You can see the exit point here where i came out with the 3 wires that run the tube light as you must keep away from any warm or hot areas, i did however put on a heat sheath for good measure. The inserts fit quite well, be prepared to do a little fiddling here and there though, i did all this on a tatty carcass until i was happy to fit on the supplied headlights. I also spent a lot of time thinking about the fitment of the tube before i started drilling and screwing, you can see they come with little brackets and clear end caps. The tube light i had to cut to length and i am happy how it comes down and swings along the bottom. Offered in the headlight you can see my chosen exit point for the 3 coloured wires, these were severed as they go to a multi plug and i didn't want to be drilling a 12mm hole through everything, wires of course soldered and heat shrunk back together with the use of a grommet. Having got my softest rag out and cleaned everything i put together and lit up for a pic, so this is running light if you like but i expect will be connected to the sidelight circuit. And if you indicate the white goes off and the amber/yellow flashes, indicator turned off and there is this wonderful one second delay and the white is back, i have a video showing these in action and will upload it later :yes:.

-
Are you just showing off at how many different types you can connect up :kiss:.
-
From what i can gather it sounds like you have some wire or wires going to the 21w brake light part in your rear lights, these will suffice for a bright fog light. However, you say you have a yellow wire disconnected, this will either be a ground or will need connecting to your side light circuit to give the switch some power for it to light up something at the rear. EDIT: Oh....and your fog light switch needs to be one with a led indication ?
-
I might have to agree, black looks too aggressive and don't think goes with the body colour, it's for another day as i bet your itching to get it all finished but i'd be looking at powder coat chrome, certainly something along those lines.
-
I might have to agree, black looks too aggressive and don't think goes with the body colour, it's for another day as i bet your itching to get it all finished but i'd be looking at powder coat chrome, certainly something along those lines.
-
In my experience of this you need to firstly swap out the 'mystery' black box for another but expect your problem lies in your side light circuit, so it only blows when you have one turn on the knob and/or when you hit the fog light button ? as this also turns on your side light and no nothing goes brighter. You may be pointing the finger at your dipped/hid lights, this is unlikely but don't rule out as your side lights are again on when you go passed position 1 and do the second position on the knob. I would target age related bulb holders in the four corners and of course any botched connections and don't assume under any tape it's fine, rip it off and check.
-
Happy birthday BK :biggrin:.
-
Happy birthday BK :biggrin:.
-
Liaise with me Ian, we can gang up and go together and pretend to be a couple of experts !!
-
Liaise with me Ian, we can gang up and go together and pretend to be a couple of experts !!
-
In our family, my son as a BLACK bmw, daughter as a BLACK beetle and we have a BLACK merc, of course Zed is silver, until i respray it BLACK !!!

