

Everything posted by JeffTT
-
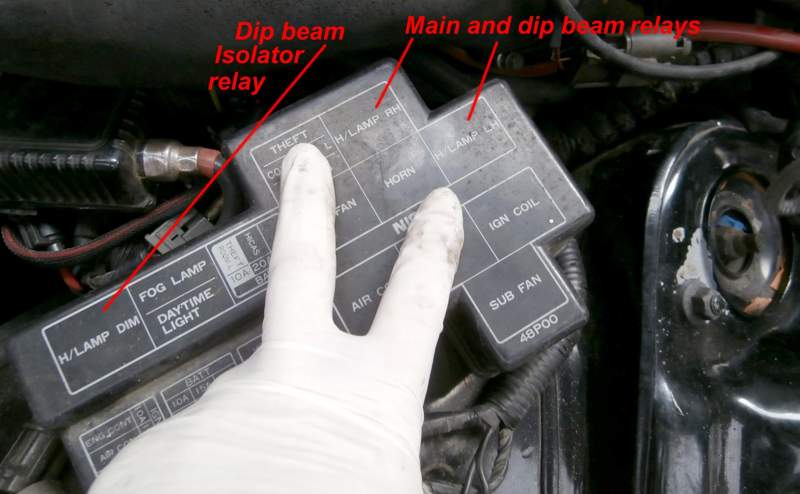
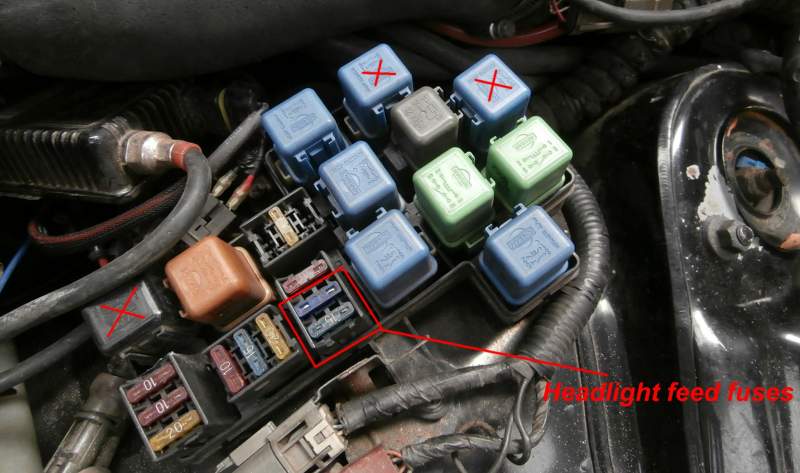
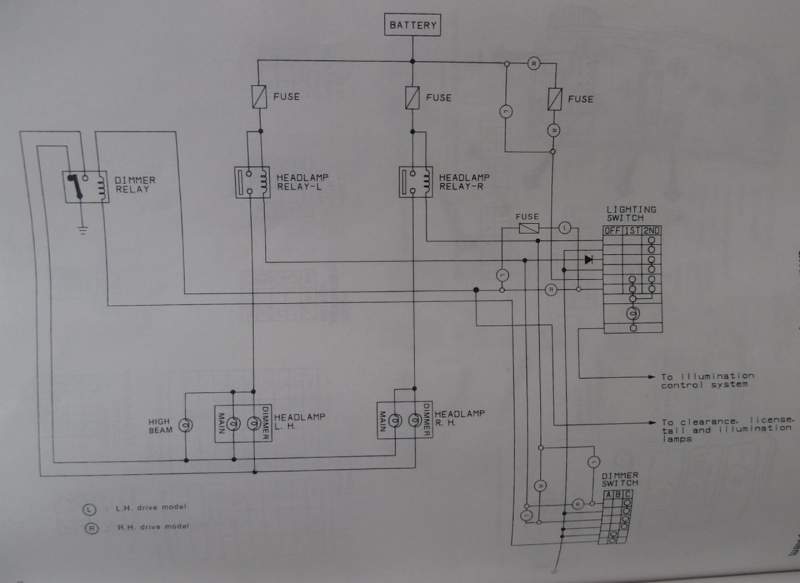
Nissan in their infinite wisdom decided to use neutral switch control cables and use twin relays with additional mode change-over not your normal automotive practice but I guess they had their reasons and it works, that is until tracing wiring faults and not knowing the particular way it was configured can make for hours of fun for the un-initiated. So on to the task we had here to sort out, a nice zed with a rather strange headlight switching issue, firstly I must add they had been previous attempts by others to correct this issue with out success. The side lights were fine but the passenger dip beam would not work, the drivers side was fine, the main beams worked but also brought on the previously non working passenger side dip beam! When flashing the main beam only the main beam came on correctly without and dip beam, but with dip and main together the passenger beam came on. Understanding the workings of the Nissan mindset when the circuit wiring was created take a little time to get into but here is a few pointers to start with. Here we have the headlight relays the legend on the fuse and relay cover is a bit of a red herring, the dim relay should really state "dip beam isolator relay" as the other two relays marked headlights are actually for the main beam and are also for the dip beam, but only when the dip beam mode relay is operating...? confused you should be!! So a quick check of the fuses and relays did not reveal anything odd, however the passenger side dip beam had an extra earth cable that had been connected to the chassis, odd but clearly a previous attempt at correcting this or another issue. Removing this and reinstating the correct earth connection now made things worse as the dip beam on the passenger now did not work at all!! At this point So back to the wiring diagram and the circuit is revealed, a strange way of using the relays but basically the main beam relays and the dip are the same but the relay marked as dim relay toggles the earth supply to the individual dip or main beam bulbs, that is why the dips go out when the main is used. So now armed with this information it was clear that the dip beam switch on the pod has dual earth outputs to the headlight relays marked left and right, and with the dimmer relay been a change over type the only reason left for the fault must be one of the outputs from the main light switch,the switch was checked and was switching correctly. So back to the relays under the bonnet and at the left hand relay base the earth trigger was not present!! voila!! the solution was simple and effective and negated the effort and time in tracing what must be a broken cable in the miles of loom between the switch and relay base, simply by linking the triggers at the relay end the main and dip beams were do as they should thank fully, needed a lie down after that one! Jeff TT
-
Your very welcome Martin always a pleasure working on such a good example such as yours. Jeff T
-
Well done that man!!!!!!!!!!! Jeff TT
-
No need other than to stop the light. Jeff
-
The yellow A/T or Power light flashing at start up is not an actual fault code but a warning that a code is stored in the auto ecu and needs retrieving, when doing a manual conversion the light will flash unless you un-plug the auto box ecu. Jeff TT
-
fixed!!!
-
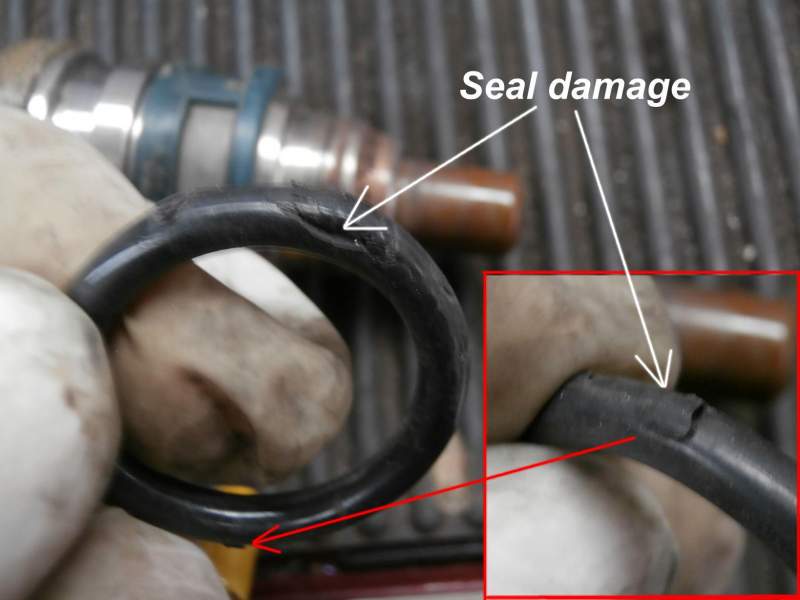
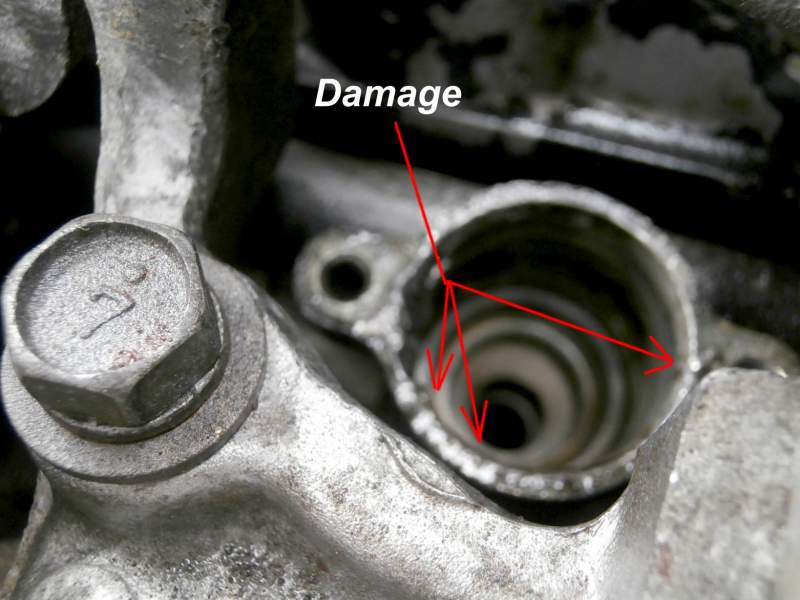
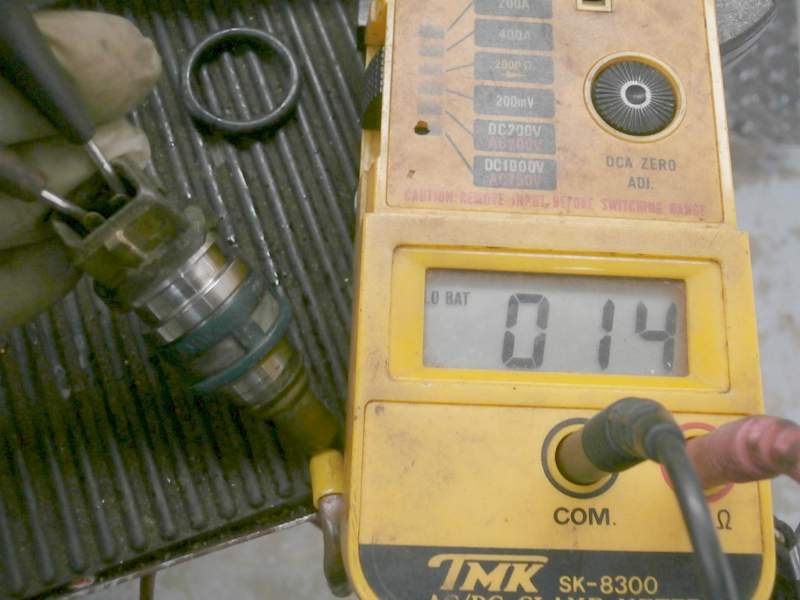
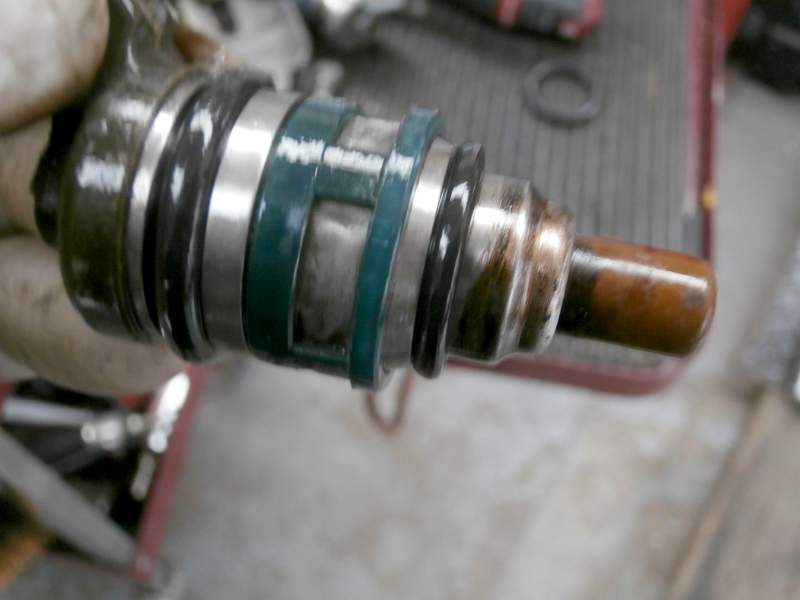
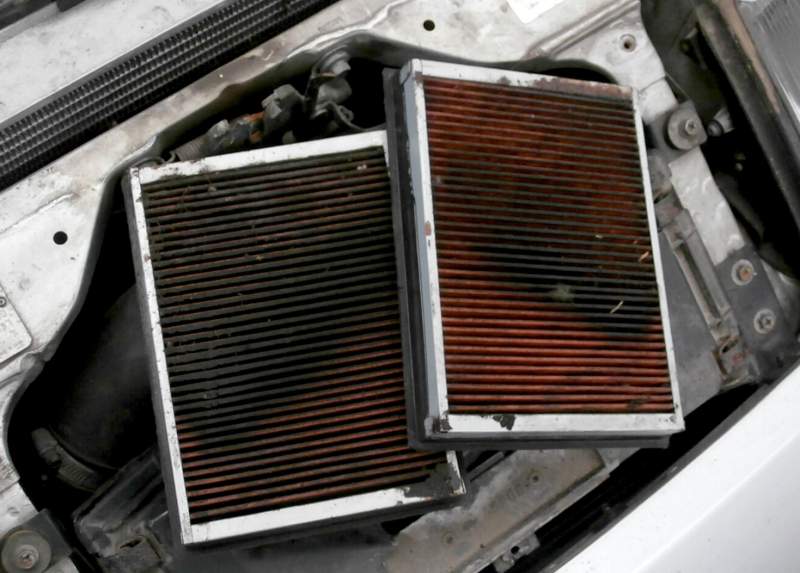
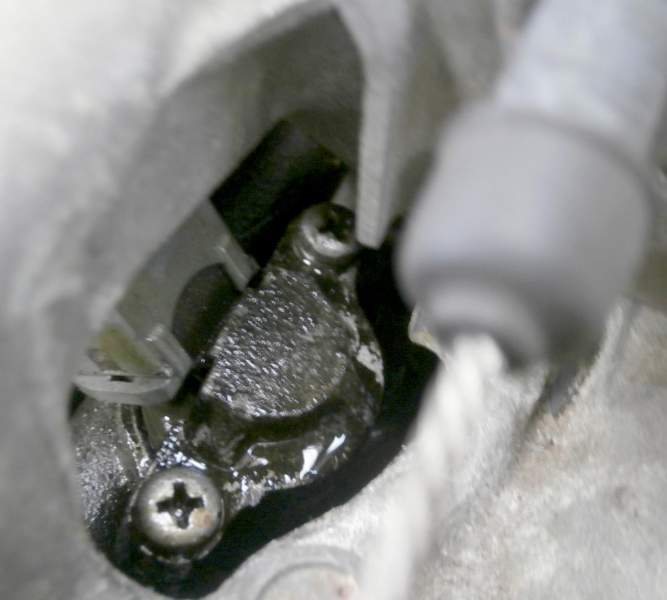
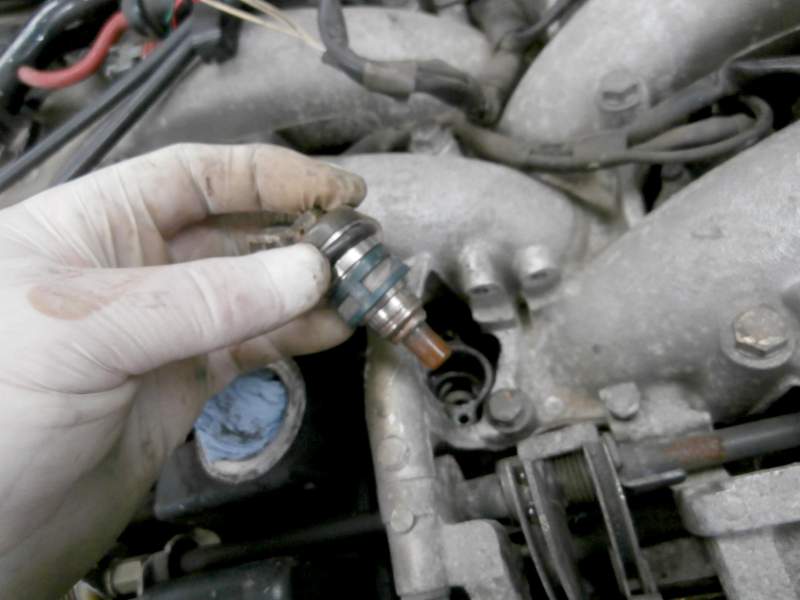
So with the injector out the seal could be checked and the damage to it was clear... Now the seal looked to be new but damaged so at first it appears it was badly fitted previously, however a further look into the fuel rail revealed the damage to the section the seal sits in! Lucky a little work with a needle file got rid of the high sharp spots, this must of been caused by what looks like screw driver marks?? the seal never stood a chance!! So now before fitting any injector always check its electrical integrity first, as sometime they can pop off for no reason.. So all good and the injector seals all lubed up and ready to fit... The fuel was now all kept where it should be and ready to be checked over again but not before the filthy filters were replaced.. So now with the work above complete the throttles set the timing checked the base idle set this zed was purring like a kitten once more, oh the a/t flashing light was now sorted the dodgy tps setting was the cause of that. The clues to the problems with this zed were all missed by the previous garage who had then gone on to make it worse...oh well all ended up good in the end. Jeff TT
-
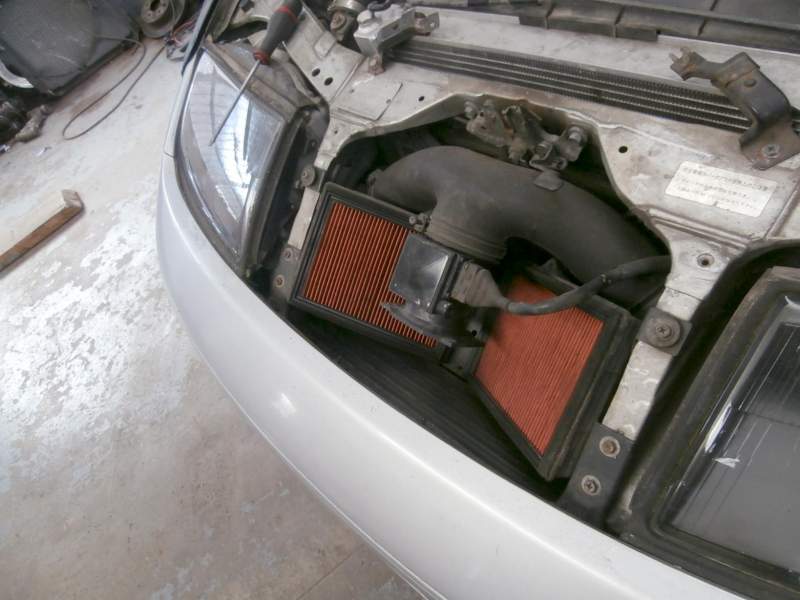
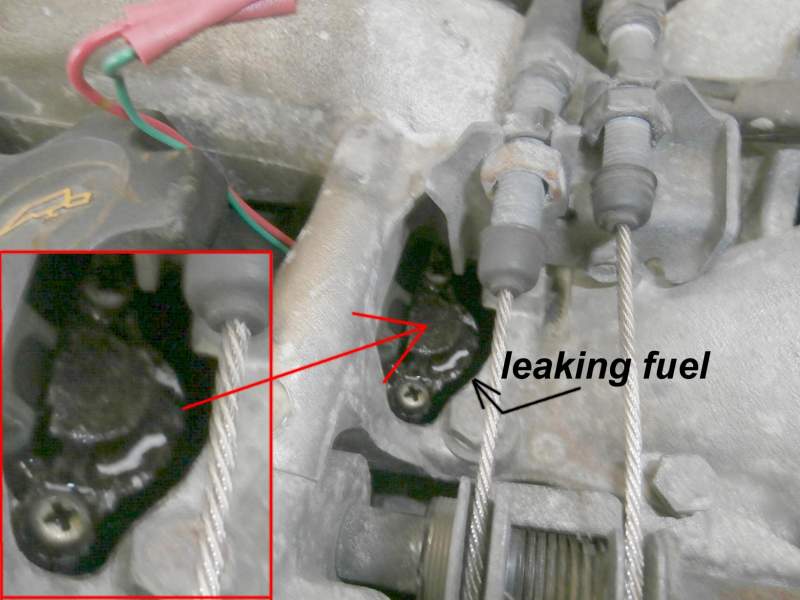
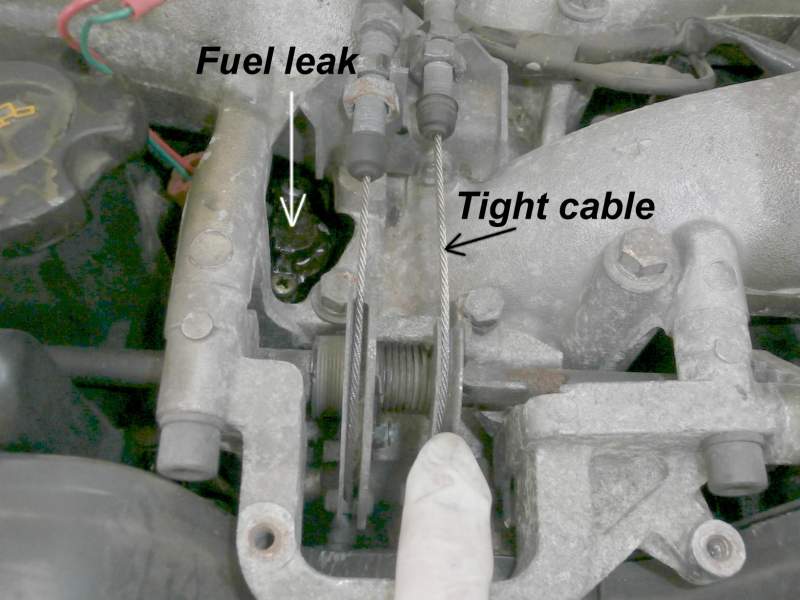
Interesting zed breakdown in the workshop this morning, was pre-booked as had some poor starting and running issues and a flashing a/t light at start up. The owner made the good decision to stay over Friday night so we could see how it performed when cold, so I popped up to the local hotel armed with the ConZult and set about preparations before starting the engine. So two codes were stored, afm and an 02 sensor heater wire fail, whilst looking at these codes with the ignition on I became aware of the very pungent smell of fuel! now I have seen the normal loose fuel lines hundreds of times but this was like been in a petrol station when they are having a delivery! A quick look around did not really reveal the cause, but back to the afm and I could see on the ConZult the voltage was very high as if the engine was running at high revs! a quick attempt at starting was fruitless and the owner mentioned the normal 15+ mins it took to get it started. So I changed the afm reset all of the codes and it fired up immediately, so back to the workshop quick smart! Now the pictures will slowly reveal the real "cause and result" story behind this break down, the owner had been chasing the poor running and starting and had already spent money elsewhere looking for the issue and of course the failed afm had been missed but worse still to be revealed, as even with a replacement afm this was still an unhappy zed. So the temp sensor had been changed and also no 1 injector on advise of the garage (?) the tps setting was way wrong the tick over was uncertain and the smell of fuel was incredible! With the throttle cover removed the fuel smell source was revealed.....No 1 injector was spraying fuel sideways out in to the centre of the engine, this continued even with the engine not running!! So knowing the injector had been replaced recently it was clear the "O" ring was having some kind of an issue keeping the fuel rail pressure under control and was going to need removal. The accelerator cable and bracket need to be removed and at this point it was clear the cable was too tight and was holding the throttles open slightly, remember the odd tps setting from earlier?? So with the pressure released and the bits out of the way the injector was removed, fortunately this one is accessible with out any dremell work. continue.....
-
Now update. Jeff TT
-
Take a look at one of my old posts below, there are some pictures of which show the turbo fixings and removed, I will add another pic in a few minutes once I have added some more info to it, back in a min... Jeff TT http://www.300zx.co.uk/forums/showthread.php?170625-whoops-turbo-mistake&highlight=turbo Ok back here we go, I have marked the 4 x turbo nuts 1 to 4 With the elbow removed both 1 and 2 are accessible to bend back the locking tabs and get a 13mm short spanner in there, the nuts are not that tight normally and also once loosened off slightly will spin on fingers. 3 and 4 nuts needs the water pipe banjo bolt removing to access them, I also remove the actuator as its so much easier, the tabs again need bending back and there is no particular way other than trying whatever screwdrivers you have to do that. No 3 nut actually will have good access and can be undone easily with a medium drive 13 mm socket, the last nut 4 is a little harder, I use smaller drive 13 mm socket on a wobble extension and whilst holding the water pipe to one side, one little tip about the locking tabs is it is easier to not refit them, you can use self locking nuts ( not nylock) or thread lock, either will work. Jeff TT

-
Best way forward is to remove the turbo, much easier than you think, once off it can be turned upside down and shaken free. Jeff TT
-
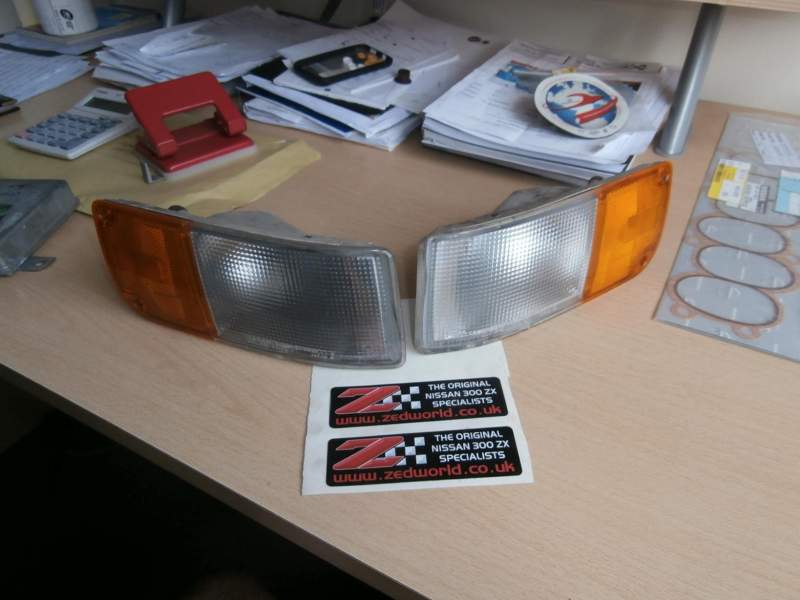
Hi Errol Just looked and have only passenger side ones left??? will take another look later see if I can make another pair up for you. Jeff
-
Here you go: Jeff TT
-
Fairly sure I have some off those in the stores, will check in the morning and post some pictures up if I have them. Jeff TT
-
Same here:

-
Yes, the 300zx is designated OB1 and does not have the ability to monitor units such as egr valve like more modern cars can with OB2. Jeff tt
-
There are different types that also are different colours and some are not mixable, the one used in your zed was Bluecol. Jeff TT
-
Dont` worry the internet is everywhere!!! Jeff TT
-
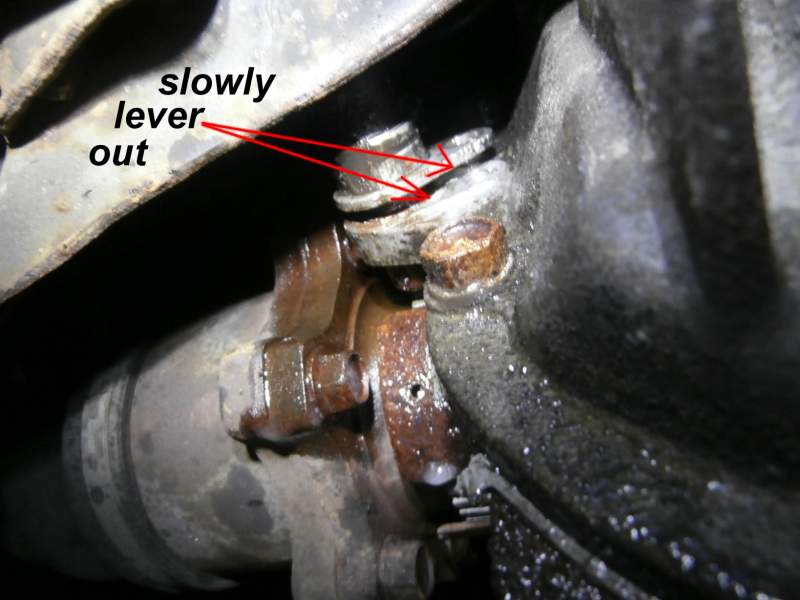
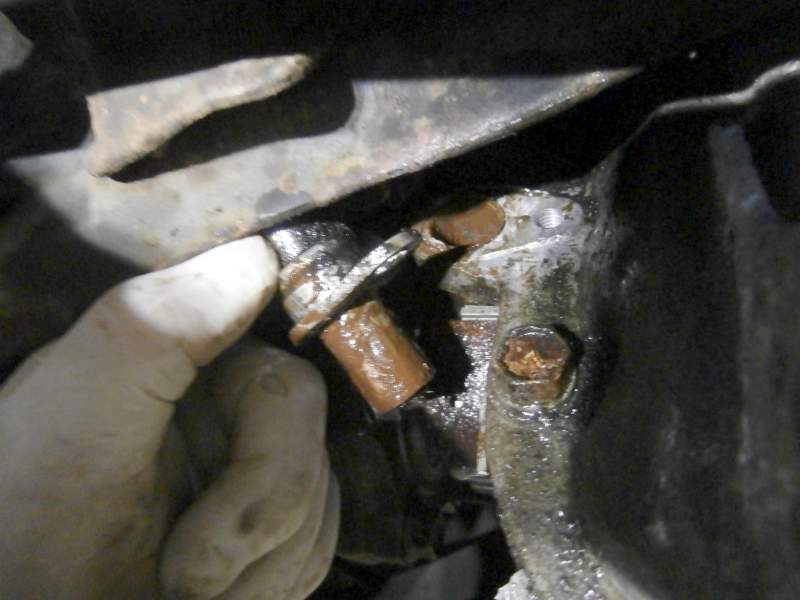
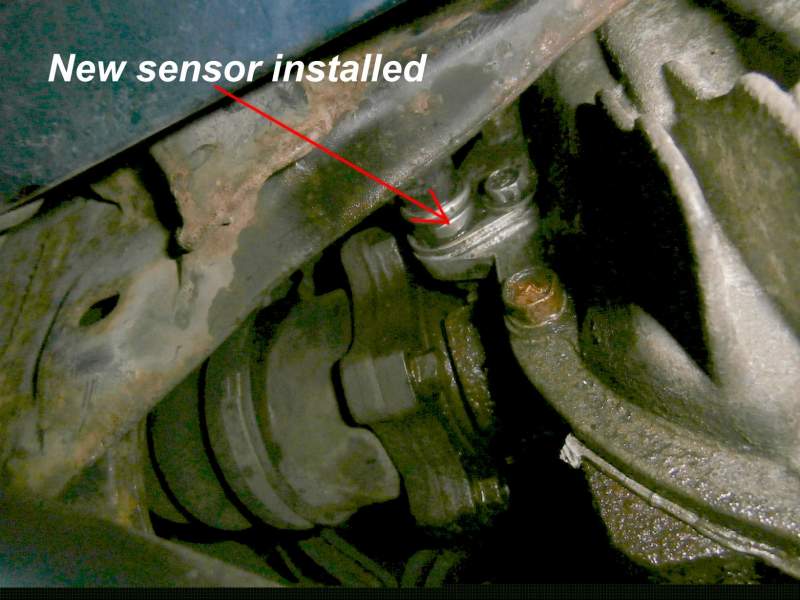
So with some luck and work you will start to see the unit come out of the insert: More turning and more WD40: The sensor will most likely be damaged if as stubborn as this one but if your changing it then its no biggy, the unit will finally come clear. So once removed the insert needs cleaning up and lightly oiling to help the new one slip in without any trouble, once fitted and the retaining bolt done up ( not too tight) then its a case of connecting up and running the car and hopefully no ABS fault light!! Good luck with this guys this was done on a four post ramp standing up, would be a mare on your back on side jacks unless the sensor was one of the few that come out clean. Jeff TT

-
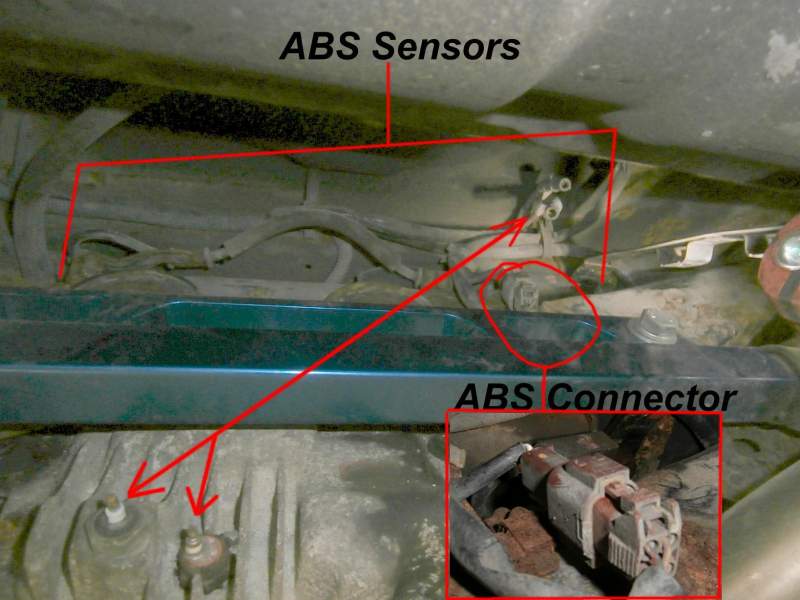
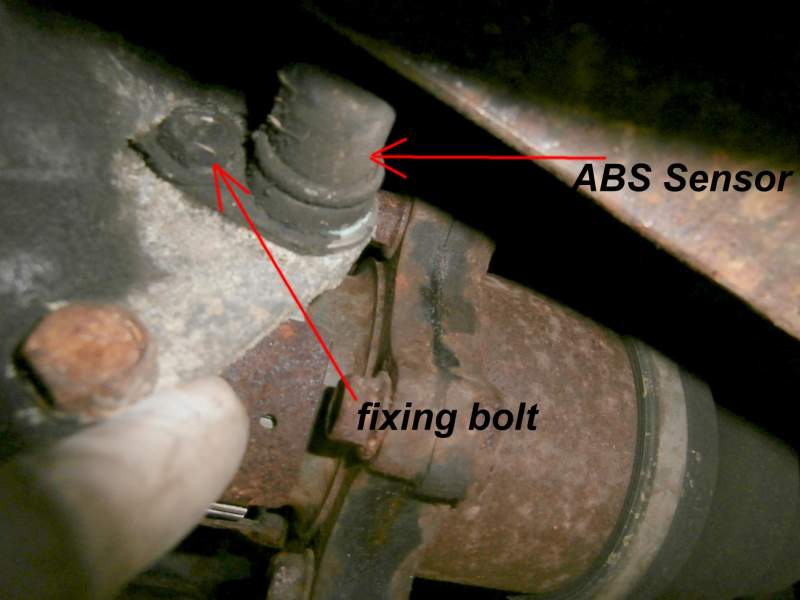
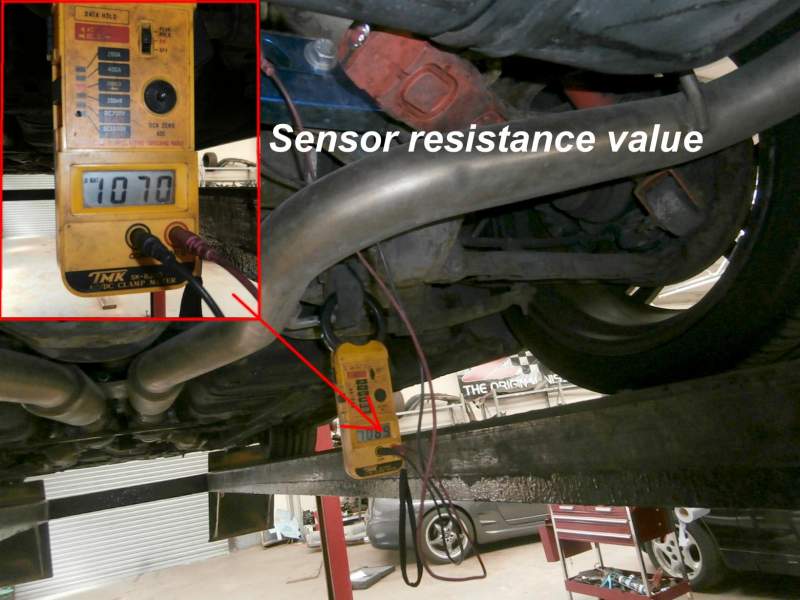
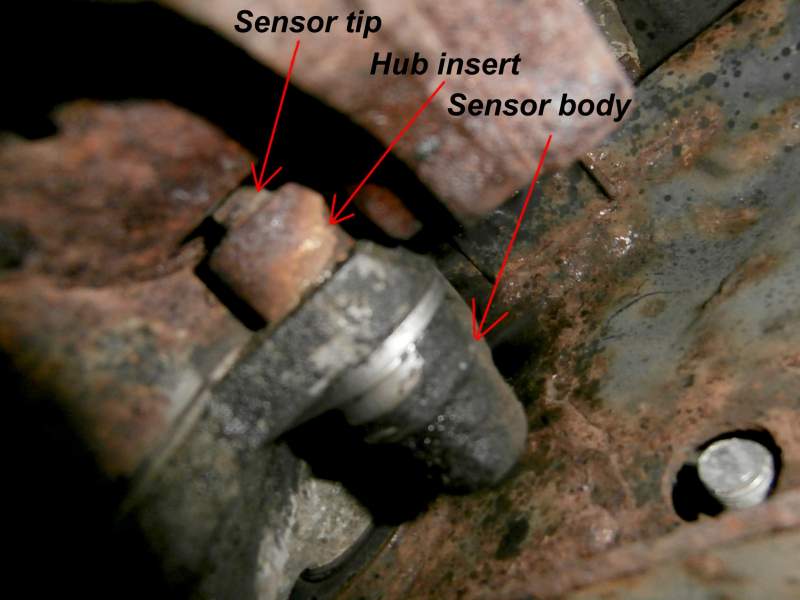
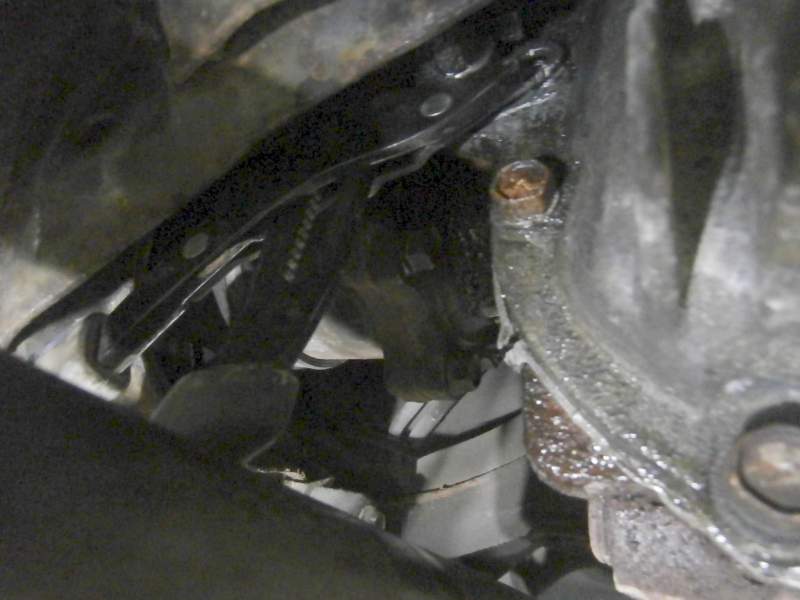
Having seen a question about changing the abs sensors on the diff a week or so ago I had the very job come in the workshop and though a few pics would be useful. As it happened this particular zed had a hicas lock out fitted which made the access a little easier but not by a lot, it made the pics easier though. The sensors on the rear diff do not fit directly into the alloy unit but into steel inserts that are pressed into the diff, now this makes for a 50/ 50 chance of the unit coming out easy, the steel insert rusts and makes the removal a real pain, the most important thing is to ensure the sensor comes out of the insert not the insert out of the diff. As it happened this zed was a little rusty :blink: and the sensor was held fast by rust in the insert, a generous amount of WD40 or similar is required and needs to be re-applied through out the job. The 12 mm bolt needs undoing and its worth using a good ring spanner to be sure there is no chance of rounding it off, also once it starts loosening off is to work it back and forward to prevent its snapping because that will really mess up your day! Of course we had done both in-built diagnostic check and on our specific ABS diagnostic tester but its a good idea to check the sensor with a test meter, the pic shows the good sensor on the drivers side the one that was faulty was the passenger side and was open circuit. As the picture shows the sensor is well rusted in and we had to leave it overnight soaking in releasing fluid. So with lots of WD40 and a good pair of water pump pliars the unit is slowly rotated back and forward with with more WD40 re-applied. Continue.....
-
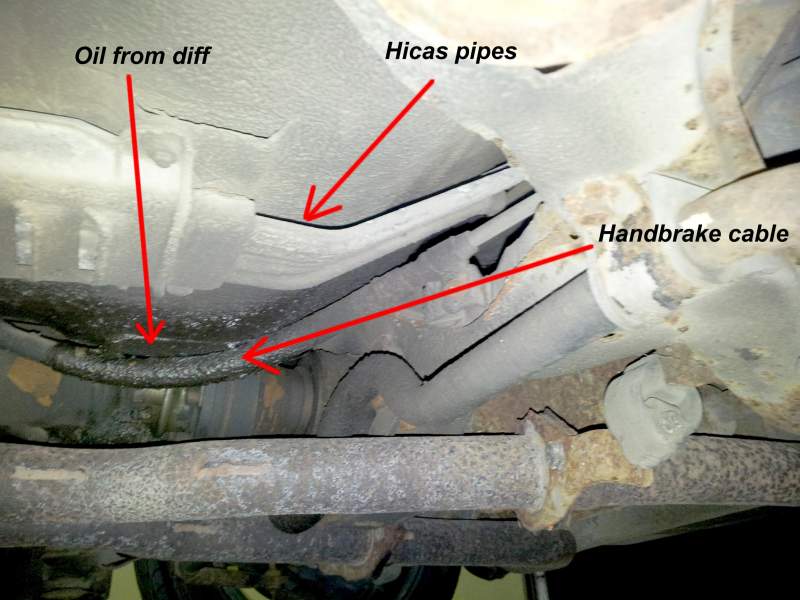
Firstly I have added some detail to your picture and as you can see the oil is from the diff front pinion seal, the other item close is one of the handbrake cables and the cluster of pipes which are dry are the hicas ones. As you mention our passenger side is the leak area then its likely the hicas pipes further forward than the picture is where the leak is, in fact there are some clips over the pipes that can some times trap moisture and cause the pipes to rot through, if it is part of the steel pipe it is quite simple to cut a small section out and fit a new piece in ( high pressure rubber with new clips). Hope that helps. Jeff TT
-
Ok then the timing needs to be set at 25 deg by a timing light and you will have it correct then. Jeff TT
-
If the neutral switch is connected and working 15 deg tdc (at 80c engine temp) If the neutral switch is not connected or not working 25 deg tdc (at 80c engine temp) Both of those values above need to be varified using a strobe light whilst also checking with a ConZult or something similar, in both cases the diagnostic value should be the same as the strobe light value. Jeff TT
-
Bloody hell Graham that's a beast. Lynda Zedworld.
-
Yes the sensor is from us. The solenoid is in the abs unit in the boot, the sensors are in the hibs and fail internally usually by going open circuit, often caused by heavy banging around the hub area, especially common when splitting track road end ball joint etc. always suggest undoing the abs sensor and moving them out of the way when heavy work been done in that area. You can check the sensor with a circuit tester for a complete circuit or and resistance test, or you can spin the wheel and you should get a pulse voltage at the connector. Jeff TT

