Jump to content
View in the app

A better way to browse. Learn more.

300ZX Owners Club

A full-screen app on your home screen with push notifications, badges and more.

To install this app on iOS and iPadOS
  1. Tap the Share icon in Safari
  2. Scroll the menu and tap Add to Home Screen.
  3. Tap Add in the top-right corner.
To install this app on Android
  1. Tap the 3-dot menu (⋮) in the top-right corner of the browser.
  2. Tap Add to Home screen or Install app.
  3. Confirm by tapping Install.

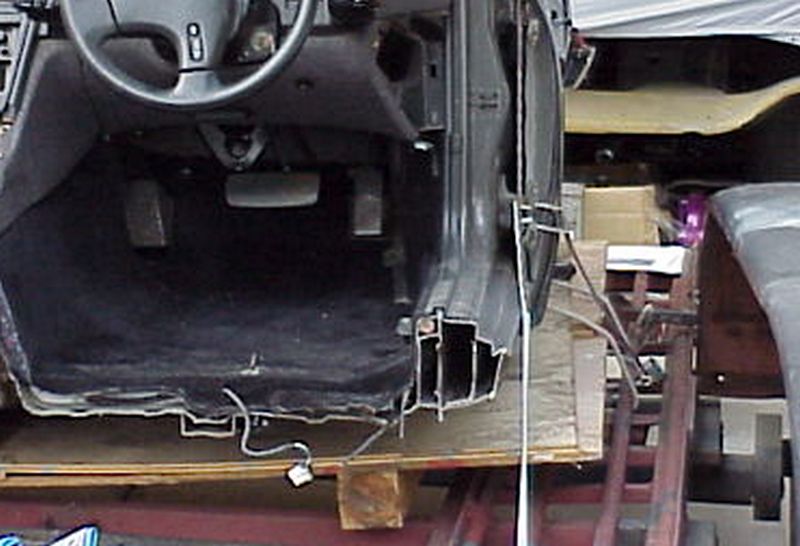
As most of you know, I'm still searching for a zed worth getting.


I might have found one, but although the owner claims it's rust free it has these bits. Is even this enough to possibly avoid it, or is it likely to be able to be ground back and repainted?


315a16604b1f685ffa84f0c081295e63.jpg


e9881c279917058a0cbd5aa8af3addc0.jpg


7f6fb2445461e65fefa9147ce8f6ced4.jpg


35ec4b45080ad2f0aa9062fdec64ebf0.jpg

  • Replies 52
  • Views 4.7k
  • Created
  • Last Reply

Top Posters In This Topic

Posted Images

Featured Replies

Your best route to a rust free car at a reasonable budget is to import your own or a fresh import from japan. I've had a couple of Zeds and a couple mitsubishis fresh off the boat as first UK owner. The underside, chassis components, suspension etc all looked like the car was less than a year old. Not a spot of rust anywhere. Zinc/cad plated washers that were 16yrs old looked like they'd been fitted last month. You'd be amazed at how fresh jap imports are.


As long as there's been no serious accident damage which might give rise to rusty repairs, a fresh import will be your best bet for rust free.


I can highly recommend buying or borrowing a borescope to look inside the body cavities/sill sections etc of any zed purchase. I have seen inside some real minters (zeds) and could see surface rust that the owner would've sworn wasnt in his car. He didnt know until the camera went in. It looked mint and was original on the outside. Get a fresh import and spray every cavity with Dinitrol/Bilt Hamber/3M cavity wax and it'll outlast you.

Awesome work, thanks for the link. Any idea how much the sill repair would have cost?


You will have to speak to bodymech im afraid. Awesome work though eh?

  • Author
This might help you make your mind up.


http://www.mig-welding.co.uk/forum/threads/thanks-everyone.15465/


Mine did not look as bad from the outside, it's only when you dig deeper you find the real extent of the corrosion.

Just gone through that thread, and bloody hell, the amount of rust it had was worrying. Congratulations for doing all that yourself!

Looking at the red Zed also they have made a sh!t£ attempt at spraying over the corrosion etc... Like Si said its inside what counts. (Sounds like a love story!!)

It's because of the targa roof, the drain channels stupidly end inside the shell instead of letting out in the wheel arches. The fronts behind the indicators somewhere, and the rears somewhere within the shell where the water does up using the sills as a drain. Absolutely stupid. I'd expect this means even fresh imports could potentially already be rusting away.


The rear targa drain hoses run from the roof right down to an exit in the sill, if you use a torch and mirror and look hard you will see the end of the hose just peeking through the sill exit (well mine do anyway). You can slowly pour water down the rear targa drain holes and check the water cleanly exits. You can also see sections of this drain hose on its travels by looking behind the appropriate interior trim.

So, my point is that the sills don't just fill with water, well their not supposed to anyway.

My current Zed, an '89' plate is currently not showing any sill problems. They are nice and solid.

My previous Zed, a '93' plate also had no rear sill issues during my time with the car, so it is possible to find rot free car.

Sure there will no doubt be some hidden surface rust beginnings somewhere, but that's what Waxoyl or similar is for, it is supposed to kill existing surface rust and protect from further corrosion.

The best way to protect these cars (sadly) is to limit their use to fair weather only, mine very rarely sees a wet road, certainly not a wet and salty one! That way the targa's don't have any water to drain!

I am also lucky enough to keep mine in a good damp free garage. Makes a massive difference.

Edited by lonezedder

Same; they're old cars now and I'd hate to leave mine out in the shitty weather, let alone drive it in the winter with salt all over the roads (might as well throw gravel all over it and pour sodium chloride all down it). I think, in the 10 years I've owned mine, it's been in the rain maybe 5 or 6 times (that was getting caught short). It gets its use though, I use it A LOT in the summer. I don't see the point in driving it in the winter if you don't have to. Generally the roads are slimey and you can't put the power down, lighting is poor, there's a lot of debris on the road and more accidents. I don't like driving in the winter, so leave it for pleasurable summer motoring. :)


As for the drain holes, they tend to collapse after incorrect jacking, this will cause drainage issues and subsiquently rust. I've had a boroscope inside my inner arches and sills. Thankfully, there are absolutely zero signs of even any tarnish. :)

Edited by Funkysi

I'm looking under mine tomorrow as I have a day off!

image.jpg

Mines an import!

Here it is in UK!

image.jpg

And a here & now photo

image.jpg

No mention of rust on my MOT inspection!

Art- if you want to keep it rust free, get every cavity, sill section (4 sheet steel parts within some sections of the sills), inside doors, pillars, arches etc rustproofed with the best rustproofing liquid you can get (waxoyl is not the best - though better than nothing)

As said before, they rust from inside out, so when you start to see it- too late to call it surface rust. It's like an iceberg, only a little visible on the surface!

Thanks for the advice! Can get inside doors, how do I get into the body cavities?

Extension probe. Dinitrol is one of the better products you can use. I wouldn't advisd doing it at this time of the year though. Cavity waxing is best when it's hot. The product will flow MUCH better when it's hot.


Also, thoroughly clean the wheel arches and floor pan and paint with a few coats of satin black Hammerite paying particular attention to the wheel arch lips and inward facing external sill seams.


Then when it's hot, take the boot panels out, rear quarter trim and sill finishers and coat as deep down as you can. Inner arches (as far into the lips as possible), inner sills and quarters, inner well behind the inner arch and the inner floor pan seams.


It's a VERY messy job.

When you are using cavity wax in the sill sections (I used Dinitrol aerosol cavity wax with 60cm lance) it helps to know

where you are trying to get to with the product. This photo shows the complex sill structure in cross section. You can get

at the various sections from inside the car, the plastic door sill plate fixings and the hole at the front of the sill located

behind each front plastic wheel arch liner.


MVC-001Fc.jpg

Project 1547 - Out of the Blue

She's so fine, there's no tellin' where the money went - Simply irresistible.

When you are using cavity wax in the sill sections (I used Dinitrol aerosol cavity wax with 60cm lance) it helps to know

where you are trying to get to with the product. This photo shows the complex sill structure in cross section. You can get

at the various sections from inside the car, the plastic door sill plate fixings and the hole at the front of the sill located

behind each front plastic wheel arch liner.


[ATTACH=CONFIG]86161[/ATTACH]


You have all the best reference material! Great pic!

When you pull back the carpet from the inner sill you'll see tape over circular holes in the inner sill metal. Remove the tape to open up the holes and put the probe in there. You have to finesse it about in order to get through as many of the steel sections as possible. The holes go right through to the outer sill but they're staggered so it's not straightforward.

Time consuming and as Si says very messy but a great investment.

I sold a 1975 Lancia Beta coupe a few years ago that had been dinitrol'd when new and redone over the years, it still had original sills and chassis legs etc and was in spotless unwelded condition which is amazing when you consider that 70's Lancias rotted away to scrap within 3 years.

If the drain tubes are stuck inside the sills instead of poking out of them, is there any way of getting them back in place?


You could probably open up the sill seam at that point and replace the metal tubes, ideally with longer sections of tube to make it easier to reconnect the plastic drain tube .

That's great advice AG &. Si.

The times I have taken the Z out & it's been wet, I've jet washed the arches & underside.

Just about to jack the car up & take a look under the car.

If the drain tubes are stuck inside the sills instead of poking out of them, is there any way of getting them back in place?


Yes, if you take off the rear quarter interior trim panels either side of the bench seat, you can see and reach down to the point where the rubber hose joins the sill drain to reposition it.


The metal drain tube at the rear is part of the sill structure, a rubber hose comes down the B pillar from the hole in the top targa channel, to join this metal tube. Unfortunately, it often gets damaged when jacking which can result in the water draining into the sill section. Also, what tends to happen is, over time, the rubber hose shrinks and becomes too short to reach the sill metal drain tube. Or in the case of the front drains, it pops off at the most difficult place to access and spills water over the fuse box and other nasties!

Is it possible to put all new tubes in from top to bottom?


Yes. However, the front would require a bit of strip out to access the drain points into the front wing and the rear hose runs up inside the b pillar, so would be difficult to push up onto the drain point securely. You should be mindful of that before you remove it, possibly considering other options first.

  • Author

Just a thought that a new rubber pipe all the way would be better than 20 year old bits and bats joined together. That way, I could leave more poking out of the sills too, maybe even anchoring it in place somehow to stop it ending up back inside the sill.

My hose is nice and supple.....


See your GP for some wee blue pills, excessive suppleness shouldn't be a problem in this day and age!

I replaced mine with a single piece of hose all the way from the top right through the bottom of the sill with plenty spare. I still need to actually attach them somewhere to hold them in place. There's no old pipes to split or joins to come apart so shouldn't ever see a drop inside again.

Having said that, after all the welding work I had to do its not seen rain since, nor will it! :D

Join the conversation

You can post now and register later. If you have an account, sign in now to post with your account.

Guest
Unfortunately, your content contains terms that we do not allow. Please edit your content to remove the highlighted words below.
Reply to this topic...

Recently Browsing 0

  • No registered users viewing this page.

Important Information

Terms of Use

Configure browser push notifications

Chrome (Android)
  1. Tap the lock icon next to the address bar.
  2. Tap Permissions → Notifications.
  3. Adjust your preference.
Chrome (Desktop)
  1. Click the padlock icon in the address bar.
  2. Select Site settings.
  3. Find Notifications and adjust your preference.