Jump to content
View in the app

A better way to browse. Learn more.

300ZX Owners Club

A full-screen app on your home screen with push notifications, badges and more.

To install this app on iOS and iPadOS
  1. Tap the Share icon in Safari
  2. Scroll the menu and tap Add to Home Screen.
  3. Tap Add in the top-right corner.
To install this app on Android
  1. Tap the 3-dot menu (⋮) in the top-right corner of the browser.
  2. Tap Add to Home screen or Install app.
  3. Confirm by tapping Install.

Wiring up a KPH to MPH converter - how? (LARGE PICS)

Ok,


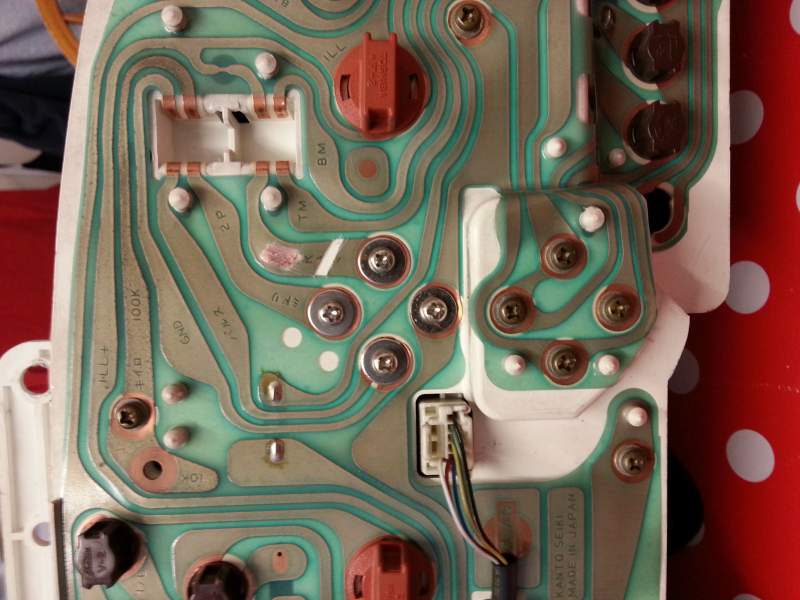
I have these nice clocks -


saCdvw3.jpg


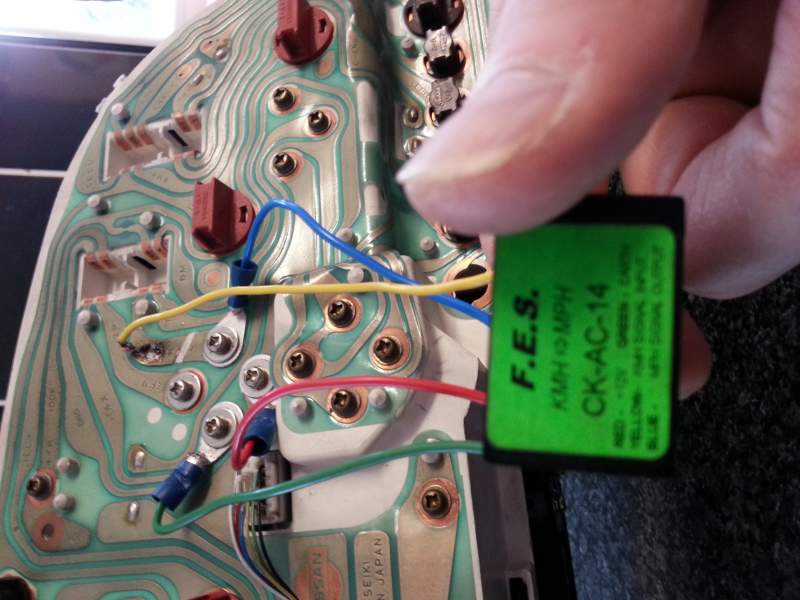
and with help from the seller, I have wired up the KPH to MPH converter I got with them, as follows -


f0Pw4rF.jpg


You'll notice I have one light orange (dark yellow maybe) wire with a spade on the end that is not connected. I'm told this needs splcing into the main clock loom.


That's great, but which wire?


Left or right -


zSdxYdw.jpg


I think, one of the left ones...makes more sense -


p1EMAG0.jpg


...but could be the right -


gl80zJa.jpg


I'm not sure what effect splicing into the wrong wire could have, but I imagine it cant be good.


Any help would be greatly appreciated! :)


EDIT - I found the sellers original intructions -


Black - Left

Red - Low mid

Green - Right

Yellow 4th wire on right loom plug


So which is the 4th wire on the right plug?

Edited by MasterCookieman

  • Replies 26
  • Views 5.2k
  • Created
  • Last Reply

Top Posters In This Topic

Posted Images

Featured Replies

Black and red ones are connected correctly.

The other two need splicing into the speed carrier signal wire. Unfortunately I can't remember which wire that is and all the stuff I have on it is on my laptop at home.

Zed #2: 1998 Midnight Purple 2+2 NA. (owned 2020 - now) 

Zed #1: 1995 Blue Slicktop NA (2013-2015)


No need to cut into the loom, do not like that method myself keep it all on the back of the cluster, have modified your picture to show how.


Four simple stages


1 Cut out section of track

2 Cut off spade terminal

3 Clean off track coating with a blade to reveal copper strip

4 Solder cable to copper strip


Jeff TT


speedo.jpg

Sorry to hijack the thread a bit..... I have converter on my JDM and seem to have the MPH reading as KPH and the KPH ring as MPH......

The outer ring with big numbers is marked as MPH..... I am guessing that someone has swapped the clocks for UK ones and still fitted the converter????

Driving me nuts now.....

Remove converter?

I am guessing the previous owner did it to remove the 'bing bong' speed annoyance..... lol

Edited by veilside01702

Watching my Z disintegrate on my driveway!!!

I never personally like cutting the tracks as after you do there's no going back,


Jumper link cable soldered back in.


Jeff TT

Sorry to hijack the thread a bit..... I have converter on my JDM and seem to have the MPH reading as KPH and the KPH ring as MPH......

The outer ring with big numbers is marked as MPH..... I am guessing that someone has swapped the clocks for UK ones and still fitted the converter????

Driving me nuts now.....

Remove converter?

I am guessing the previous owner did it to remove the 'bing bong' speed annoyance..... lol


If you have UK clocks there is no need for the convertor, if you want rid of the bong you can either take off the box to the left rear of the dash binnacle or snip the wire to the box.

If you have UK clocks there is no need for the convertor, if you want rid of the bong you can either take off the box to the left rear of the dash binnacle or snip the wire to the box.

Think I need to pull dash..... and have a look what they did...... lol

Watching my Z disintegrate on my driveway!!!

Aaahhhhh youve cut the wrong track :scared::scared:


:lol::lol: only joking, now go and test it lol

  • Author

Well thanks for that! I could only see the top half of your post on my phone, so I did actually freak out a little!! :)


Sent from my HTC One using Tapatalk

Aaahhhhh youve cut the wrong track :scared::scared:


:lol::lol: only joking, now go and test it lol


OOooooooh you nasty person you........... ROFL.....

I have to say the soldering could do with cleaning the soldering iron tip, tinning the tip with fresh solder and then a quick reheat and feed in solder to that joint as looks like it hasn't flowed very well and could cause future problems....

I wouldn't want it to come away when it is all back together......

Watching my Z disintegrate on my driveway!!!

  • Author

I haven't soldered in many a year, but fear not, I used flux and made sure it had a very good contact. No way it's coming off! :)


Sent from my HTC One using Tapatalk

  • 1 year later...
Well, the deed is done!


q5jKPIE.jpg?1


Right i need to do this but my colours are wrong conpared to your pics. But i will post a pic up

Right heres a pic of the clock pre prepared for soilder and a pic of converter to tell me what were the wires go

20150624_162043.jpg

Edited by Spin Doctor

Your Yellow wire is the one that needs soldering onto the track.

Your blue on is the one that is screwed on after the track cut.


Red and Green should be obvious as they are the power and earth (red and black in previous example)

Zed #2: 1998 Midnight Purple 2+2 NA. (owned 2020 - now) 

Zed #1: 1995 Blue Slicktop NA (2013-2015)


Cheers lex not the neatest job but its not going anywere ill try this tomorow and should solve a long term issue. Thanks

20150624_183208.jpg

Edited by Spin Doctor

Be done with and get some UK clocks. Much easier and better! :)


PS....time to cut your nails! :p

  • Author

I never reported back on my post, mine worked fine after the slice and dice. I haven't been on the road yet so it so it could be reading the wrong MPH, but the needles all move as expected. :)


Finally after finding a 12v supply powered when the lights were switched on, I wired up the ELs, and they look like this -


zrdWM7F.jpg?1


I'm a happy bunny.

Join the conversation

You can post now and register later. If you have an account, sign in now to post with your account.

Guest
Unfortunately, your content contains terms that we do not allow. Please edit your content to remove the highlighted words below.
Reply to this topic...

Recently Browsing 0

  • No registered users viewing this page.

Important Information

Terms of Use

Configure browser push notifications

Chrome (Android)
  1. Tap the lock icon next to the address bar.
  2. Tap Permissions → Notifications.
  3. Adjust your preference.
Chrome (Desktop)
  1. Click the padlock icon in the address bar.
  2. Select Site settings.
  3. Find Notifications and adjust your preference.