Everything posted by zedwizz
-
If you can arrange a Kylie and Danni manougue sandwich Steve then you can have a set for free hell, I’d LED your whole car lol The plan will be to sell these with plug an play connections so you would only need to plug them in to where you would normally plug in the oem light bulbs and a option of two pre wired Load Ballast Resistors for the indicators or If you wanted LED's back and front then you could just replace your oem flasher relay with one designed to work with LED's. Martin
-
Thanks Im very pleased with them. Just a few alterations to do
-
Thanks Graham. What condition are the unit you have? The lenses on my unit aren’t the best. The plan was to put the resistors on the back but lack of space on the ends and parts of the mid sections between the board and the light unit put pay to that. Im no electronics expert so I use a LED array design program, which gives me the resistor, values to use in this case 1/4 watt. Do you think this is enough Graham ?
-
Thanks Si The units i used were slightly damaged when i got them so the lenses arent in the best condition but, i will clean one up and put it on and take some picturers
-
im no computer expert but it works for me lol
-
sign in to your photobucket account goto the album where the picture you want is hover your mouse over the picture you want and a menu appears move your mouse down to IMG code and left click once on the code then right click and copy paste the IMG code into your post message
-
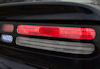
Finally finished installing the components and fitting out the light unit. There is a gap of LED’s in the middle of the top section because this is where the reflector sits on the outer lenses so I decided not to install any LED’s here because you would not see them behind the reflector. What do you think? Now for the big switch on...
-
The yellow plug is called a Junior Timer 2 way connector and you can get replacements from here: http://www.thetoolboxshop.com/0-012-71-junior-timer-2-way-connector-2420-p.asp You may have to mod the key way in the plug. The Zed uses a number of these in the engine bay from injectors to ECU water temp etc.
-
I did and very good pictures they were to lol thanks again jaikai andyzx i use photobucket just upload your pictures then copy the IMG code and paste simple. Photobucket is also free :clap::clap:
-
:lol::lol::lol:
-
Thanks Graham. It speeds things up without a doubt but I thought I’d put a little more thought in to it lol Not sure of price yet components and materials alone come to £109. I have just got to tot up the hours but these wont be anywhere near $1900.00 price tag for the clear corner ones and as I will be selling these as a kit to fit into your original units instead of buying the hole unit so should make them an affordable mod.
-
Hi Steve, thanks for the comments mate the rears should be done very soon.
-
I'm a working boss :hammer::hammer::hammer:
-
Not long now ...
-
what a lot of holes lol. The first board is now filled with LED's and ready to solder. only three to go...
-
lol sorry mate that positon has already been taken but thanks for the offer.
-
All depends on demand but the first batches will be done by hand. A company near me has a wave solder machine but I would need a large volume of orders to make it viable
-
Thanks Si Im using 5mm through hole LED's but 3 different types to get into the corners. Type 1 are normal sized 5mm LED's with a height profile of 8.6mm, Type 2 are again 5mm LED's but with a height profile of 6.5mm known as flat top LED's and Type 3 which again are 5mm LED's but with a height profile of 4.7mm these are know as straw hat LED's. These had matching brightness and appearance when on. There are issues with clearance between the lens and the LED's in the corners but the shorter profile LED's should be ok in the corners. The indicator units contain 190 LED's per side and the side/brake units have 196 LED's. I’ve looked at the SMD LED's and they do look a bit difficult to solder but if these units don’t look right when finished then I may try these next.
-
update After a lot of work getting this right especially the ends the circuit for the rear LED lights are finished yeah. Here are a few pictures of the tracks, which will be mounted on to mirrored Perspex before installing the LED’s and resistors. The tracks that look gery still have toner on this will be removed before assy.
-
Wasn’t the company that offers extended car warranties and advertises on the TV come from the Dragons den?
-
if need any help let me know Martin
-
Tudor this was something I looked at but the sealing rubbers will still provide a good seal against the rain. The test car the first lot was fitted to never let any water in. Martin
-
I'll check this out over the weekend. The test car was an auto which was also fitted with parking sensors and i cant remember it having this problem.
-
When i was a kid my dad got me a Hoilday buggy great starter R/C car then i saved up my pocket money and brought a Rough rider. Cant remember what happened to them shame. I got a rough rider rolling chassic of ebay for £40 a few months ago so im going to rebuild it.
-
That bullhead looks good. Must try not to get to drunk tonight and buy one of ebay lol
