craig
Main Committee
-
Joined
-
Last visited
Everything posted by craig
-
 What reference did you use please, so I know it's yours when I see it. Edit: Don't worry, found it, matches your name on email. Thank you.
 -
I applied for club stand using the form, but Karen emailed me back to say it was a single vehicle application. I have asked her to clarify what i need to do next, but not see a reply yet. If you could follow up with her, that would be great. Although it might be prudent for people to apply individually anyway, and mention the club on the form.
-
Nice one Steve
-
I am sure I applied as a club, but I received a single vehicle exhibitor pass back today, so I would suggest you all apply individually, and we can meet up somewhere close and arrive together.
-
probably not until thursday or friday, when i am working from home and can have another go at 5pm onwards. or the weekend. until then, i dont get home until it is dark during the week.
-
thanks Chris, that's the bit i was hoping to avoid, but seems like not much choice really. i will then have to work on removing more of the previously untouched nuts and bolts, and possible issues with that, which is more problem than my experience can cope with. may have to find a way to get my daughters boyfriend onto the problem, i am sure i can find some leverage with him :lol:
-
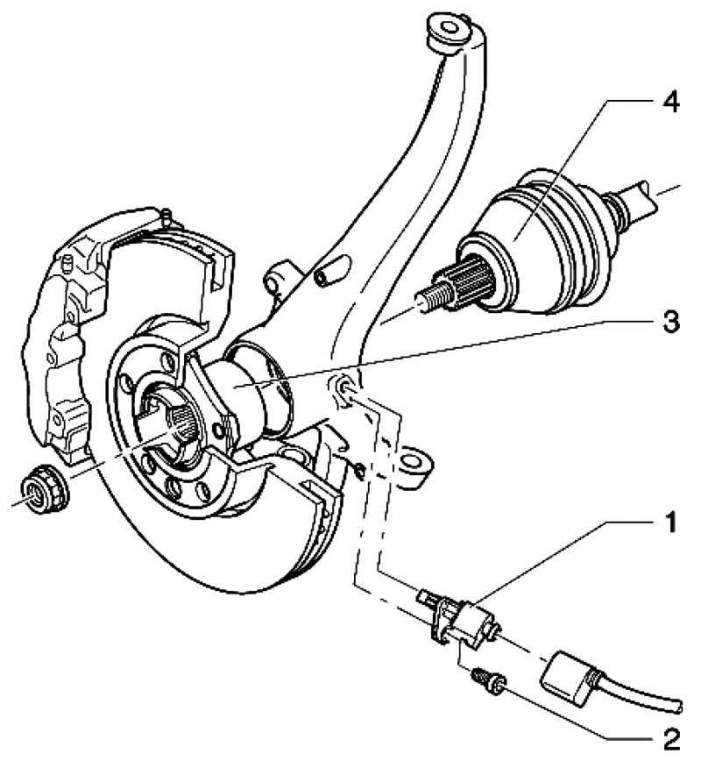
haha yes, the diagram was left side, but the photo and problem is the driver side, thanks Chris(bas). If the remaining part of the sensor is now effectively through the slot, and the inside part is no longer there, how is it still "hanging on"? If while carefully drilling through the slot and into what is left of the sensor, part of the sensor falls into the hub void, do i need to worry about that, or will it eventually works its way out of the 1-2 mm gap around the drive shaft?
-
i run out of knowledge and ability really quickly when something doesn't go to plan though Chris :lol: plus i only have weekends. like, what do i do if the track rod end just starts to spin when i try and undo it, without having a bunch of other tools that i dont own. here is a pic of progress so far.... I think the "hole" turns into a "slot" further in, and i think i have reached that point. i think i have also now got a metal element of the sensor, rather than just plastic casing, to try and drill into

-
sorted this morning for you cozza
-
Got a screw into it, wouldn't budge, screw broke off inside. Grr. Managed to melt some of the remaining plastic to get some grips on and remove the broken screw thread. Drilled some of it out, dug some out, broke a drill bit in there too, and still not got all of it out. Grr. Just absolutely destined to fail on this. :cursing: Now to decide whether to start taking the whole assembly off, track rod end, calipers, brake line, mounting bolts, wheel hub, or just put the wheel back on and take it to a garage and let them fix my **** up, assuming it still drives ok. The fault makes it keep locking the brake when trying to read the sensor, but not sure if I have pushed anything further into the hub now.
-
Is that your recent remodelling? I like what you've done with your place Andrew :lol:
-
thanks Chris, that "some other way" is the method i am aiming/looking for :lol: the plastic end sticking out is about 5mm long, since it is broken where the probe attaches underneath the retaining nut collar, so the connector and collar are not there now (or will be removed once i cut the final internal cable holding them together. i will try clamping around whats left, i have some small surgical locking clamps which look like they will attach easily, and then try heating up a long thin self tapper to screw in to the end of whats left of the probe i think. Could also try heating up the hub a bit, if that helps. am sooo looking forward to this saturday job.... :no:
-
yes, its the "out the other side" but i am worried about Chris, as it doesn't seem there is an "out" unless i take it apart. but like i said, i will have another look with fresh eyes on saturday, and maybe a take a couple of pics if i am still worried about it disappearing, lol. maybe it would be more obvious if i take the disk off, it might expose where the end of the sensor is. i have found a diagram, part 1 is the sensor

-
i was worried about any part of it falling into the hub? if it loosens off then drops inwards before i can pull it out? being nothing like my day job, i can only worry about the implications of something going wrong.. :lol: I will take another look before i start drilling etc, as i might have not pictured the whole thing properly, but thats how it looked.
-
I am not sure I will be able to see the end of the sensor even with the disk off Graham, it seems to be inside the hub? It looked like I would have to remove the drive shaft to be able to see the end of it, but I am not completely sure. It sticks out slightly from the connector end Chris, where the connector is now broken off. If I whack it, it will disappear inside the hub I think. It's definitely not threaded, just slides in. Will be having another go at it Saturday, so have until then to draw up a plan, or entice someone over with the promise of tea and cakes, :lol:
-
Got an ABS fault code, which turned out to be front right wheel sensor. These are supposed to just undo the retaining bolt and slide the probe out of the hub, about 25mm of probe I think? But I guess 10 years of crud build up and heat cycle means I can't get it out, and the electrical connector part has broken now as well meaning nothing to pull it out with by hand really. The probe is sticking out about 5mm, but if I clamp with pliers or grips too much that will eventually wear down to nothing as its plastic. I had thought about a self tapper, but not sure I can get it started without pushing the probe further in if it starts moving, and possibly giving myself more ball ache having to remove the whole hub assembly and take it apart? I could maybe heat the self tapper up and melt it into place with a couple of turns and cool it off before pulling? Anyone got any tips or experience having to do this before?
-
Ah, must have just been me that applied separately then... :lol:
-
Last time, I think we all applied individually, but mentioned the club on the application? Can probably all do the same thing again, and I will send a covering email to let her know that.
-
Went to the reps meet today, saw the layout, got the lowdown on whats going on. The space allocated for us is ok, fairly central to the action, no problem here. They seem to be trying harder to keep people entertained, and utilising a lot of the indoor space for show'n'shine and other special activities. Guessing it might still be a lonely place to be on the club stand at the moment though :-/ Also, Sunday clashes with another local event now.
-
I have been emailed about this event again, on 3rd September this year. Apart from being a bit chilly last year, I enjoyed this local show. It clashes with JAE, although that doesn't seem to have much interest again this year.... Register your interest here and I will send off requesting for 10-15 cars I think.
-
nice one. changing colour, or staying the same and just getting a refresh?
-
might be able to make this too
-
1. Craig 2. (adl) phoenix 3. ZEDDash 4. art213 5. BedZee Man 6. eddZ32TT 7. kgonzokia 8. Chrisbasildon 9. veilside01702
-
i will go through the thread later and add to the list which i started on the first post hoping people would quote/add themselves :lol:
-
i might not be able to get a picture in time for the closing date, but in a similar position to Stephen, would replace the silicone ones that are already installed. also, don't have a sob story, but could start a similar thread with the ones i replace once swapped, which are perfectly fine. a bit of charity regurgitation :lol: aka hand me downs