Jump to content
View in the app

A better way to browse. Learn more.

300ZX Owners Club

A full-screen app on your home screen with push notifications, badges and more.

To install this app on iOS and iPadOS
  1. Tap the Share icon in Safari
  2. Scroll the menu and tap Add to Home Screen.
  3. Tap Add in the top-right corner.
To install this app on Android
  1. Tap the 3-dot menu (⋮) in the top-right corner of the browser.
  2. Tap Add to Home screen or Install app.
  3. Confirm by tapping Install.

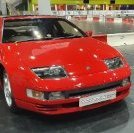
ADAMZX's OEM+ 2000spec Version R Replica Conversion & Rebuild Project Build Thread


Me:
Adam, born 1983, interests include movies, cars, computers and video games.
 
Personal Information:
Married to my beautiful wife Pauline in 2013, our first child Sebastian was born in 2014 and our second child Alessia was born in 2018.
 
Current Job Employment:
Working as a Retail Team Leader (RTL) for Repco Auto Parts, currently stationed at the Roxburgh Park store since 2016.
 
300ZX Experience:
Z32 enthusiast and novice mechanic since 2006.

Model:
12/89 Japanese Domestic Model (series I) None turbo 2+2 Automatic. chassis #GZ32-003944

Build Description:
Complete 2000 model retrofit and OEM+ restoration

Mileage:
Purchased with 97,220km and when I began this build project, the car had reached 190,483km

Body Colour:
OEM Metallic Silver (Paint Code: #673). resprayed in 2012 in same Metallic Silver.
 
Bodykit:
Complete OEM 2000 model body styling retrofit.
 
Engine Type:
OEM 3.0 Litre V6 2960 cc (Code: VG30DE) original engine.
 
Transmission Type:
Purchased with 4 Speed Automatic (Code #re4r01a). Replaced in 2007 and then replaced again in 2017
 
Interior Colour:
Purchased with original Grey Tweed (Code #G), retrofitted with OEM Blue Velour (series II) interior 2012.

Arrival modifications:
NOS Sticker on interior rear view mirror, otherwise bone stock fresh import from Japan.

Bad parts on arrival:
Cracked front bumper bar, plenty of minor scratches and marks on OEM body paint work, badly rusted battery tray, damaged drivers seat side bolster, missing OEM scissor jack and tool kit, no OEM stereo installed and the dashboard had the common lifted demister vent damage

Date of purchase:
September 2006
 
Build Project Start Date:
January 2012 to November 2021

Build Budget:
For Parts the budget was unlimited from 2007-2012 (estimated spend was around $60k-$70k)
 
For paint/bodywork the budget was strictly $5k no more.
 
Between 2012 to 2021 the budget for the build had diminished to almost nothing, with only essential repairs and general maintenance allowed to be spent on the car.


My 300ZX’s Story:
The 300zx was been a car that I fell in love with back in 1997 after playing the original Gran Turismo video game on my PlayStation gaming console as a young 14 year old, with the car’s stunning futuristic aerodynamic body styling being the biggest factor of why I love the 1990 Nissan 300ZX Z32 model.
 
spacer.png
 
In 2006 after several years of looking, I finally found an affordable 1989 Nissan 300ZX Z32 to buy in a none turbo 2+2 automatic configuration which had recently been imported into Australia that same year from Japan. I purchased the car for $7550, and it was the biggest day in my life up to that point and I remember having the biggest smile on my face the whole trip home as I was thrilled to finally own my very own Nissan 300ZX.
 
spacer.png
 
Over the next 5 years of ownership, I learned a great deal about the ins and outs regarding the Nissan 300ZX and the community that supports it. I attended many community events including tech days and several victorian based car cruises to places like the Great Ocean Road and the Goldfields to name a few. Over those 5 years I  have also had the pleasure of meeting a great many amazing and passionate Z32 owners who like me love this car for what it is, a great and unquie japanese sports car. I am glad to have meet them and they will always be life friends to me.
 
spacer.png
 
When I purchased my nissan 300ZX, I quickly developed a desire to not just restore my 300zx over time but I also wanted to upgrade it to that of the latest 300ZX model Nissan had ever produced, that being the 2000 Version R 300ZX model sold only in Japan, and are an uncommon sight to see here in Australia and still to this day. 
 
[IMG] 
 
To complish my goal I spent 10's of thousands of dollars sourcing and collecting brand new, rare and optional OEM 300ZX Z32 parts from the United States and Japan over the span of 4 years in an attempt to create the world’s first fully optional Nissan 300ZX that could have ever existed.
 
spacer.png
 
In 2012 I had to begin the build phase of the project ahead of sechdule as my partner and I were in the process of organising our wedding day and honeymoon events that following year and so in order for me to help out with paying for some parts of the wedding, I stopped my part sourcing efforts and began the complex task of planning out the dismantling and reassembling phase of the project.
 
It took me 12 months of hard work to strip down my car and then reassemble it using all of the new and used parts that I had been sourcing over the last 4 years to make it as close to a 2000 special edition model as I could. I was extremely proud of the amazing work my Dad and I had accomplished with the build and I brought the car to its first official outing on the 2012 GOR cruise and the response from the community was very positive and lots of intrigue.
 
spacer.png
 
After 2012, my new and improved daily driver was driven as much as possible, almost everyday. The car collected over 100,000 kms after 10 years of driving and though the car was basically finished, I still managed to find more and more rare and optional parts as the years past by and depending on finances new additions to the car we installed but the car remained as is for last 11 years or so.
 
My 300ZX’s Big Accident 2021:


Rebuild Project Start Date:
November 2021 - ongoing
 
Rebuild Budget:
Insurance payout was $8k after the accident, but the budget has since blown out to an additional $2k with more finances required to complete the rebuild.
 
Rebuild Project Plans:
Obliviously the main goal of the rebuild is to get the car back to a drivable state and repair the damage, so the car will look like it did before the accident occured. I also feel this is a golden opportunity for me to continue finishing off my original build project that I never really finished back in late 2012.
  • Replies 126
  • Views 6.3k
  • Created
  • Last Reply

Top Posters In This Topic

Most Popular Posts

  • DJ_Party_Favor
    DJ_Party_Favor

    PARTS ACQUIRED DURING THE MONTH OF JANUARY So this month I actually recieved a couple of rare emblems or badges mainly for the new nose panel setup Im going with for the rebuild. I was not expect

  • DJ_Party_Favor
    DJ_Party_Favor

    PARTS ACQUIRED DURING THE MONTH OF MAY Finally after 2 months of no new parts coming in for the project, May has seen a number of big purchases for the project. I had a big parts order from Nissa

  • DJ_Party_Favor
    DJ_Party_Favor

    PARTS ACQUIRED DURING THE MONTH OF JUNE For this months parts acquisition, I received a very special and as far as I can tell, rare OEM part which ended up coming from all the way in Europe of al

Featured Replies

  • Author

DISASSEMBLY PROCESS OF MY SPARE SET OF OEM REAR BRAKE CALIPERS

After successfully tearing down my original pair of 1989 non-turbo front OEM brake calipers, I decided the best way to build on that experience was to dismantle a spare set of OEM aluminum rear brake calipers from a 300ZX. In theory, the rear calipers should require much the same disassembly process as the fronts, with the main difference being that each rear caliper only contains two hydraulic pistons rather than four.

One other notable difference, however, is the overall condition of these rear calipers. Unlike the fronts, these are in fairly poor shape, with heavy grime buildup and a significant amount of rusted hardware that I expected would make the teardown more challenging. Despite this, I was confident I could fully disassemble them and further expand my mechanical knowledge in the process.

IMG%5D

https://i.postimg.cc/kMSKz9Hm/1_Before_Dismantling_(Rear_Brake_Calipers)_Rear.jpg

Step 1: Tearing Down the Left-Hand Rear Brake Caliper

As with the front calipers, the first step was to remove the hydraulic pistons. I planned to use compressed air to force the pistons out of their bores, just as I had done previously.

This is where I hit my first major roadblock. Both rear OEM brake hose fittings were completely seized in the back of the caliper. Despite using a correctly sized 10 mm flare nut wrench, neither fitting would budge. Things quickly got worse when the hex portion of the fitting began to deform under the wrench due to rust and soft metal.

Not wanting to risk further damage, I stopped and reconsidered my approach. I remembered seeing my Dad successfully free stubborn bolts using penetrating lubricant, so I applied a generous amount of WD-40 to the fittings and surrounding threads and allowed it time to soak in.

https://i.postimg.cc/L4PLwRbG/2_First_Roadblock_Frozen_Brake_Hardline_Hose_Caliper_End_(Close_Up).jpg

https://i.postimg.cc/vHdfdkRm/2_Second_Roadblock_Frozen_Brake_Hardline_Hose_End_(Close_Up).jpg

Thankfully, this approach worked. Both brake hose fittings eventually broke free, allowing me to continue with the teardown.

https://i.postimg.cc/BZFHkszj/2_Removed_Brake_Hardline_Hose.jpg

Unfortunately, the fittings sustained noticeable damage during removal. While I originally hoped to refurbish the hardlines as part of a future restoration, replacing them outright will be far easier and safer.

https://i.postimg.cc/8kvM9DYP/2_Rear_Brake_Hardline_Hose_Damaged_After_Removal_(Wide).jpg

https://i.postimg.cc/SQ9C3qvw/2_Rear_Brake_Hardline_Hose_Damaged_After_Removal_(Close_Up).jpg

With the hoses removed, I used compressed air to push both pistons outward as far as possible while the used brake pads were still installed. At this point, another issue surfaced: two brake pad slide pins were seized in the caliper body. After applying WD-40, I was able to remove one pin, but the second pin refused to move.

Even using a hammer to drive it out proved ineffective. After exhausting all options I could think of, I decided to leave it for now and seek advice from my Dad before risking damage to the aluminum caliper body.

Fortunately, the stuck slide pin did not prevent me from continuing. I removed the four caliper mounting bolts and separated the two caliper halves without issue.

https://i.postimg.cc/DyKLKHVB/3_Dismantling_Process_Separating_LH_Rear_Brake_Calipers_1.jpg

https://i.postimg.cc/Yqfg2Rkz/3_Separated_Rear_Brake_Caliper_LH_Current_Condition_1.jpg

https://i.postimg.cc/8PBWk4Dy/3_Separated_Rear_Brake_Caliper_LH_Current_Condition_2.jpg

I then removed the old brake pads.

https://i.postimg.cc/kXdKdzrK/3_Dismantling_Process_Finally_Separated_LH_Brake_Caliper.jpg

The final step for this caliper was removing the pistons completely, along with the dust boots and internal rubber O-ring seals seated inside each piston bore.

Once everything was laid out on the bench, the amount of grime and contamination was obvious. A thorough cleaning would be required before any refurbishment could begin.

https://i.postimg.cc/Qd87F7dD/4_Dismantling_Process_(LH_Rear_Brake_Caliper)_Component_Layout.jpg

https://i.postimg.cc/L6Bf4D2S/4_Close_Up_of_LH_Rear_Brake_Caliper_Seals_Pistons.jpg

https://i.postimg.cc/qMXnBw0W/4_Close_Up_(LH_Rear_Brake_Caliper)_Front_Half_Section.jpg

Step 2: Tearing Down the Right-Hand Rear Brake Caliper

After dealing with the challenges on the left-hand caliper, I was better prepared for the right-hand side. As expected, both brake pad slide pins on this caliper were seized solid. While frustrating, I was still able to work around the issue and complete the teardown.

https://i.postimg.cc/CxcqkKRd/5_Dismantling_Process_(RH_Rear_Brake_Caliper)_Component_Layout.jpg

Just like the left-hand caliper, all components were heavily soiled and coated in grime.

https://i.postimg.cc/x1fmXmTB/4_Close_Up_of_RH_Rear_Brake_Caliper_Seals_Pistons.jpg

https://i.postimg.cc/fRzdVdRX/5_Close_Up_(RH_Rear_Brake_Caliper)_Rear_Half_Section.jpg

The front half of the caliper clearly shows the two rusted slide pins still stuck in place.

https://i.postimg.cc/Mp6BnBpn/5_Close_Up_(RH_Rear_Brake_Caliper)_Front_Half_Section.jpg

Step 3: Cleaning Process for Both Rear Brake Calipers

With both calipers fully disassembled, it was time to assess what could be reused or refurbished. All metal components were placed into my ultrasonic cleaner and soaked in an all-purpose cleaning solution for 20 minutes at 60 °C.

The results were far better than expected. Most of the built-up grime and residue was completely removed. After thoroughly blow-drying each component to eliminate moisture, I sorted the parts into groups and stored them safely for the next phase.

https://i.postimg.cc/XYsCdvrB/6_Set_of_Rear_Brake_Caliper_Components_After_Cleaning_Drying_1.jpg

https://i.postimg.cc/8zZ6MC7r/6_Set_of_Rear_Brake_Caliper_Components_After_Cleaning_Drying_2.jpg

The real work begins next. Both caliper bodies will be stripped back to bare aluminum before being repainted in a durable, high-gloss finish. More updates to follow.

Join the conversation

You can post now and register later. If you have an account, sign in now to post with your account.

Guest
Unfortunately, your content contains terms that we do not allow. Please edit your content to remove the highlighted words below.
Reply to this topic...

Recently Browsing 0

  • No registered users viewing this page.

Important Information

Terms of Use

Configure browser push notifications

Chrome (Android)
  1. Tap the lock icon next to the address bar.
  2. Tap Permissions → Notifications.
  3. Adjust your preference.
Chrome (Desktop)
  1. Click the padlock icon in the address bar.
  2. Select Site settings.
  3. Find Notifications and adjust your preference.